
本篇文章是我学习CS 106L课程的笔记记录,但本文中大部分内容来自于学习过程中查阅的各种blog以及StackOverflow和cpp的标准文档,作为个人日后查询、补充和深入学习的手册使用。此外,我将2019秋季Stanford的CS 106L作业发布在我的Github仓库,按照课程要求,设置为私人仓库。
stream
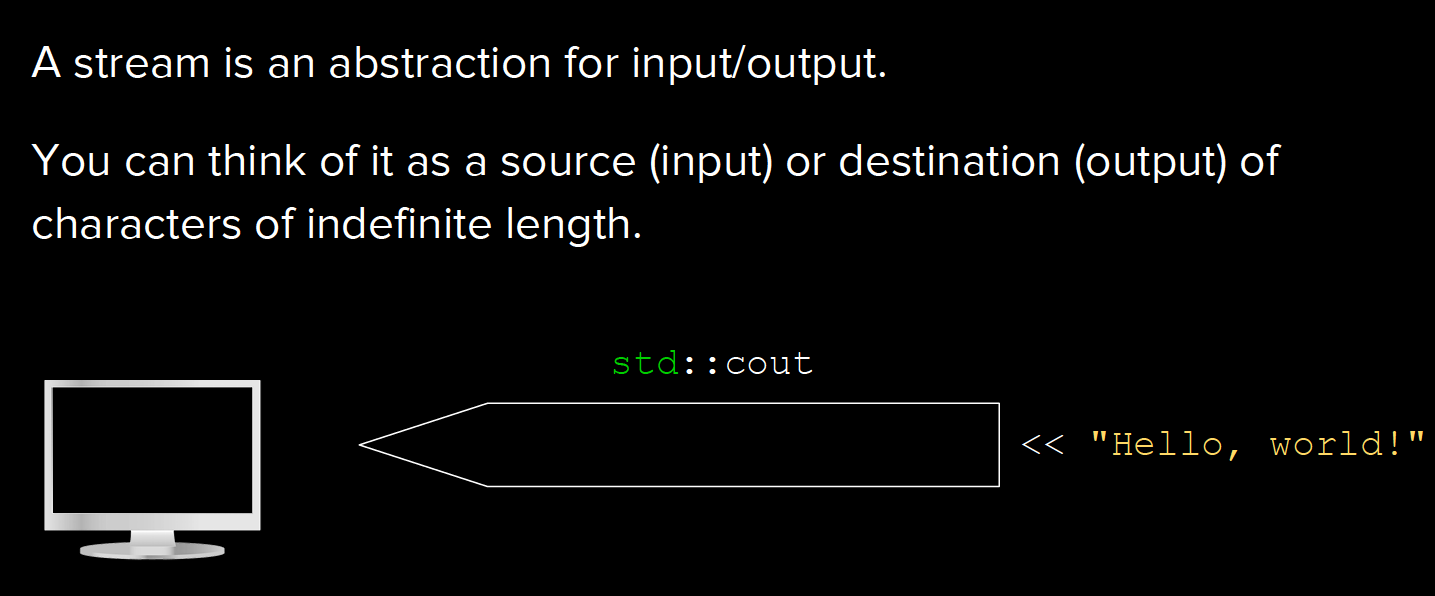
stringstream
以下内容来自官方文档:
Stream class to operate on strings.
Objects of this class use a string buffer that contains a sequence of characters. This sequence of characters can be accessed directly as a string object, using member str.
Characters can be inserted and/or extracted from the stream using any operation allowed on both input and output streams.
stream buffer: “A stream buffer is an object in charge of performing the reading and writing operations of the stream object it is associated with: the stream delegates all such operations to its associated stream buffer object, which is an intermediary between the stream and its controlled input and output sequences.”


All stream objects, no matter whether buffered or unbuffered, have an associated stream buffer: Some stream buffer types may then be set to either use an intermediate buffer or not.
stringstream类继承自几个ios基础类:

stringbuf继承自streambuf:

read & write
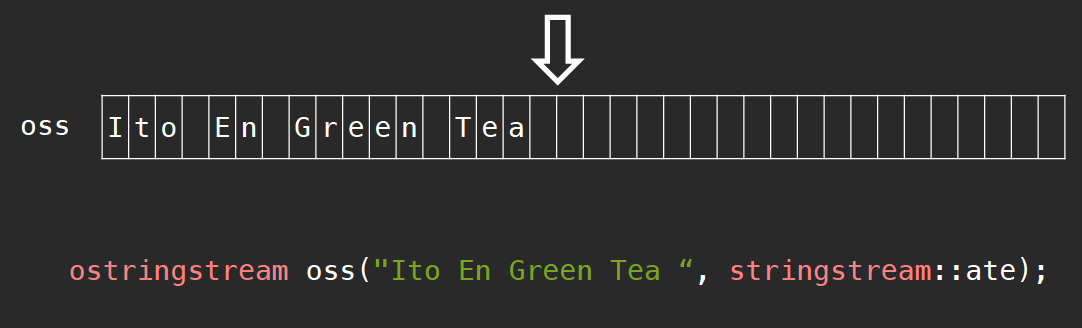
该类在实际使用中,常常用于分割字符(按空格)。它将string存放到一个string buffer(继承自streambuf)中:
Internally, its iostream base constructor is passed a pointer to a stringbuf object constructed with str and which as arguments.
我们可以通过参数stringstream::ate指定指针位置在末端;如果我们使用的是istringstream,那么可以使用stringstream::bin的方式以二进制读取。

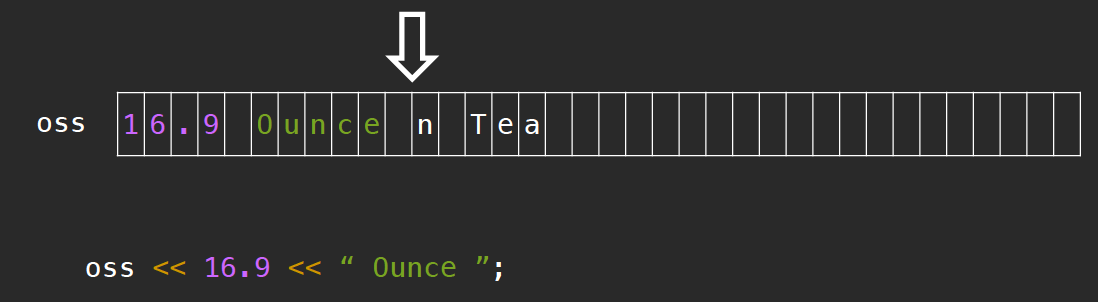
每当我们使用stringstream object向该string buffer中读入数据时,指针会不断向后做相应移动,就像这样:
我们还可以使用.str()方法将存放于string buffer中的内容读取成字符串。
about “»”
我们可以指定类型,之后使用>>操作符将内容读入指定类型的变量中。在cpp官方文档页面上,对这一操作进行了详细的描述,该运算符被多次重载用以接受以下三种参数:
arithmetic typesstream buffersmanipulators
具体的操作可以参见上边的链接,总之就是要借助于继承自istream的sentry类来辅助处理输入流(接受一个stream object parameter),它首先会检测当前internal error flags的状态,如果为good,则继续进行,否则不会对流做任何操作,这一点需要注意。

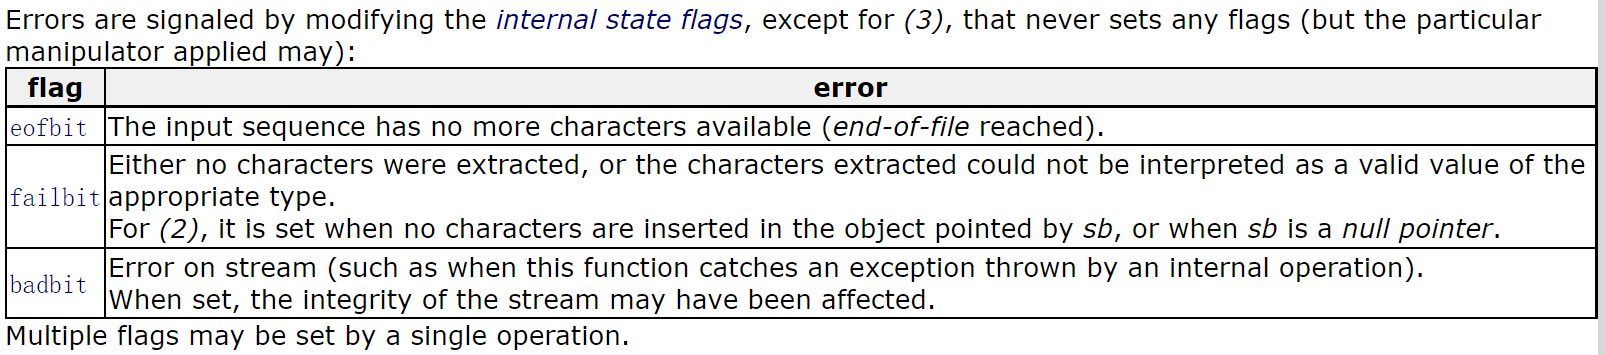
在运算过程中,程序通过设定ios_base::iostate的值来告诉目前stream的情况–还提供了相应的函数帮助我们进行判断,这几个常量被称为internal error state flags,具体见下表:

我们可以通过调用方法ios::rdstate() const来获取当前internal error state flags的值,或者使用basic_ios::setstate()来修改当前标志位的值。需要注意的是,已经设置了的bitflag是不会自动清除的(sticky!),需要通过调用basic_ios::clear(iostate state = goodbit)来替换当前状态。
需要注意的是,
End-Of-File并不是什么存在于文件末尾的字符,EOF是定义于标准库内的一个宏(macro):#define EOF (-1)当文件或者字符串被读取到末尾时,读取函数会返回
-1,所以我们也说eof reached.当文件(字符串)末尾到达后,程序设置eofbit,但是需要注意此时failbit与badbit也可能同时被设置.“Reaching the End-of-File sets the eofbit. But note that operations that reach the End-of-File may also set the failbit if this makes them fail (thus setting both eofbit and failbit).”
那么问题来了,>>会在什么时候设置这几个bitflag呢?官方文档也给出了详细说明(啥都没发生就是goodbit):
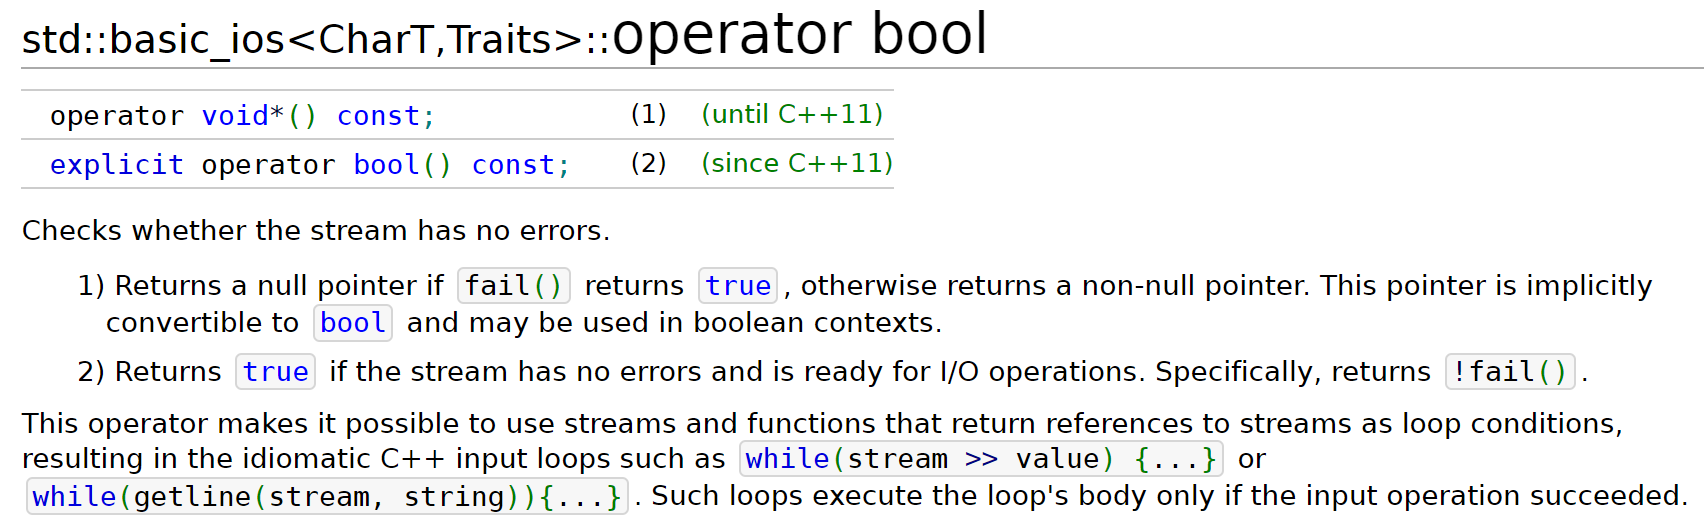
当内置错误标志为fail时,我们也可以利用cpp库的从istream object&到bool的隐式转换ss >> ch作为!ss.fail()的替代,之后的getline()函数也可以利用null pointer->bool的转换:
在本课的stringToInteger函数中,我们见到如下使用方式:
int stringToInteger(const string& str) {
    istringstream iss(str);
    int result;
    iss >> result;
    cout << "result: " << result << endl;
    if (iss.fail())
        throw domain_error("error1");
    char remain;
    iss >> remain;
    cout << "remain: " << remain << endl;
    if (!iss.fail())
        throw domain_error("error2");
    return result;
}

// case 1:
// result: 5, remain: l
// error2
stringToInetger("5lol");
// case 2:
// result: 0
// error1
stringToInteger("lol");
为什么会出现如上的情况?这要考虑到>>第一种重载模式,即用来读取算术类型的内置操作:
“Extracts and parses characters sequentially from the stream to interpret them as the representation of a value of the proper type, which is stored as the value of val. Internally, the function accesses the input sequence by first constructing a sentry object (with noskipws set to
false). Then (if good), it calls num_get::get (using the stream’s selected locale) to perform both the extraction and the parsing operations, adjusting the stream’s internal state flags accordingly. Finally, it destroys the sentry object before returning.”
注意到此时在内部是使用了num_get::get方法对数字进行读取的,如果成功读取,把结果存储在参数val中,并利用此函数更新internal error flags(利用传递给get方法的ios_base::iostate& err参数):
“The function stops reading characters from the sequence as soon as one character cannot be part of a valid numerical expression (or end is reached). The next character in the sequence is pointed by the iterator returned by the function.”
“Return value: The next character in the sequence right after where the extraction operation ended.”

当尝试使用int type读入字符串"5lol"时,首先num_get::get方法读取数字5,由于下一个char不是part of valid numerical expression,所以他立即停止读取,此时val的数值为5. 指针指向5的下一个字符l.
当尝试使用int type读入字符串"lol"时,首先num_get::get方法读取字符l,发现 The sequence did not match the expected format,所以他立即停止读取,此时val的数值为0. 指针仍然指向头部,并设置了一个failbit,于是当我们返回到>>的处理过程中时,就会显示fail()了,这也与>>产生failbit的条件吻合,因为此时相当于没有新的字符被成功提取,同时sb此时也是一个null pointer.(因为我们用的是int type处理)。并且result的输出值为0,这也是num_get::get方法中val被存储的值。
如果我们把第二次读取的类型换成
double,并尝试读入字符串“5.2”时,不会出现任何问题,因为在第一次读取5之后,序列中余下的.2被程序理解为0.2,也是我们第二次读取输出的结果。
white space separating?
为什么使用stringstream之后istream >> string读取字符串能够自动以空白字符作为分割?
这是因为string类本身也对extraction operator进行了重载:
istream& operator>> (istream& is, string& str);
按照StackOverflow的说法,该函数的实现类似于C中的scanf %s,他会持续读取直到遇到空白字符(包括空格、tab等)下一次从空白字符开始读取(但是默认会skipws)。在官方文档中,我们找到了依据:
Notice that the istream extraction operations use whitespaces as separators; Therefore, this operation will only extract what can be considered a word from the stream. To extract entire lines of text, see the string overload of global function getline.
也就是说如果我们使用>>将数据读入字符串,那么他会尝试着一个单词一个单词地读取。该过程的实现也是借助于一个由指针sb指向的streambuf object,每次我们都在向该streambuf写入数据,在向streambuf写入完毕之后,将streambuf object中的内容写给string对象。所有的stream对象,都有一个与之关联的streambuf object.
Again–About Whitespaces!
下边来看这样两个例子:
string a = " 12 3";
stringstream iss(a);
char b, c;
iss >> std::noskipws >> b >> c;
cout << "b: " << b << " c: " << c << endl;
// result: b:  c: 1
string a = " 12 3"; stringstream iss(a); char b, c; iss >> b >> c; cout << "b: " << b << " c: " << c << endl; // result: b:1 c: 2string a = " 12 3"; stringstream iss(a); string b, c; iss >> std::noskipws >> b >> c; cout << "b: " << b << " c: " << c << endl; // result: b: c:string a = " 12 3"; stringstream iss(a); string b, c; iss >> b >> c; cout << "b: " << b << " c: " << c << endl; // result: b: 12 c: 3
这两个例子中唯一的区别就是第一个我们提供了char类型,而第二个是string类型。首先我们不去关注代码中的noskipws,看第二个例子,即string的那一个:根据上一节的描述,当istream >> string遇到了空白字符时,他会停止读取,而恰好,在字符串a的最前边存在一个空白字符,所以我们想它应该会直接在开头处停止,不会读取到任何东西,所以最后返回的是空字符串。
但是我们发现如果尝试将代码中的std::noskipws去掉,那么返回的结果会与之前不同,这又是为什么呢?
首先我们需要了解运算符>>重载的第三种类型:manipulators。
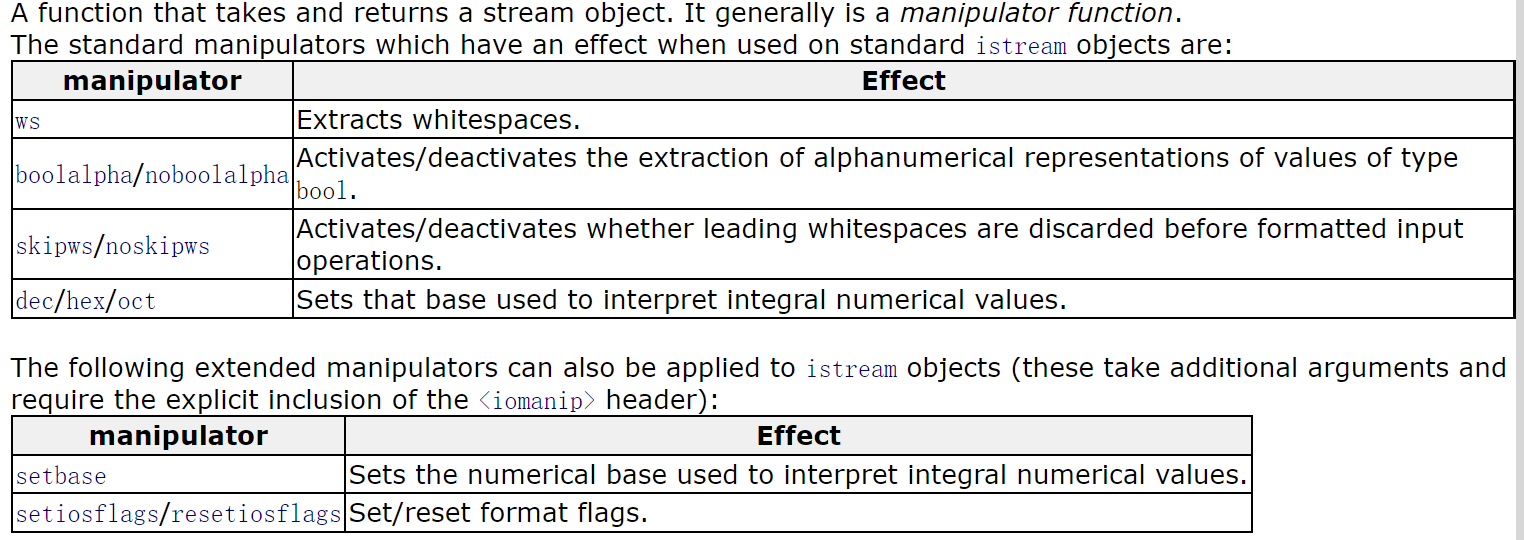
注意到skipws/noskipws这种类型,当skipws被设置时,stream默认会忽视所有的空白字符,文档中提到:
“For standard streams, the skipws flag is set on initialization.”
也就是说,在默认情况下初始化的结果为设置了skipws,所以所有空白字符都会被读取之后跳过,直到我们又发现了一个非空白字符。如此一来,上边例子的结果就好理解了。需要注意的是,在cpp中,对于所有的formatted input(即可以格式化成我们需要的类型的,比如C中的prinf, scanf,cpp中使用>>操作的),默认都是noskipws=false,也就是说会跳过空白字符;而对于所有的unformatted input(比如getchar(char), getline(string))均设置为noskipws=true。
关于格式化输入与非格式化输入,我是这么理解的,格式化输入意味着我们可以把输入的数据变成我们想要的类型,比如当我们使用
>>操作符时,我们可以读入整型,也可以读入一个字符串;但是非格式化输入只能读入rawText type,好比geline(string)我们输入了一个字符串那么接受类型就是一个字符串.
同时,skipws与noskipws两者是sticky的,也就是说我们只有重新设置,才能变回原来的状态。如果想要每一步都可以设置是否保留空白字符,我们可以使用std::ws,提取空白字符,直到遇到非空白字符。
设置
skipws等的步骤是在为输入序列创建sentry对象时进行的.
除了上述提到的skipws这种manipulator之外,常见的可以用于pad output的还有:left/right/internal, setw, setfill等:
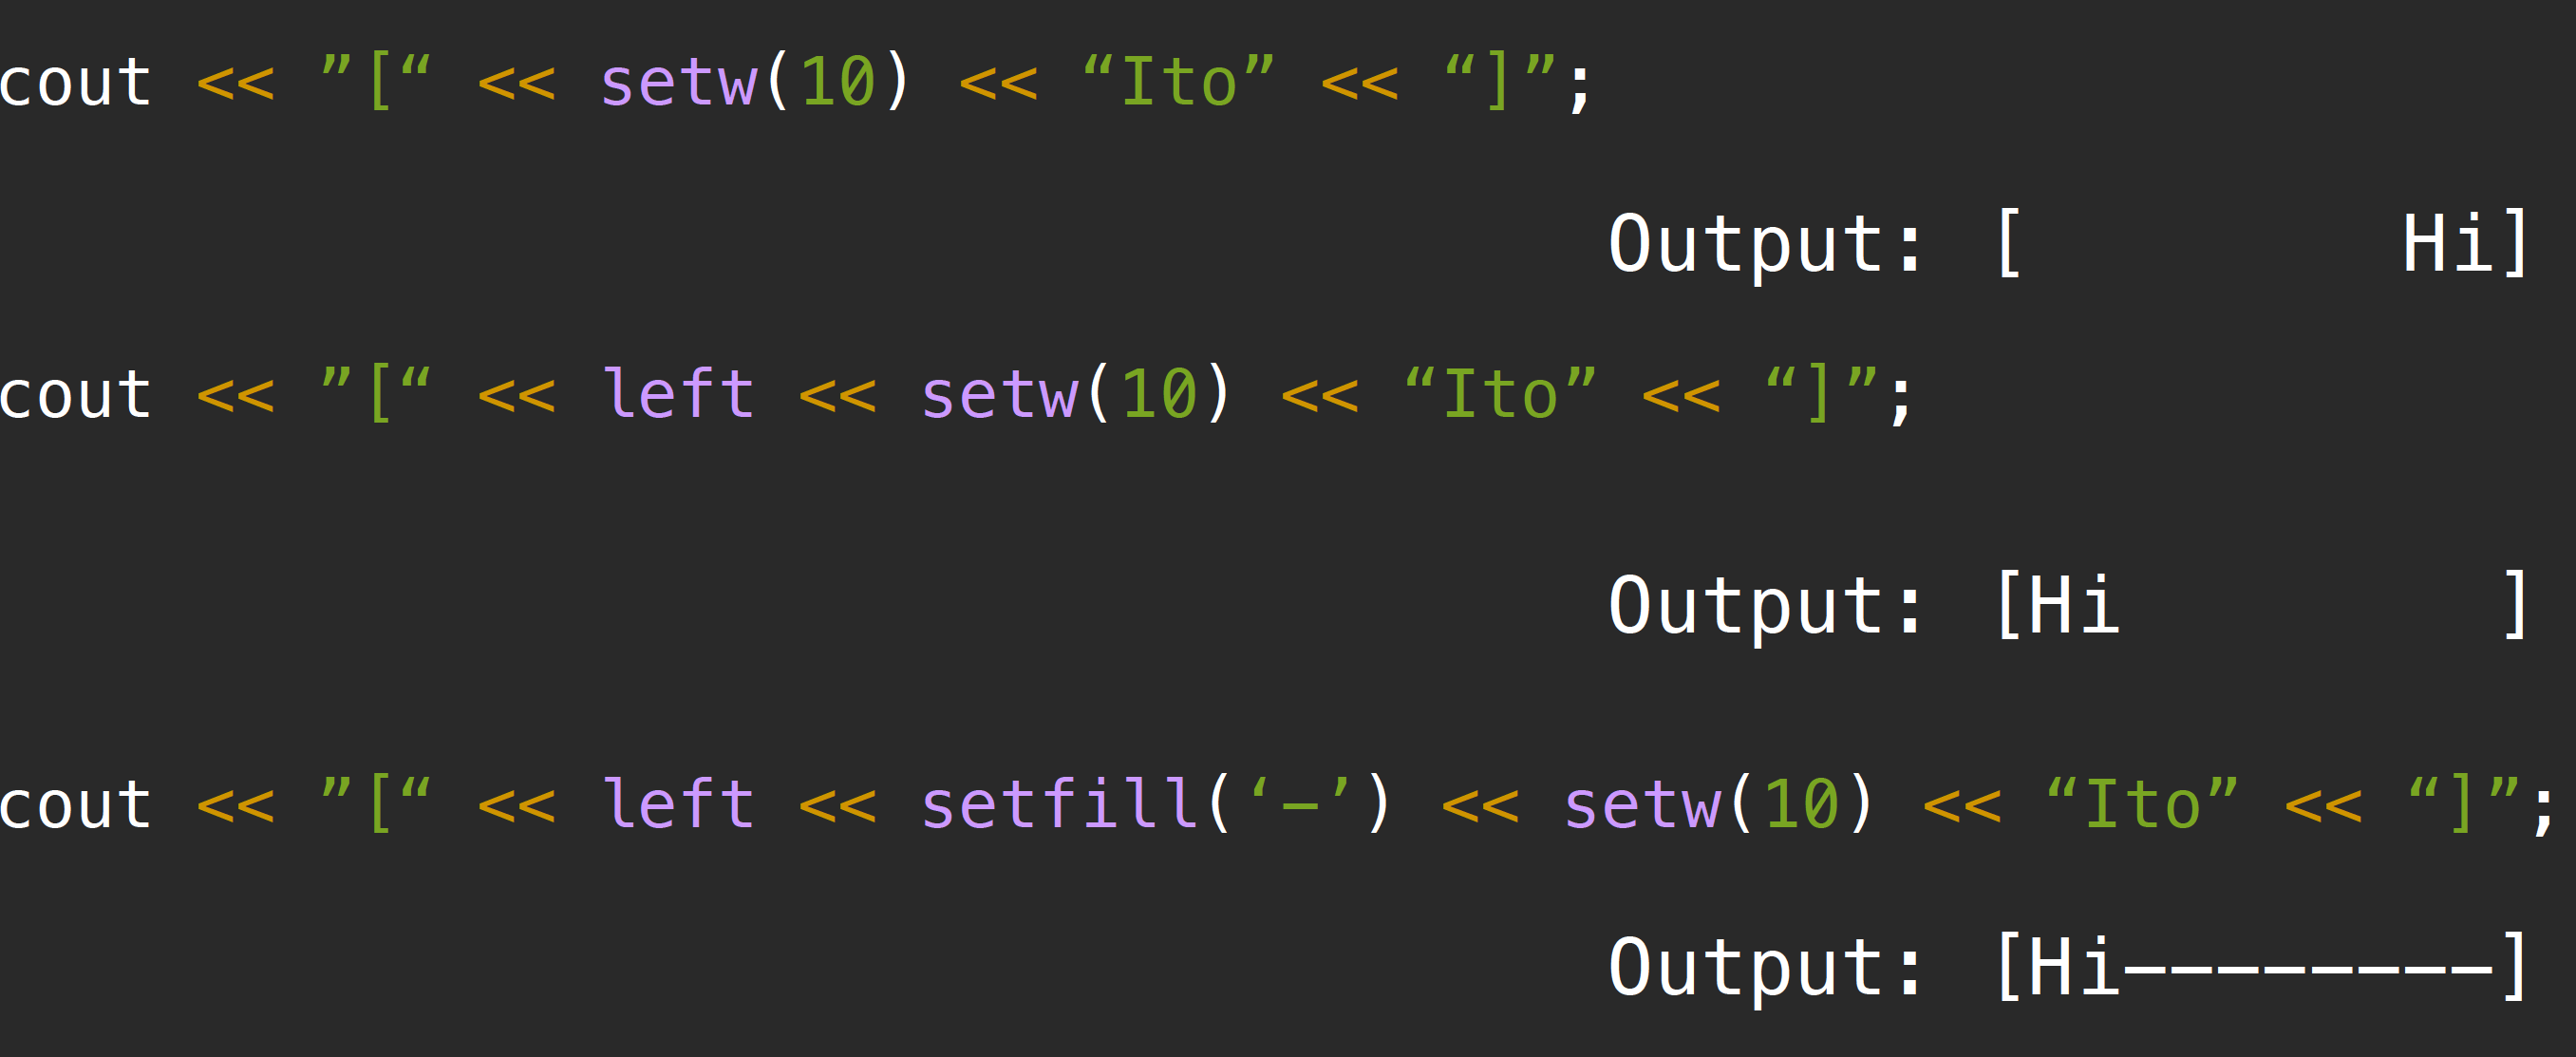
这几个manipulator在内部调用了内置的一些方法,比如setfill是调用了basic::ios::fill(char_type),left是设置了名为adjustfiled的flag value,setw则和使用width(n)的效果相同,设置了field width–所以该函数指定的是输出序列中允许存在的最少的字符数。
set position
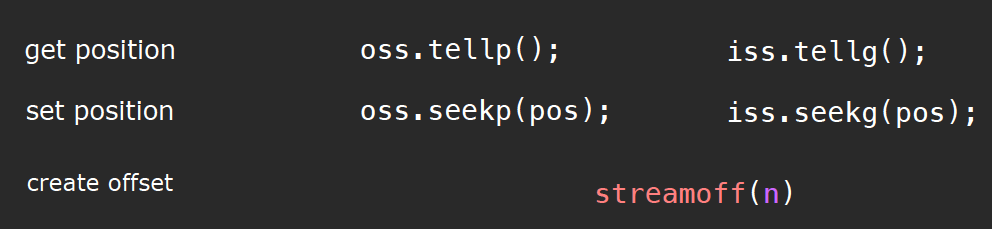
需要注意的是,在streamoff中,n的值可正可负。常见的使用方法如下:
fpos = oss.tellp() + streamoff(3);
oss.seekp(pos);
// or
oss.seekp(streamoff(1), stringstream::cur);
cin & cout
由于cin实际上是一种istream object,有些特性上边一节已经总结的差不多了…这里只总结两点:
- 为什么明明输入流默认设置
skipws,但是我们输入一个\n时,console内仍然会打印出新的一行?
这是因为控制台内的打印是由consle software控制的,与cin没有任何关系。
- cin is tied to the standard output stream cout (see ios::tie), which indicates that cout’s buffer is flushed (see ostream::flush) before each i/o operation performed on cin.
The tied stream is an output stream object which is flushed before each i/o operation in this stream object.
我们常用的std::endl就是换行+刷新输出缓冲区,所以如果我们仅仅使用cout而不添加endl,字符会首先存到output buffer中,只有当output buffer满了或者程序终止时,才会调用flush方法。
那么问题来了,std::flush是如何工作的?这里给出了较为详细的解答。
言简意赅地说,ostream::flush()会在内部调用streambuf::pubsync()方法,对流缓冲区进行操作;流缓冲区的作用是负责“缓冲”字符并把数据发送给外部目的地–这发生在缓冲区已满或者内部数据应当与外部目的地进行同步的时候(比如flush())。当需要同步时,缓冲区内部的数据立即发送给外部目的地,根据官方文档:
For stream buffer objects that implement intermediate buffers, this function requests all characters to be written to the controlled sequence.
这意味着,如果我们正在尝试把数据输出到控制台上,那么此操作会立即把缓冲区内目前所有的字符输出输出流中,再显示到控制台界面上,这意味着清空了stream buffer。对于文件流效果是一样的,只不过外部目的地换成了文件而已。
所以何时需要进行flush操作呢?当然是我们接下来有可能需要向外部目的地写入数据的时候,因为如果此时缓冲区内还存有先前的数据,那毫无疑问的会造成影响!
- 如果我们注意在输入过程中
internal error flag的变化,则在每次flush之后,以及每次cin读取完数据后,内置错误标志位都会被设置成eof. 因为输入流意识到自己读到了字符串的末尾。需要注意的是,如果在输入过程中,标志位在某一刻被设置成fail,那么此后的所有尝试输入的操作均会失效,这一点我们在前边提到过,必须使用clear()清空状态才可以继续进行。
ignore
函数原型:
istream& ignore (streamsize n = 1, int delim = EOF);
注意到这种特殊的使用方法,可以帮助我们忽略掉当前stream buffer中所有的数据,直到eof:
con.ignore(numeric_limits<streamsize>::max(), ‘\n’);
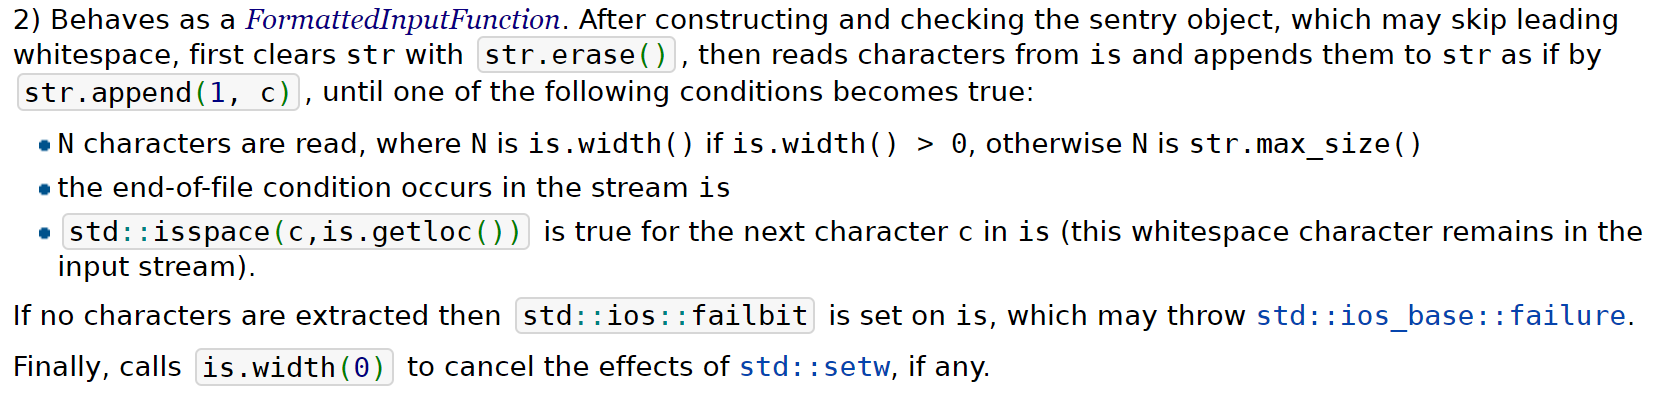
getline(string)
该函数常被用来读取一整行的数据,或者按照delimiters分割数据;这是一个unformatted input function,根据前几节所属的特点,非格式化输入函数默认设置noskipws,那么当遇到分割字符时,它的处理方法是:
If the delimiter is found, it is extracted and discarded (i.e. it is not stored and the next input operation will begin after it).
同样的,该函数也会对internal error flags进行设置。
在文件读取中,如果我们读到了文件末尾,那么getline会设置一个eofbit,但是此时并不会设置failbit,而在继续的下一次读取中,因为我们没有读取到任何内容,根据failbit的定义,sentry object会置一个failbit,借助这一特点,我们在实际使用中常把读取循环写作如下形式而非while(!input.fail()),进而避免向数据结构中输入最后一次读取的garbage value:
ifstream file(filename);
while(true) {
    string line;
    getline(file, line);
    if (file.fail()) {
        break;
    }
    // process the read data
}
我们可以通过在
char*(c-string)后加一个s字母的方式,将其转化为cpp string
type deduction
structure
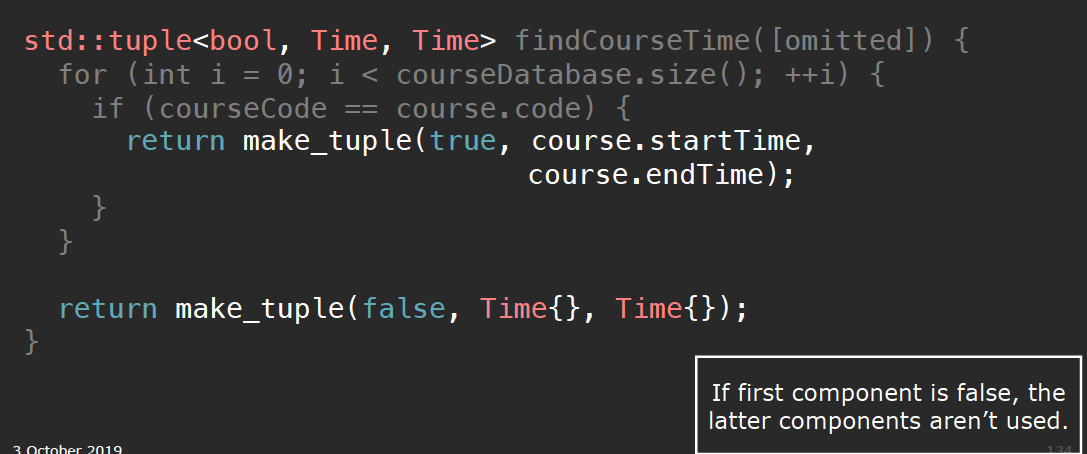
pair
在cpp中,传统的返回多个值的方法是使用reference parameters,但问题在于除非我们查看函数定义,否则引用参数并不明显。在cpp11中提供了pair或者tuple,我们可以使用他们组合多个返回值:

std::pair<std::string, std::string> f(std::pair<std::string, std::string> p)
{
    return {p.second, p.first}; // list-initialization in return statement
}
tuple
structured binding
在cpp17中,与Python类似,我们可以做unpack(structured binding):
auto [min, max] = findPriceRange(dist);
如果我们使用结构体作为以上函数的返回值,那么structured binding仍然可以使用。
我们还可以对引用使用structured binding:
void transformToDST(vector<Course>& courses) {
    for (auto& [code, start, end, instructors] : courses) {
        start++;
        end++;
    }
}
void print_map(std::string_view comment, const std::map<std::string, int>& m)
{
    std::cout << comment;
    for (const auto& [key, value] : m) {
        std::cout << key << " = " << value << "; ";
    }
    std::cout << "\n";
}
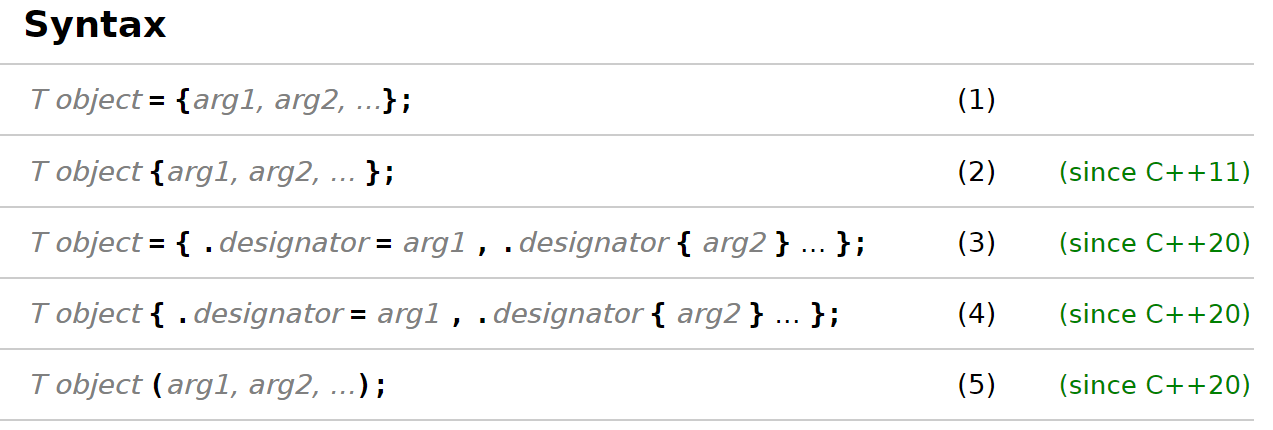
Aggregate initialization
随着cpp标准的不断更新,初始化的方式愈发多样化。aggregate initialization是一种list-initilization,在cpp20中也被叫做direct initialization. 他应用于arrays以及class type,比如结构体或者联合,但是在使用时有一些特殊要求,可参见文档。
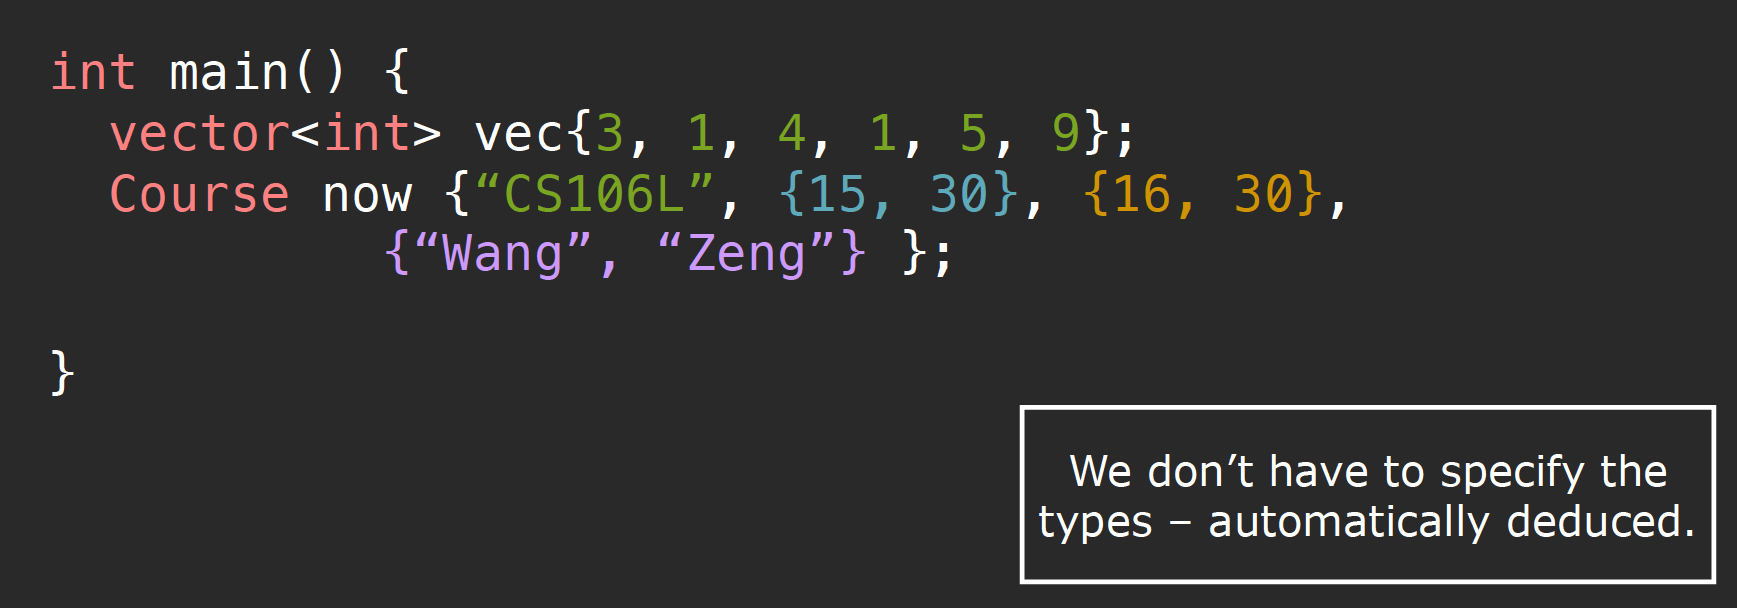
这里的
course是一个结构体
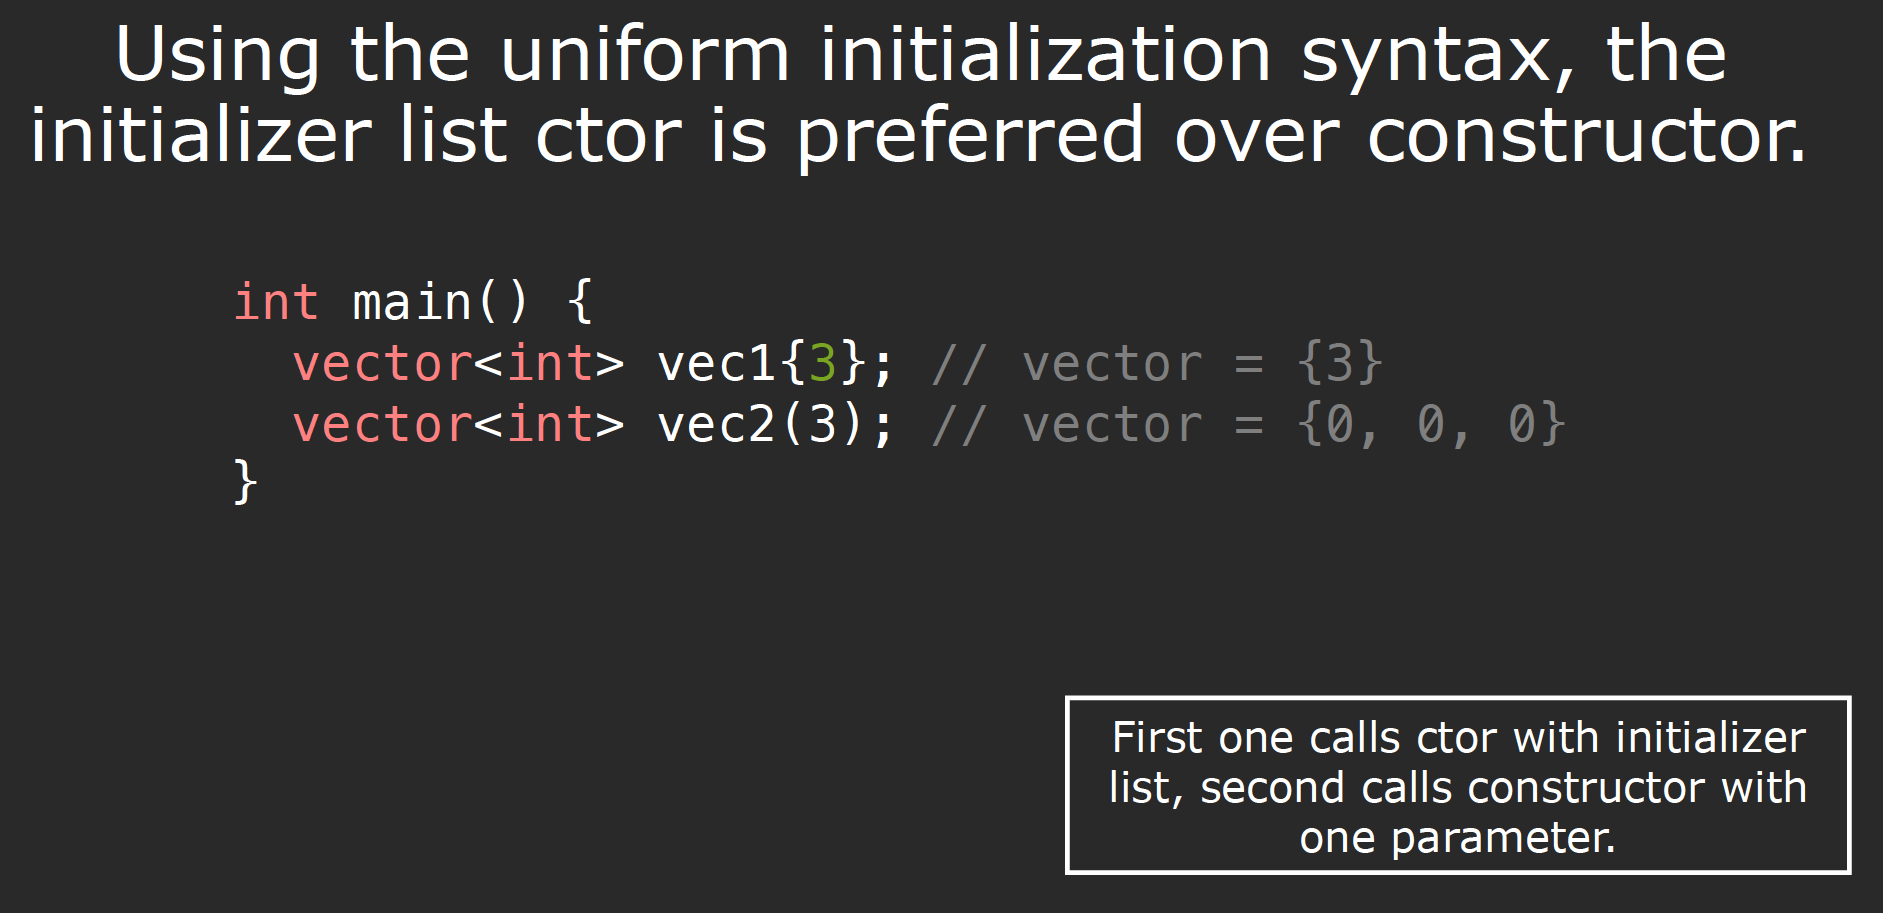
需要注意的是,当使用uniform initialization(目前我将这两者理解为相同的东西……)时,对象会首先尝试使用initilizer list constructor而非普通的构造函数:
另一个使用uniform intialization的例子是我们将要初始化一个std::pair:我们可以选择使用{}语法初始化所有部分,或者初始化一部分:
foo({ {}, {} }); // OK: call default constructor on both parts
foo({ key, {} }); // OK: call defualt constructor on the second part
foo({ key1, key2 }); // OK
下边根据文档说一些比较细节的内容:
当我们尝试使用aggregate initialization的方法初始化结构体等class type时,在cpp11中被做了不允许在存在默认初始化参数的情况下使用的限制,这一限制条件在cpp14中被取消。:
struct A {
  string str;
  int n = 42;
  int m = -1;
};
A{.m=21}  // Initializes str with {}, which calls the default constructor
          // then initializes n with = 42
          // then initializes m with = 21
文档截图中的初始化方案3、4被称为designated initilizers,这种初始化方法要保证所有元素的初始化顺序与定义顺序一样,但是我们可以缺省某个参数:
struct A { int x; int y; int z; };
A a{.y = 2, .x = 1}; // error; designator order does not match declaration order
A b{.x = 1, .z = 2}; // ok, b.y initialized to 0
我们可以使用designated initializers来初始化联合,但是union只允许我们提供一个初始化参数成员:
union u { int a; const char* b; };
u f = { .b = "asdf" };         // OK, active member of the union is b
u g = { .a = 1, .b = "asdf" }; // Error, only one initializer may be provided
详细内容参见官方文档.
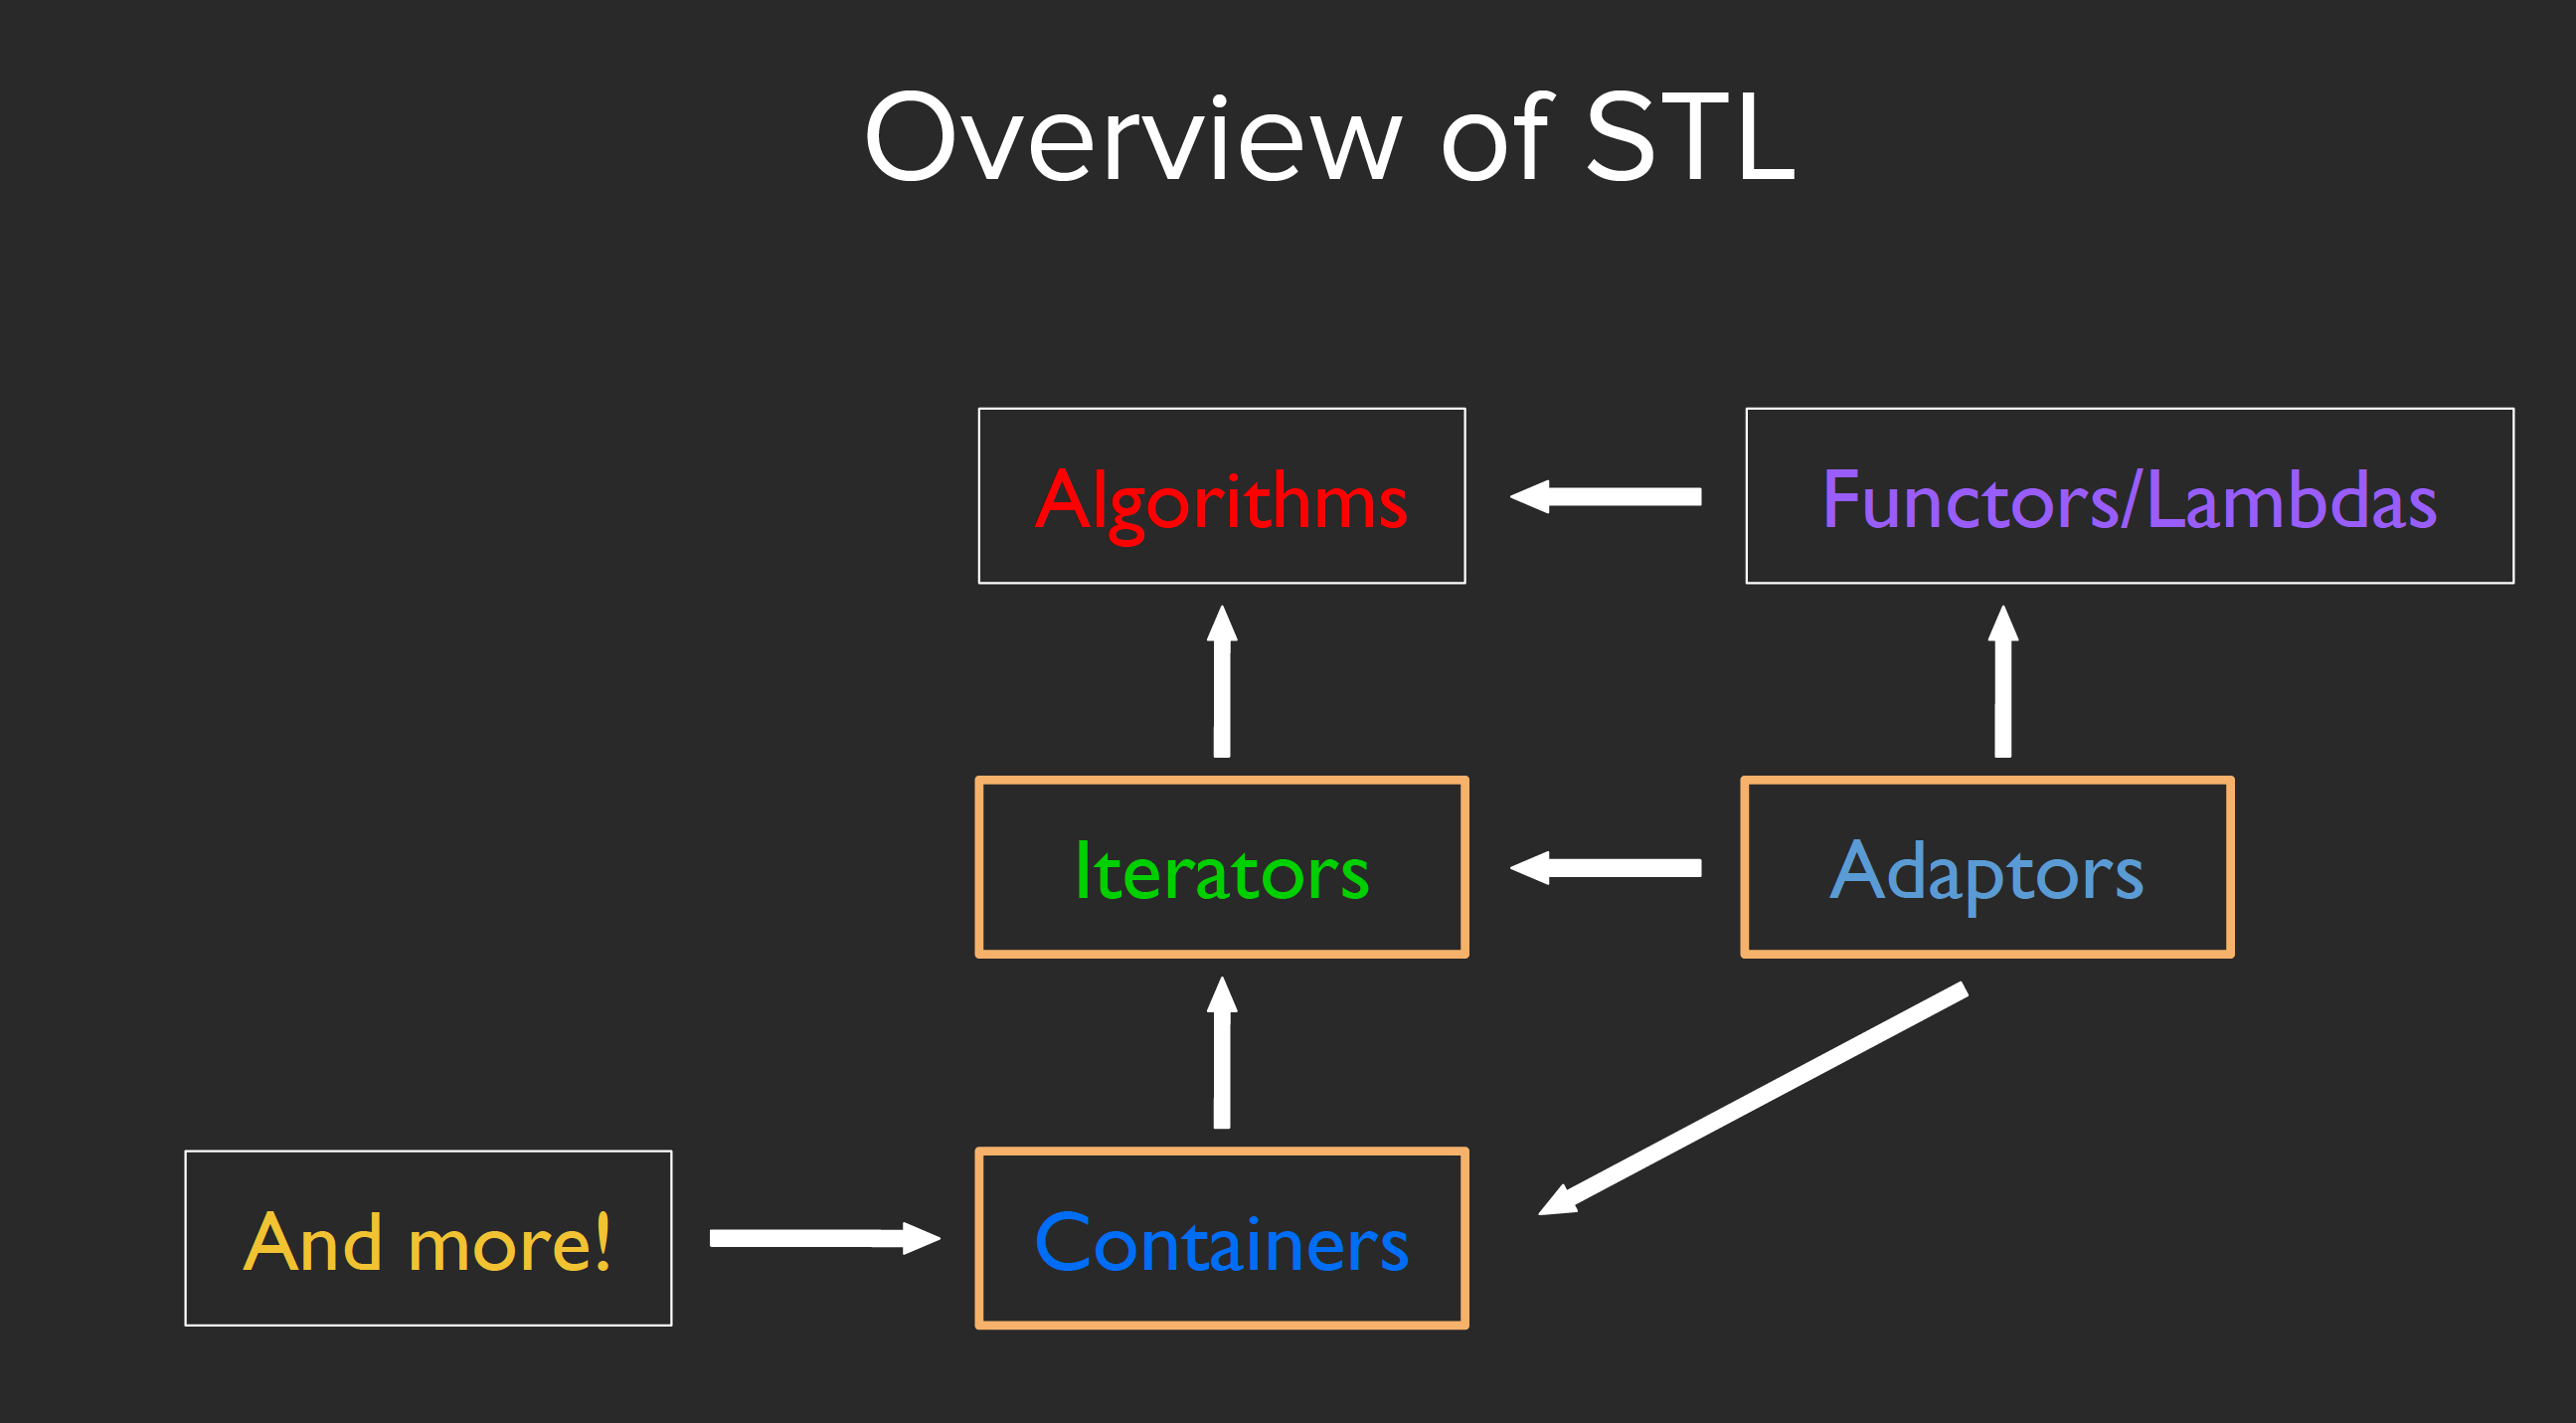
STL
vector[i]causes undefined behavior!
Sequence containers
- vector
- deque(双端队列)
- array
- list(双向链表)
- forward_list(单链表)
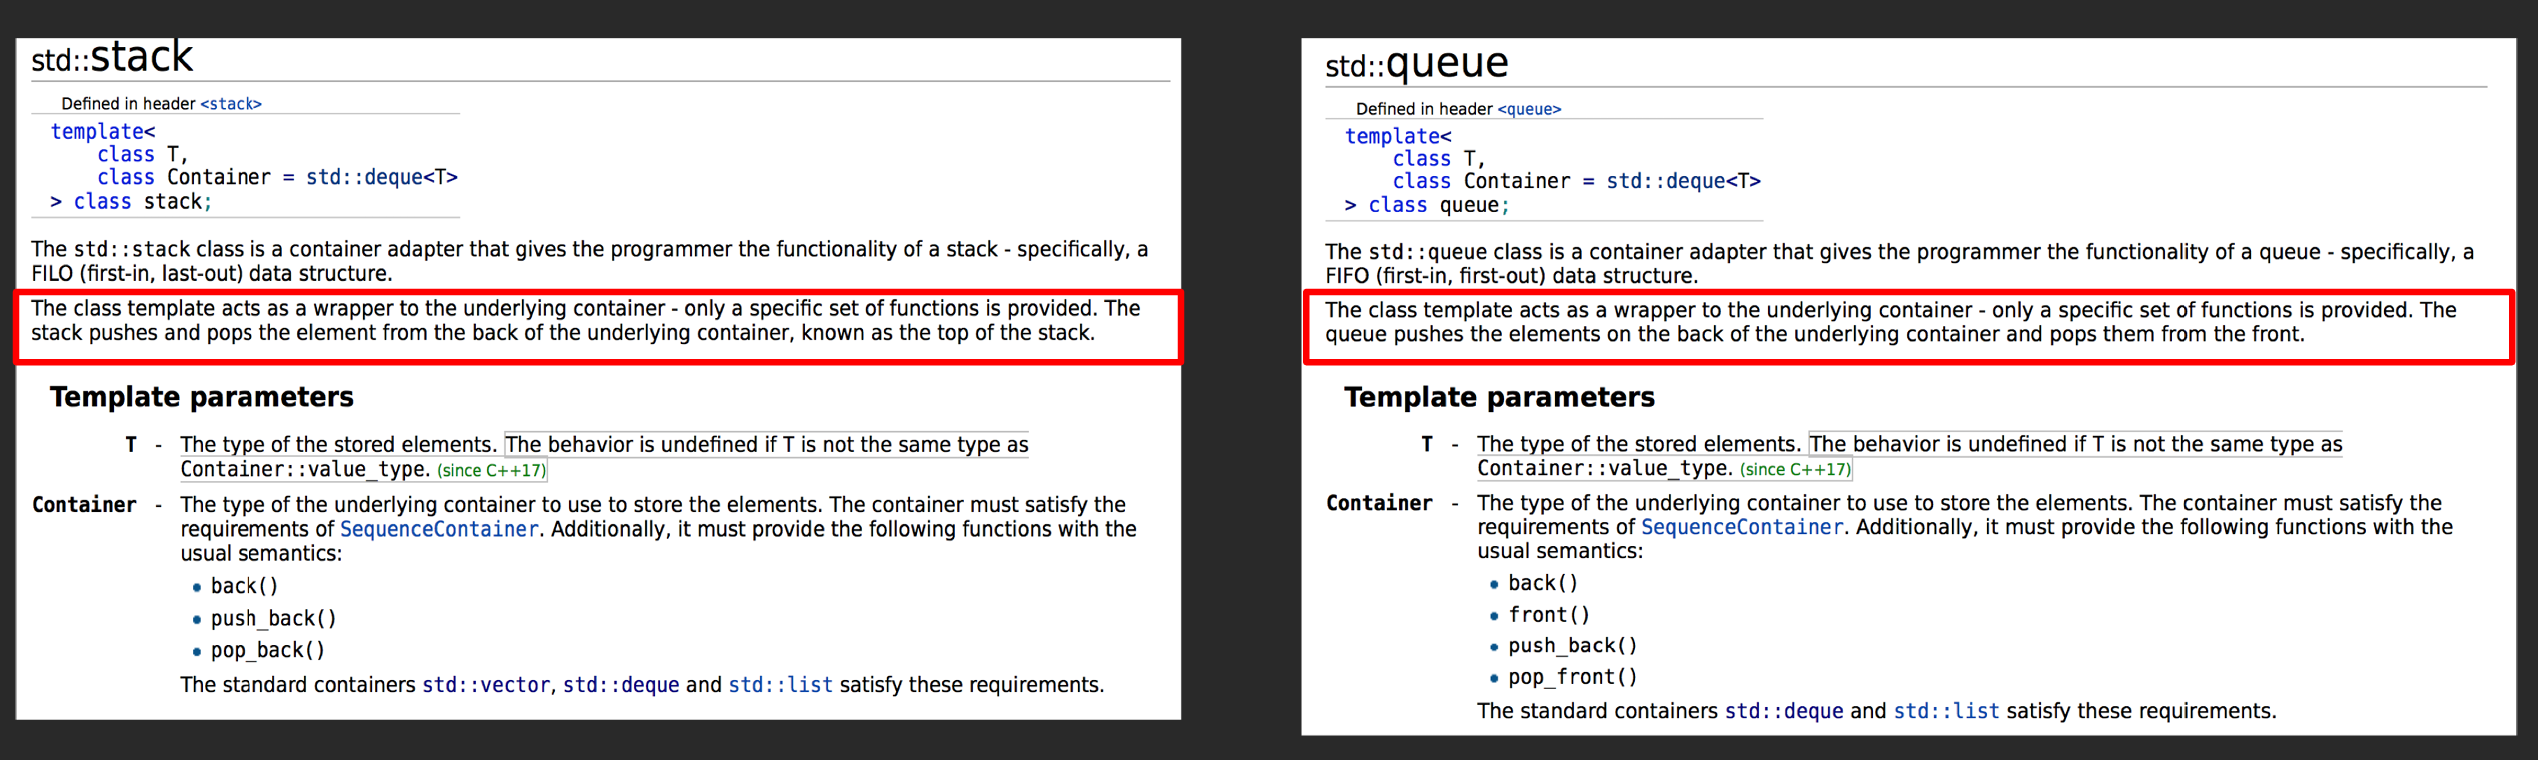
Container Adaptors
- stack
- queue
- priority_queue
这类容器之所以叫adaptors,是因为他们底层的结构实际上是由另一种容器构成的,我们也可以通过更换函数声明中的模板参数: stack和queue的底层是一个deque:
Associative containers
- map
- set
- unordered_map
- unordered_set
- multimap/unordered_multimap
- multiset/unordered_multiset
所谓
multimap与multiset,是指的可以存在多个相同的键值(元素).
需要注意的是,map方法at(i)和[i]的区别:at方法如果没有找到该元素,会抛出一个异常,而如果我们使用[],那么在没有找到该元素时,会先进行创建。
deque & vector
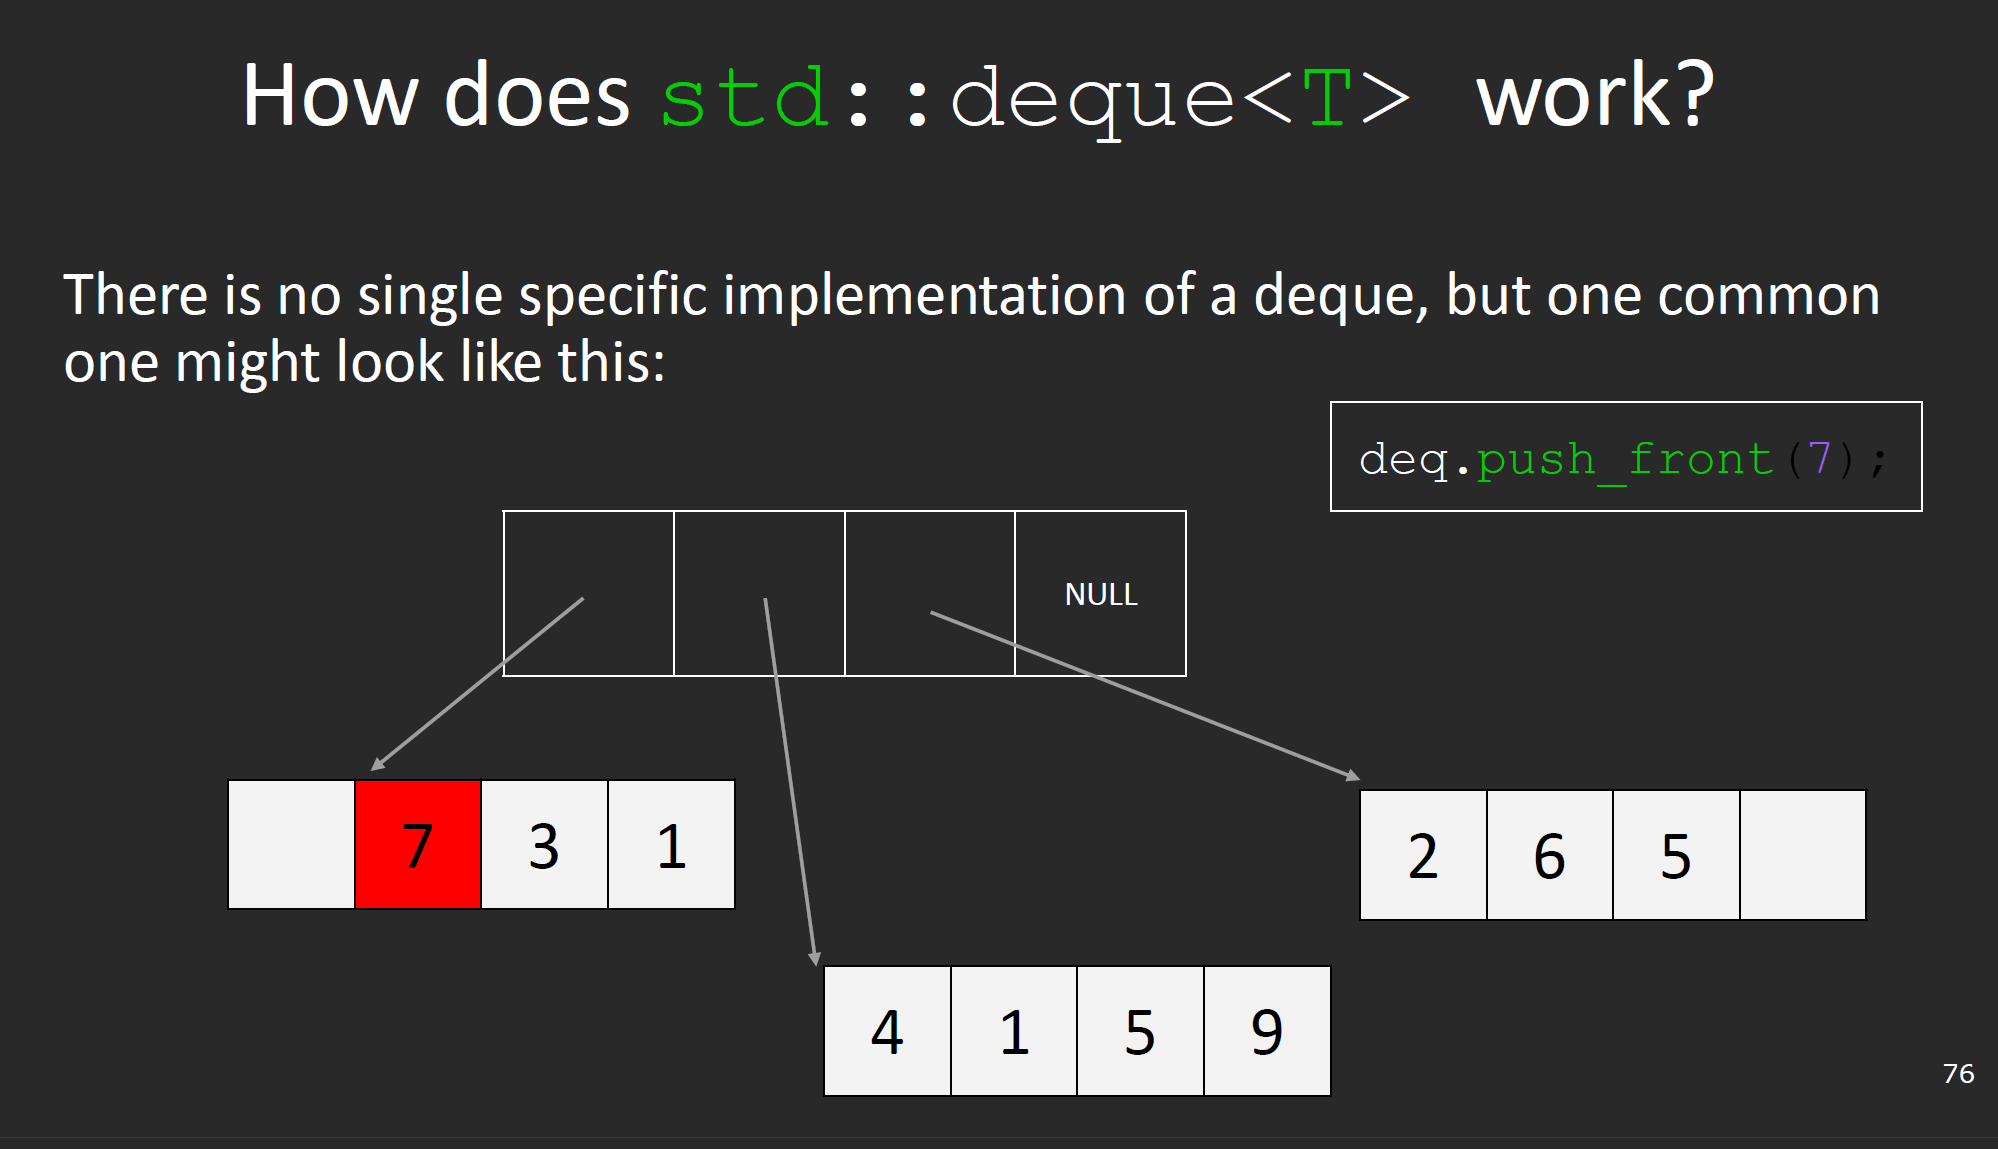
如图所示的结构使得deque的左右插入要比vector更快,但是对于元素的随机访问和随机删除操作,要比vector慢。
iterator
迭代器是STL的重要方法,我们所使用的range for loop就是使用迭代器在内部工作的。
注意
iterator的end指向的是最后一个元素的后一位.
map iterator
map的迭代器比较特殊,它指向一个pair对象,所以我们可以使用a.first和a.second获取键与值:
map<int, int> m;
map<int, int>::iterator i = m.begin();
map<int, int>::iterator end = m.end();
while(i != end) {
    cout << (*i).first << (*i).second << endl;
    ++i;
}
在cpp20之前,如果我们想要查找容器中是否存在某个键,那么需要调用find或者end方法,而在cpp20中,我们只需要调用contains即可。
如果
find成功,则iterator指向对应的元素,否则指向end.count方法通过调用find实现,所以find方法的速度更快.
lower_bound & upper_bound
lower_bound接受一个值v,返回一个iterator对象,该对象指向第一个不小于元素v的位置,如果没有找到,则指向end。
upper_bound与lower_bound的工作方式类似,但是其返回的迭代器对象指向第一个大于元素v的位置。
Iterator Types Introduction
共有五种基本的迭代器类型:

上图中的箭头我们可以理解成继承关系。对于所有的迭代器类型,他们都具备以下几种基本操作功能:
- Is copy-constructible, copy-assignable and destructible
- can be advanced using
++ - can be derederenced using
*
Input Iterators
应用对象:连续+单向输入,下边来分别解释这两个限制条件的意思:
- 连续,表示所应用的数据结构不可以是
queue,stack等(不包括deque,因为deque实际效果上是一个优化了前序插入的vector) - 单向(
single-pass),迭代器对应的每个位置只能允许被经过一次,这个限制条件之后会详细解释
input iterators只能作为右值(rvalue)被解引用:
int val = *itr;
这种迭代器的应用场景有之前提到过的find以及count函数等。这种迭代器类型数据是只读的。
output iterators
它的应用条件与input iterators相同,但是它只能作为左值(lvalue)被解引用:
*itr = 12;
该迭代器对象的应用场景主要有copy以及output streams等。它是只写的。
forward iterators
这种迭代器类型与把前两种类型结合起来的效果类似,不同的是,他可以做multiple pass. 应用场景主要有replace函数以及forward_list中。
bidirectional iterators
承接forward iterators,但是可以做--操作:
vector<int>::iterator itr = v.begin();
--itr;
应用场景主要有reverse函数,map, set以及list等。
random Access iterators
承接上一种类型,但是支持+=n与-=n操作,同时可以使用offset dereference operator ([]),应用在容器vector, deque, string以及指针上。
Instead of being defined by specific types, each category of iterator is defined by the operations that can be performed on it. This definition means that any type that supports the necessary operations can be used as an iterator – for example, a pointer supports all of the operations required by LegacyRandomAccessIterator, so a pointer can be used anywhere a LegacyRandomAccessIterator is expected.
关于迭代器类型,补充以下一些内容:
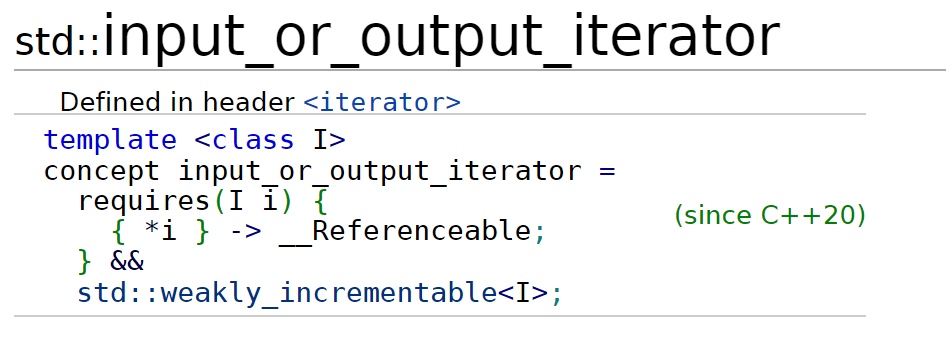
除了上述提到的5种基本类型的迭代器,cpp后来新增了一种基本迭代器类型:Contiguous Iterator,这种迭代器类型在randomAccess Iterators的基础上保证了其中的数据在内存必须连续存储。
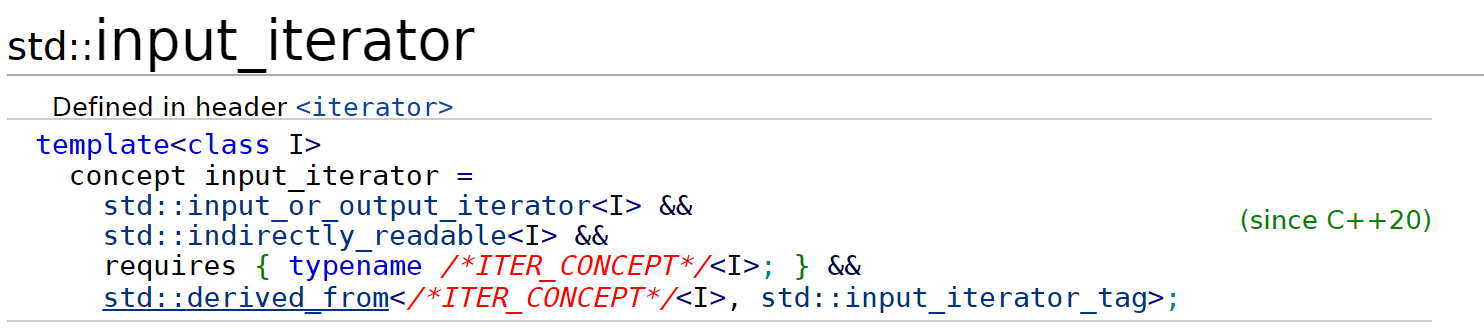
在cpp20中,根据新的关键字concept以及requires对迭代器类型根据新的系统设计了一套定义,但是基本的类型是相似的;
我们可以简单地将这两个关键字的功能理解为:为模板参数制定一些限制,使得在编译阶段就能够进行
evaluation。应用他们的主要优点是可以得到更加清晰地编译器报错。这里不去深究,这篇文章写的较为清楚。
新的迭代器定义基本方法是先使用这两个关键字定义了一种input_or_output_iterator类型,之后扩展的每一种类型均满足这种基本迭代器类型的要求,从定义中可以看到,这种基本类型支持两种操作:解引用+递增操作符:
新定义的迭代器类型除了output_iterator是直接在input_or_output_iterator基础上增加了写入功能之外,其余的迭代器类型均继承自cpp20之前的迭代器类型,比如对于input iterator:
What is single-pass?
什么是single-pass?为什么只能single-pass?cpp标准库中提到:
For input iterators, a == b does not imply ++a == ++b. (Equality does not guarantee the substitution property or referential transparency.) Algorithms on input iterators should never attempt to pass through the same iterator twice. They should be single pass algorithms. Value type T is not required to be an Assignable type (23.1). These algorithms can be used with istreams as the source of the input data through the istream_iterator class.
这里对该问题进行了细致的讨论。在讨论input iterators时,常使用istream_iterator作为例子,该迭代器类型从输入流中读取数据,我们可以想到,无论该读取过程是否需要用到stream buffer,读取都是发生在迭代器不断向前推进的时候,而输入流某个位置在被读取之后,我们就不能够再次对流中同一个位置的元素进行操作了,也就是说我们只能用一个迭代器,单向,走一次:
std::istream_iteratoris a single-pass input iterator that reads successive objects of typeTfrom the std::basic_istream object for which it was constructed, by calling the appropriateoperator>>. The actual read operation is performed when the iterator is incremented, not when it is dereferenced. The first object is read when the iterator is constructed. Dereferencing only returns a copy of the most recently read object.The default-constructed
std::istream_iteratoris known as the end-of-stream iterator. When a validstd::istream_iteratorreaches the end of the underlying stream, it becomes equal to the end-of-stream iterator. Dereferencing or incrementing it further invokes undefined behavior.
所以在标准文档给出的说明中,++a==++b为什么此时不能够保证成立呢?这里首先我们要明确以下++操作符的作用机理:
Increment/decrement operators
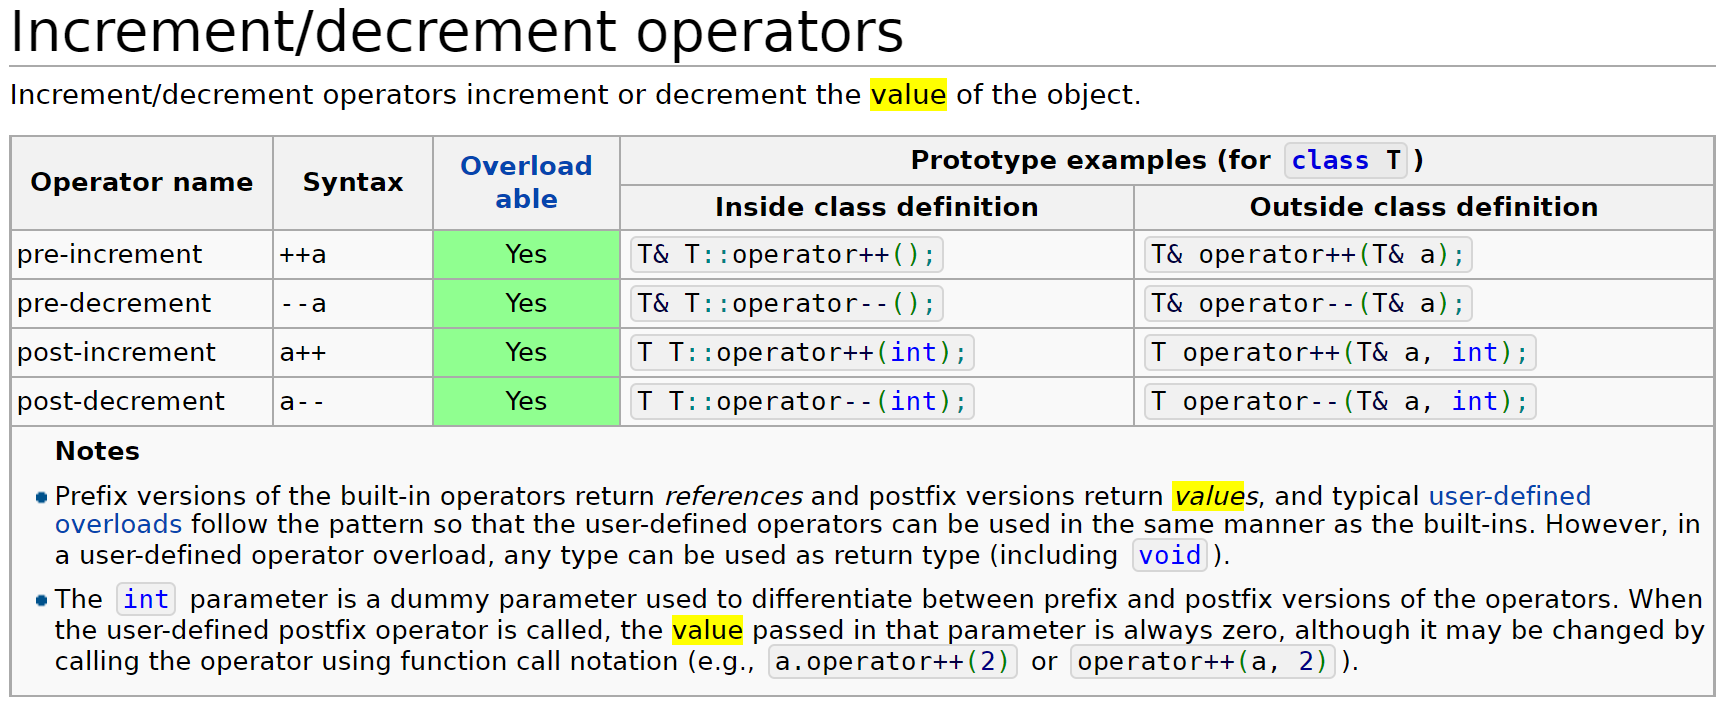
根据官方文档中的解释,前置递增操作符的运算过程与x += 1完全相同,在对元素递增之后,返回一个该元素的引用;而后置递增操作符则是先保存一下元素副本,对该元素本身(引用)进行递增之后,把副本(保存着原值)返回。
在清楚了++操作符的作用机理后,我们把目光转回到iterator上。在表达式++a==++b上,如果我们已经进行了++a的操作,那么根据istream_iterator的特性,已经对流内的数据进行了读取,那么此时iterator b就找不到流内原位上的数据了,换而言之,iterator b失效了!
如果我们读取的是字符,那么需要用到
stream buffer,此时使用std::istreambuf_iterator是效率更高的选择,因为他不需要对每一个字符建立一个sentry object,程序在开始时先建立一个sentry object,之后把所有数据放入缓冲区,再使用迭代器进行读取.
所以,在count以及find函数中,我们确实只需要走一次就可以获得我们想要的结果,于是只需要使用一个input iterator即可。对应着output iterator的ostream_iterator也是一样的道理。
Write our own iterator?
在cpp17之前的版本中,如果我们想给自己的类写一个iterator,那么一般的方法是继承std::iterator的类模板,并在类模板中指定所谓的iterator_category:
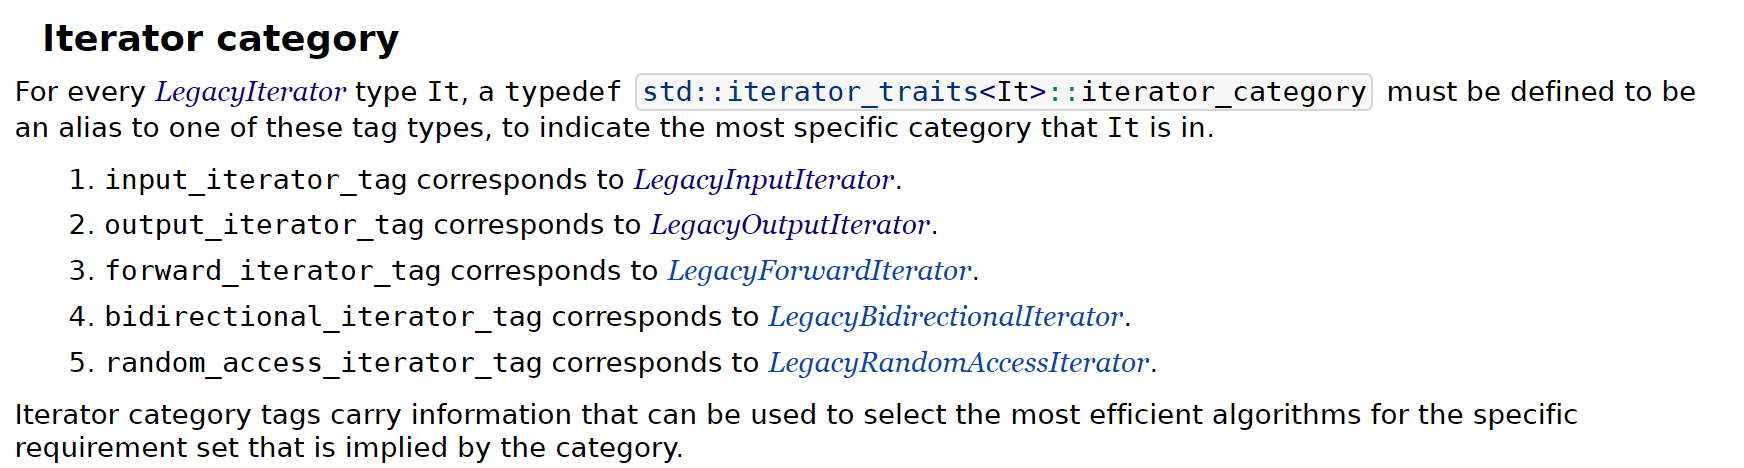
迭代器标签关联着之前所述的迭代器实体。但是自cpp17起,std::iterator的类模板遭到舍弃,详情参见。所以现在,我们只能手写迭代器,具体可以看这里。
在这里,
iterator_traits是一个meta-function,返回的是根据给入参数决定的迭代器的type(通过::iterator_category),也即上图中的各种iterator_tag,这些tags绑定着一些同名迭代器类实体,我们可以利用这些类别构造我们自己的函数,在下方模板一章节的最后一个例子中有提到(来自于Stanford CS 106L Fa2020 lecture)。
iterator – friend class
在作业HashMap中,我们被要求手写一个迭代器类。在这里,我们被要求将hashmap与hashmap_iterator的定义(声明)放到两个头文件中。所以,而迭代器与容器本身的关系要求他们互为友元,也是我们后边提到的mutual friends class,因为此处均为模板类,所以我们使用了Template friends class的方法在各自类中声明其友元。
需要注意的是,我们应当把该类也声明做友元,因为我们可能会获取它的成员们:
friend iterator_of_hashmap<HashMap, !Const>;
iterator – const?
在这里,一个很重要的方法是利用std::conditional_t<>来对迭代器内部的数据类型(是否为const)进行条件选择–这是因为我们要提供iterator与const-iterator两个类。而const_iterator之所以存在,是因为当我们的容器(container)类被置为const时,迭代器不应该被允许修改数据:
当一个类对象为常量对象时,其中所有数据也均为常量类型的数据。而对于常量数据,只能使用指向常量的指针指向他们,或者使用
const引用与他们绑定,否则会编译错误。
这就是为什么在代码中我们需要诸如:
using node_pointer = std::conditional_t<Const, const node*, node*>;
iterator – basic requirement
using difference_type = std::ptrdiff_t;
using value_type = std::conditional_t<Const, const _value_type, _value_type>;
using pointer = std::conditional_t<Const, const _value_type*, _value_type*>;
using reference = std::conditional_t<Const, const _value_type&, _value_type&>;
using iterator_category = std::forward_iterator_tag;
我们必须添加这些以满足程序对iterator类设计的基本要求,同时根据iterator_category提供必要的运算符重载,需要注意的是其中前置++与后置++的实现方法(基本是固定套路),参看我的Github repository.
根据Mastering the cpp17 STL这本书的设计,我们还提供了一个conversion operator,允许迭代器从iterator转型到const_iterator:
/** a conversion operator */
operator iterator_of_hashmap<HashMap, true>() const {
    return iterator_of_hashmap<HashMap, true>{_buckets_array, _ptr, curr_bucket};
}
iterator – private member variables
迭代器的内部数据成员一定会有一个指针,指向容器中具体的,每一个数据的位置(注意:也要通过std::consitional_t来选择),其他私有成员根据需要提供,比如在HashMap中我们就需要一个size_t来告诉我们现在内部指针处于第几个bucket中。在设计时,还包含了一个指向容器的数据区的指针,具体可参见后边的Template mutual friends的一节。
我们使用一个private constructor,这是因为除了在该类及其友元类中,别处不允许直接初始化一个迭代器。
Template–Generic Programming
关于模板,这里有一篇很好的文章。
function template
函数模板的基本形式是:
template<typename T>
T getInteger(const string& prompt, const string& reprompt) {
    while (true) {
        cout << prompt;
        string line;
        T result;
        char extra;
        if (!getline(cin, line))
            throw domain_error(“[shortened]”);
        istringstream iss(line);
        if (iss >> result && !(iss >> extra))
            return result;
        cout << reprompt << endl;
    }
}
class template
e.g.
template<class T, class Container = std::vector<T>>
class Priority_Q {
  // do something
};
template parameters & template arguments
函数模板的形参列表可以由几下几种方式构成:
non-type template parameter
什么是非类型模板参数?非类型模板参数会在编译阶段被预定义并被替换为常量值作为实参,它可以具备如下类型:
- An integral type
- An enumeration type
- A pointer or reference to a class object
- A pointer or reference to a function
- A pointer or reference to a class member function
- std::nullptr_t
- A floating point type (since cpp20)
对于该类型的参数,我们需要注意以下几点:
- The top-level
cv-qualifierson the template-parameter are ignored when determining its type
// this const will be ignored
template<const int k>
void foo() {
    // do something
}
- When the name of a non-type template parameter is used in an expression within the body of the class template, it is an unmodifiable prvalue unless its type was an lvalue reference type, or unless its type is a class type (since cpp20).
template <int N>
void f()
{
    // N is a prvalue, so this is invalid! It will produce a compile error
    N = 42;
}
- the expression we give to the template as its argument must can be parsed and substitued during compile time (non-constant expressions cannot do this, since they could change during runtime)
因为模板的匹配是在编译的时候完成的,所以实例化模板的时候所使用的参数,也必须要在编译期就能确定。
template <int N>
void f()
{
    // do something
}

int main() {
    int a = 1;
    const int b = 0; // constexpr int b = 0;
    // error
    f<a>();
    // ok
    f<b>();
}
type template parameter
这类参数包括使用typename与class(即分别对应了函数模板与类模板的两种type-parameter-key),在cpp20中还提出了使用constrained type template:
template<typename... Ts> concept C2 = true; // variadic concept
template<C2... T> struct s3;      // constraint-expression is (C2<T> && ...)
template template parameter
模板模板参数:
// two type template parameters and one template template parameter:
template<typename K, typename V, template<typename> typename C = my_array>
class Map
{
    C<K> key;
    C<V> value;
};
instantiation(explicit/implicit)
在调用模板函数时,我们可以显式指定对应的模板参数类型(explicit instantiation),也可以不显式指定模板参数类型(implicit instantiation),让模板函数进行类型推断(Template Argument Deduction),需要注意的是,如果我们省略<>符号,那么overload resolution会查找所有的模板类型重载与非模板类型重载,而不是仅仅查找模板类型重载。
什么是
overload resolution?后边有提到.
需要注意的是,如果我们在explicit instantiation之前已经做了模板特化(template specialization),那么此时的实例化是不起作用的。
implicit inference
在模板函数中,我们可能会隐含着一些使用参数的限定条件,比如对于下图所示的函数:
其实隐含着这样一些限定参数使用条件:

这些限定条件意味着如果我们在调用函数时给出了不恰当的参数,那么该模板函数会报出一些非常凌乱的错误…
在cpp20中给出了新的关键字concepts与requires,也就是在之前我们提到过用于重写iterator的两个关键字,他们可以帮助我们在编译阶段就检查出参数错误,将报错的位置从函数主体转移到这两个关键字的位置上:
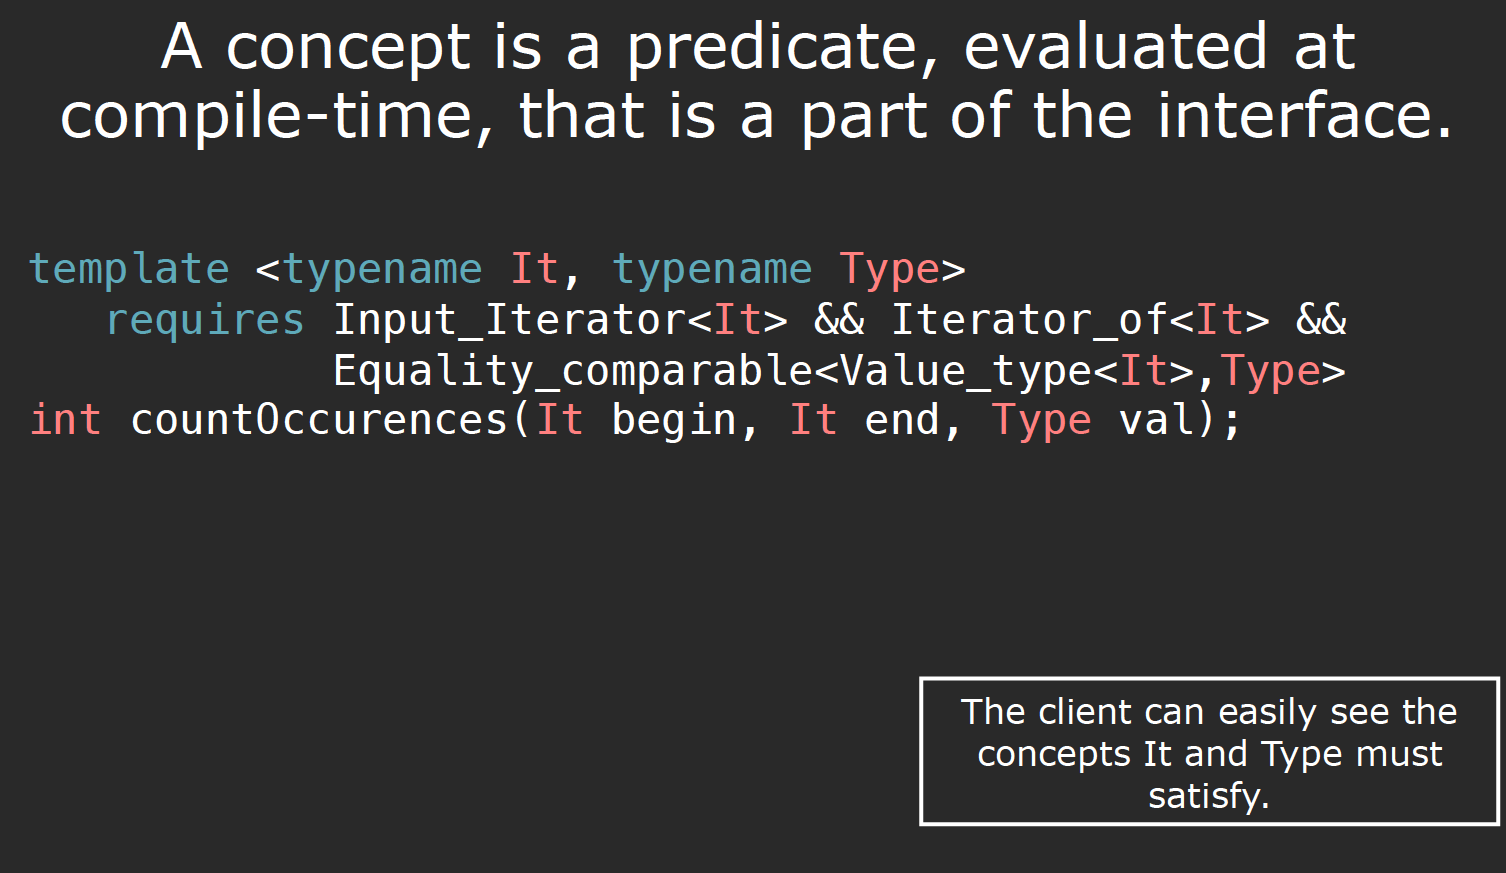
既然concepts关键字可以方便解决模板编译与运行过程中的报错问题的,那么接下来就针对模板的编译过程进行分析。
Compile a template function call
接下来所述的概念来自于官方文档以及这两篇12博客. 根据作者原文给出的例子:
struct Bar {
    typedef double internalType;
};

template <typename T>
typename T::internalType foo(const T& t) {
    cout << "foo<T>\n";
    return 0;
}

int main() {
    foo(Bar());
    foo(0); // << error!
}
当我们向程序中添加了一个新的非模板函数重载int foo(int i)时,程序便不会报错,为什么呢?我们需要了解函数整个的编译过程。
name lookup
根据官方文档,为了编译一个函数调用,程序首先会进行name lookup,这一步是将程序中出现的名字与引入它的声明联系起来,比如对于如下语句,程序正是通过name lookup的方式来解析这条语句中出现的各个名字:
For example, to compile std::cout « std::endl;, the compiler performs:
- unqualified name lookup for the name
std, which finds the declaration of namespace std in the header- qualified name lookup for the name
cout, which finds a variable declaration in the namespacestd- qualified name lookup for the name
endl, which finds a function template declaration in the namespacestd- both argument-dependent lookup for the name
operator<<, which finds multiple function template declarations in the namespacestd, and qualified name lookup for the name std::ostream::operator«, which finds multiple member function declarations in class std::ostream.
std::cout << std::endl;
在进行
name lookup时,我们依赖的是scope这个概念,也即名称的声明所在地,scope有很多种类,namespace,function,class,block,enumeration,template parameter都拥有自己的scope.
unqualified name lookup & qualified name lookup
在上边的例子中,编译器首先会对名称std进行unqualified name查找,在头文件<iostream>中找到它;之后再对cout, endl做qualified name的查找,即在命名空间std中进行的查找过程。
qualified name即在作用域解析符::右侧出现的名称,所以他包括:
- class member
- namespace member
- enumerator
同样地,
unqualified name即没有在作用域解析符::右侧出现的名称
需要注意的是,如果作用域解析符::左侧没有东西,那么程序会默认在global namespace scope或者由using引入的命名空间中进行查找:
#include <iostream>
int main() {
  struct std{};
  std::cout << "fail\n"; // Error: unqualified lookup for 'std' finds the struct
  ::std::cout << "ok\n"; // OK: ::std finds the namespace std
}
Argument-dependent lookup (ADL)
这种名称查找方式也属于一种unqualified name lookup,叫Koenig lookup,用于查找function-call expressions中的unqualified function names(包括运算符重载时对函数的隐式调用),这种查找方式的存在使得在进行函数调用时,程序不仅仅会查找一般的unqualified name lookup的scope和命名空间,还会查找函数参数们所在的命名空间:
该示例来自于官方文档:
#include <iostream>
int main()
{
    std::cout << "Test\n"; // There is no operator<< in global namespace, but ADL
                           // examines std namespace because the left argument is in
                           // std and finds std::operator<<(std::ostream&, const char*)
    operator<<(std::cout, "Test\n"); // same, using function call notation

    // however,
    std::cout << endl; // Error: 'endl' is not declared in this namespace.
                       // This is not a function call to endl(), so ADL does not apply

    endl(std::cout); // OK: this is a function call: ADL examines std namespace
                     // because the argument of endl is in std, and finds std::endl

    (endl)(std::cout); // Error: 'endl' is not declared in this namespace.
                       // The sub-expression (endl) is not a function call expression
}
Template Argument Deduction
在进行完name lookup这一步之后,程序会进行Template Argument Deduction:
In order to instantiate a function template, every template argument must be known, but not every template argument has to be specified. When possible, the compiler will deduce the missing template arguments from the function arguments. This occurs when a function call is attempted, when an address of a function template is taken, and in some other contexts.
这一机制以及上一节提到的ADL,让我们使用template operator成为可能,因为在使用template operator时,我们无法显式指定所用的模板参数的类型:
#include <iostream>

int main()
{
    std::cout << "Hello, world" << std::endl;
    // operator<< is looked up via ADL as std::operator<<,
    // then deduced to operator<<<char, std::char_traits<char>> both times
    // std::endl is deduced to &std::endl<char, std::char_traits<char>>
}
需要注意的是,对于函数以及函数模板名称,name lookup可以找到多个合理的名称,并交给之后的overload resolution过程处理,但是对于其他的名字,比如变量,类,命名空间等,name lookup只允许找到一个名字的声明以保证正常编译。
Template Argument Substitution
现在,我们已经获取到了所使用的模板参数类型,在这一步我们要将所有出现在原本的模板中的参数T替换为我们推断出的参数类型。
When all template arguments have been specified, deduced or obtained from default template arguments, every use of a template parameter in the function parameter list is replaced with the corresponding template arguments.
需要注意的是如果在替换过程中,出现了错误,比如在先前给出的例子中,我们获得了一个int::interalType的类型,那么此时,我们需要把这一参数类型(一个替换方案)剔除出overload set,这一操作被称为SFINAE–Substitution failure is not an error.
overload resolution
在做完Template Argument Substitution这一步后,如果overload set中已然没有可用的函数,那么编译失败,但存在这样一种情况:即目前有多个candicate function可供选用,那么此时overload resolution便会派上用场。
In order to compile a function call, the compiler must first perform name lookup, which, for functions, may involve argument-dependent lookup, and for function templates may be followed by template argument deduction. If these steps produce more than one candidate function, then overload resolution is performed to select the function that will actually be called.
这是一种针对于
function call的通用概念,并非只针对template.
当我们试图在模板函数中应用overload resolution以选择最佳匹配重载函数时,会使用partial ordering of overloaded function templates的方法来选择最佳匹配。什么是最佳匹配重载函数?
Informally “A is more specialized than B” means “A accepts fewer types than B”.
StackOverflow上有一篇很详细的文章描述这一机理。这也是为什么在先前的例子中加入一个匹配的新function,就可以编译成功的原因。
SFINAE
在上一节的template argument substituion中,我们提到了SFINAE的内部作用机理,那么我们要如何写出这样的代码或者说这一机理有什么用处呢?
Why we need SFINAE?
在这篇文章里,其实解释的很清楚。这里是我的一个总结。
- 首先,对于我们自己的函数模板代码,如果其中存在
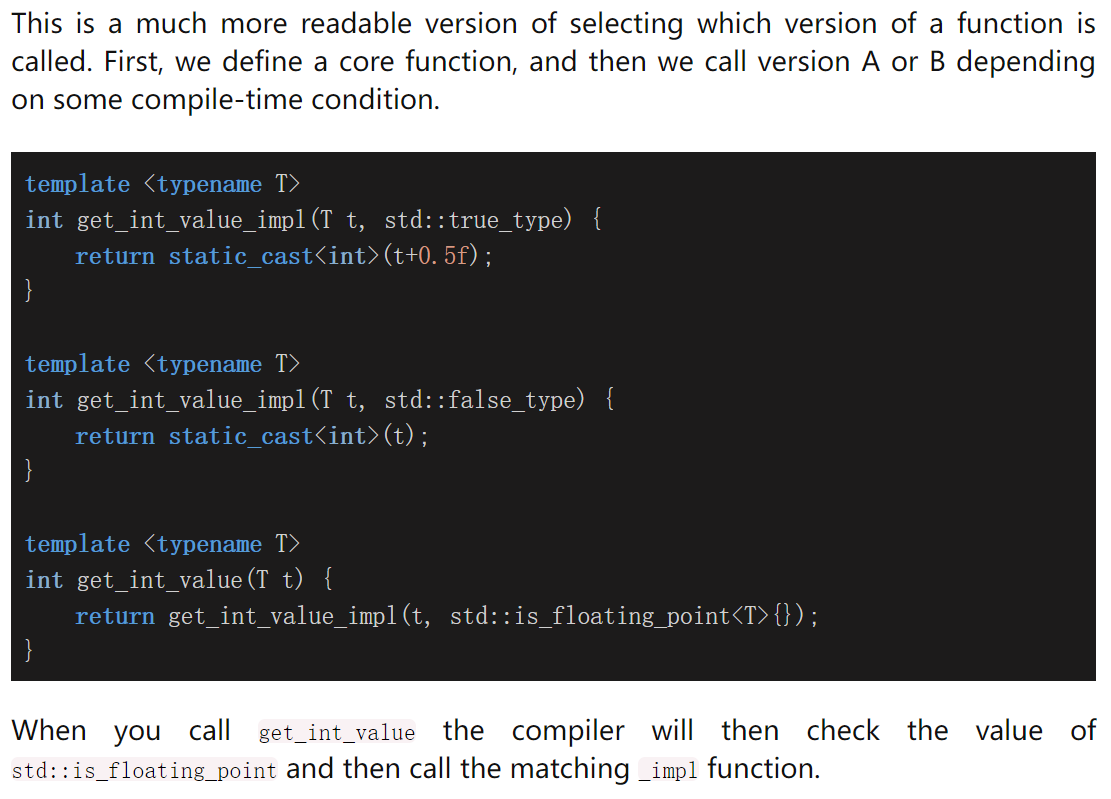
if-else分支,并且我们利用了compile-time-if,那么程序很有可能会在编译阶段报错,因为他会编译if-else两个分支,之后程序发现自己无法reject the invalid code (for this case):
template <typename T>
std::string str(T t) {
    if (std::is_convertible_v<T, std::string>)
        return t;
    else if (std::is_same_v<T, bool>)
        return t ? "true" : "false";
    else
        return std::to_string(t);
}
而我们要做的,就是让程序在编译阶段把在当前情况下不正确的分支给剔除,从overload set中将其去掉,只编译符合要求的部分,这也对应着SFINAE的定义。
How to leverage SFINAE?
为了解决这个问题,cpp11/14/17/20提出了多种方案:
Tag Dispatching
enable_if
std::enable_if can be used as an additional function argument (not applicable to operator overloads), as a return type (not applicable to constructors and destructors), or as a class template or function template parameter.
这一语法自cpp11提出,但当时的写法是enable_if,在cpp14/17中,提出了enable_if_t.
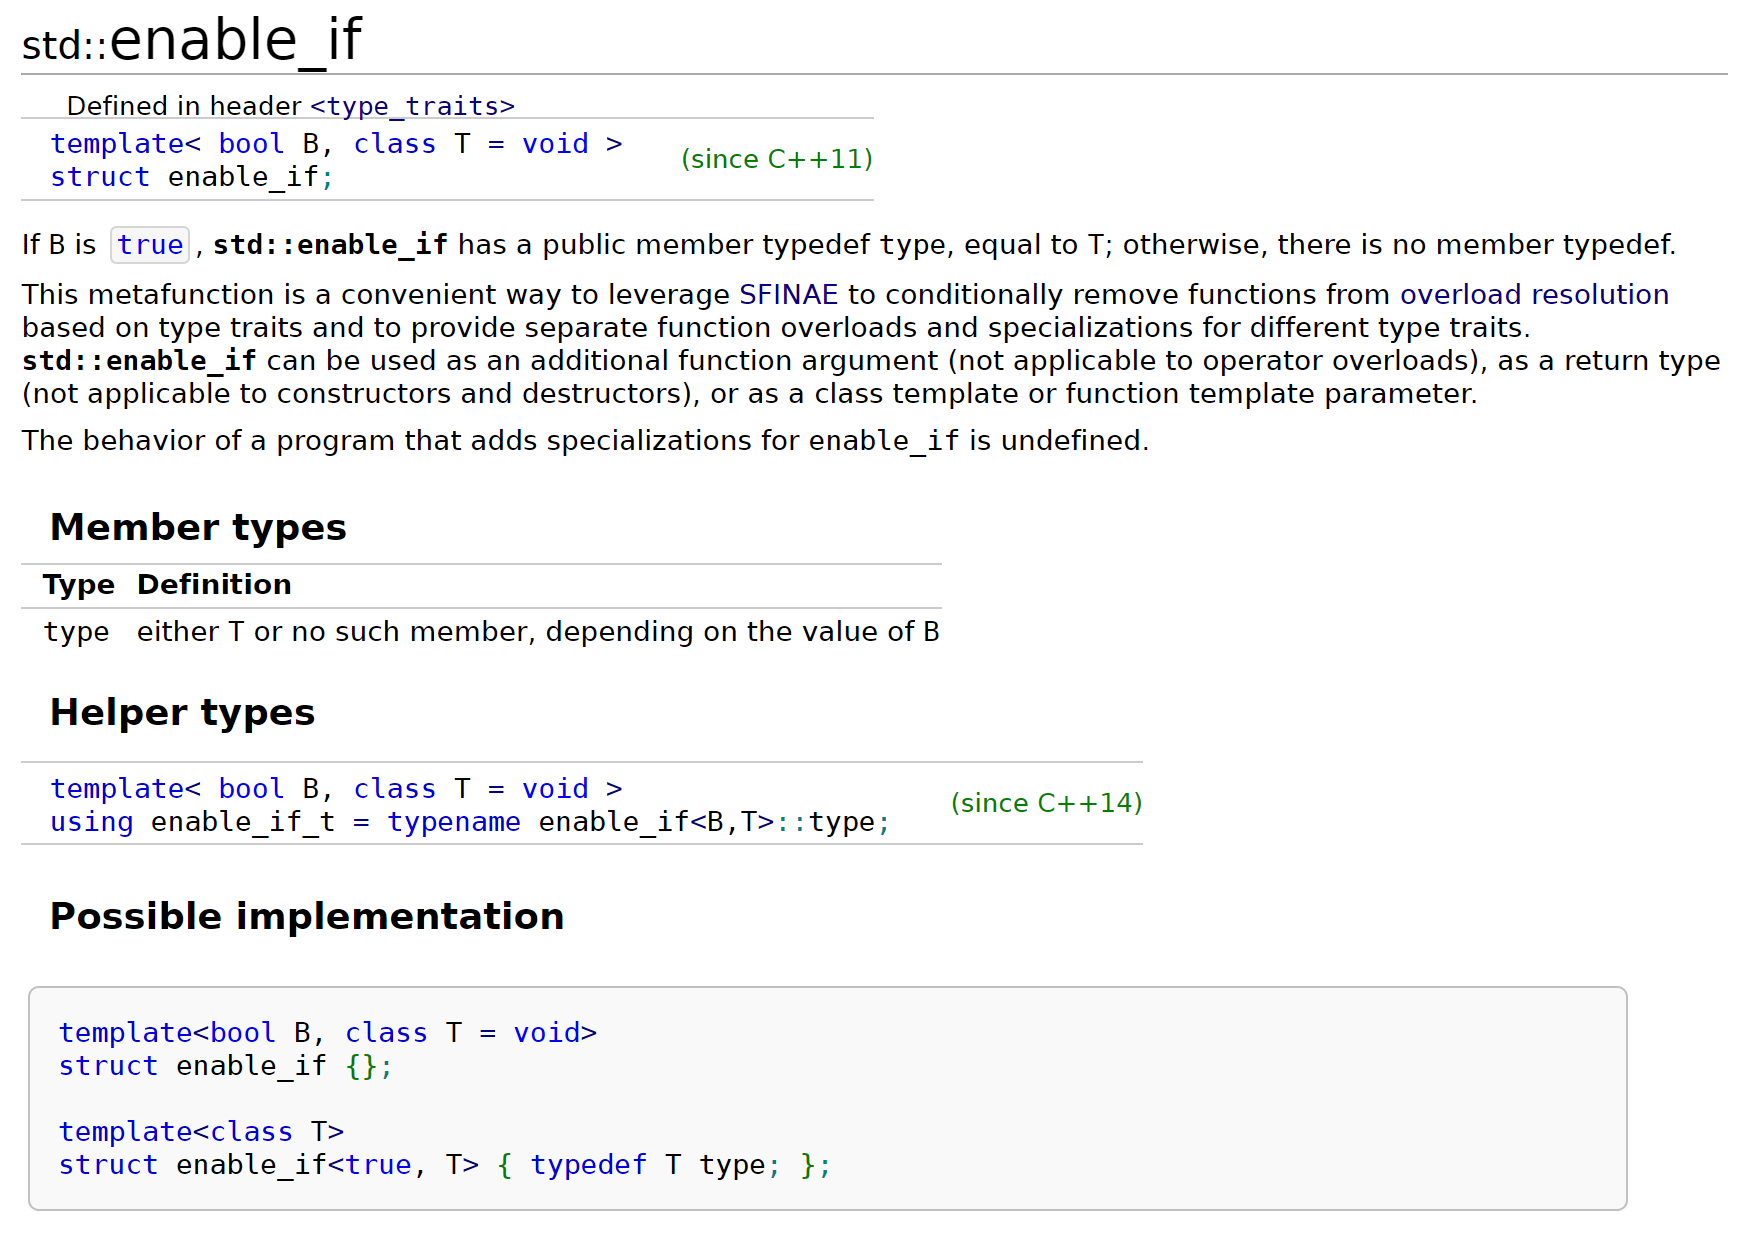
模板偏特化
也就是说,当B==true时,enable_if具备一个typedef type,即T,否则没有type成员,就会发生我们所说的SFINAE,于是当我们写成如下代码:
template <class T>
typename std::enable_if<std::is_arithmetic<T>::value, T>::type
或者参看文档中的alias–enable_if_t的定义时,如果其不具备成员type但是我们却使用了::type,那么编译就会出错,并使用SFINAE机制处理。在cpp14及以后的版本中,上述代码可被简化为:
template <class T>
typename std::enable_if_t<std::is_arithmetic_v<T>, T>
enable_if常与type traits一起使用:

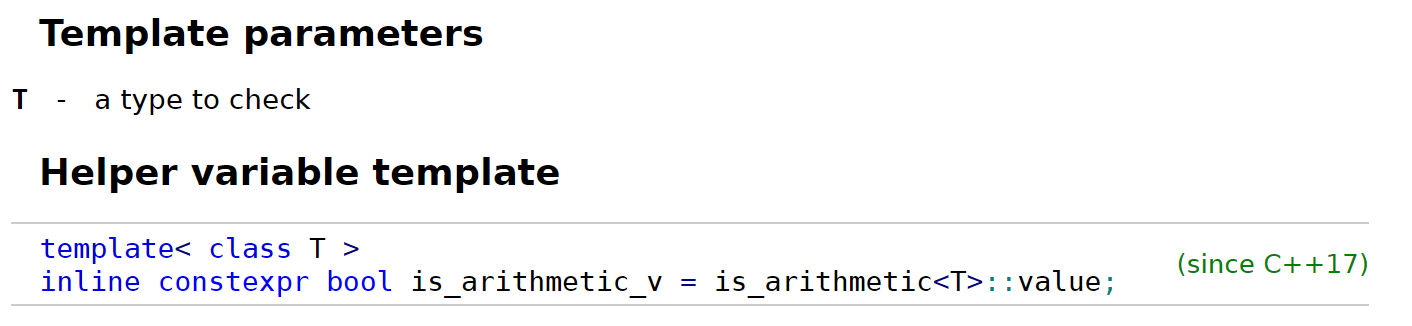
type traits在编译阶段用以确定模板特征和属性。在cpp14中也提出了类似于is_arithmetic_v的形式(原本的value当T为arithmetic type是返回true,反之false)
借助于enable_if_t,我们可以将本节最初的代码更改为:
template <typename T>
enable_if_t<is_convertible_v<T, string>, string> strOld(T t) {
    return t;
}

template <typename T>
enable_if_t<!is_convertible_v<T, string>, string> strOld(T t) {
    return to_string(t);
}
关于
enable_if的缺点,StackOverflow上的一篇文章进行了探讨。
需要注意的是,
enable_if这里直接充当了函数的返回值类型,因为它本身就返回一个type
enable_if除了可以放在返回值的位置上以外,还可以直接使用在模板参数、函数参数中,或者在模板偏特化中出现,它的使用方式十分灵活,具体可以看官方文档:
// 2. the second template argument is only valid if T is an integral type:
template < class T,
           class = typename std::enable_if<std::is_integral<T>::value>::type>
bool is_even (T i) {return !bool(i%2);}

// the partial specialization of A is enabled via a template parameter
template<class T, class Enable = void>
class A {}; // primary template

template<class T>
class A<T, typename std::enable_if<std::is_floating_point<T>::value>::type> {
}; // specialization for floating point types
在使用enable_if或者enable_if_t时,我们也可以省略模板参数中的T,因为T具备默认值void。
Notes
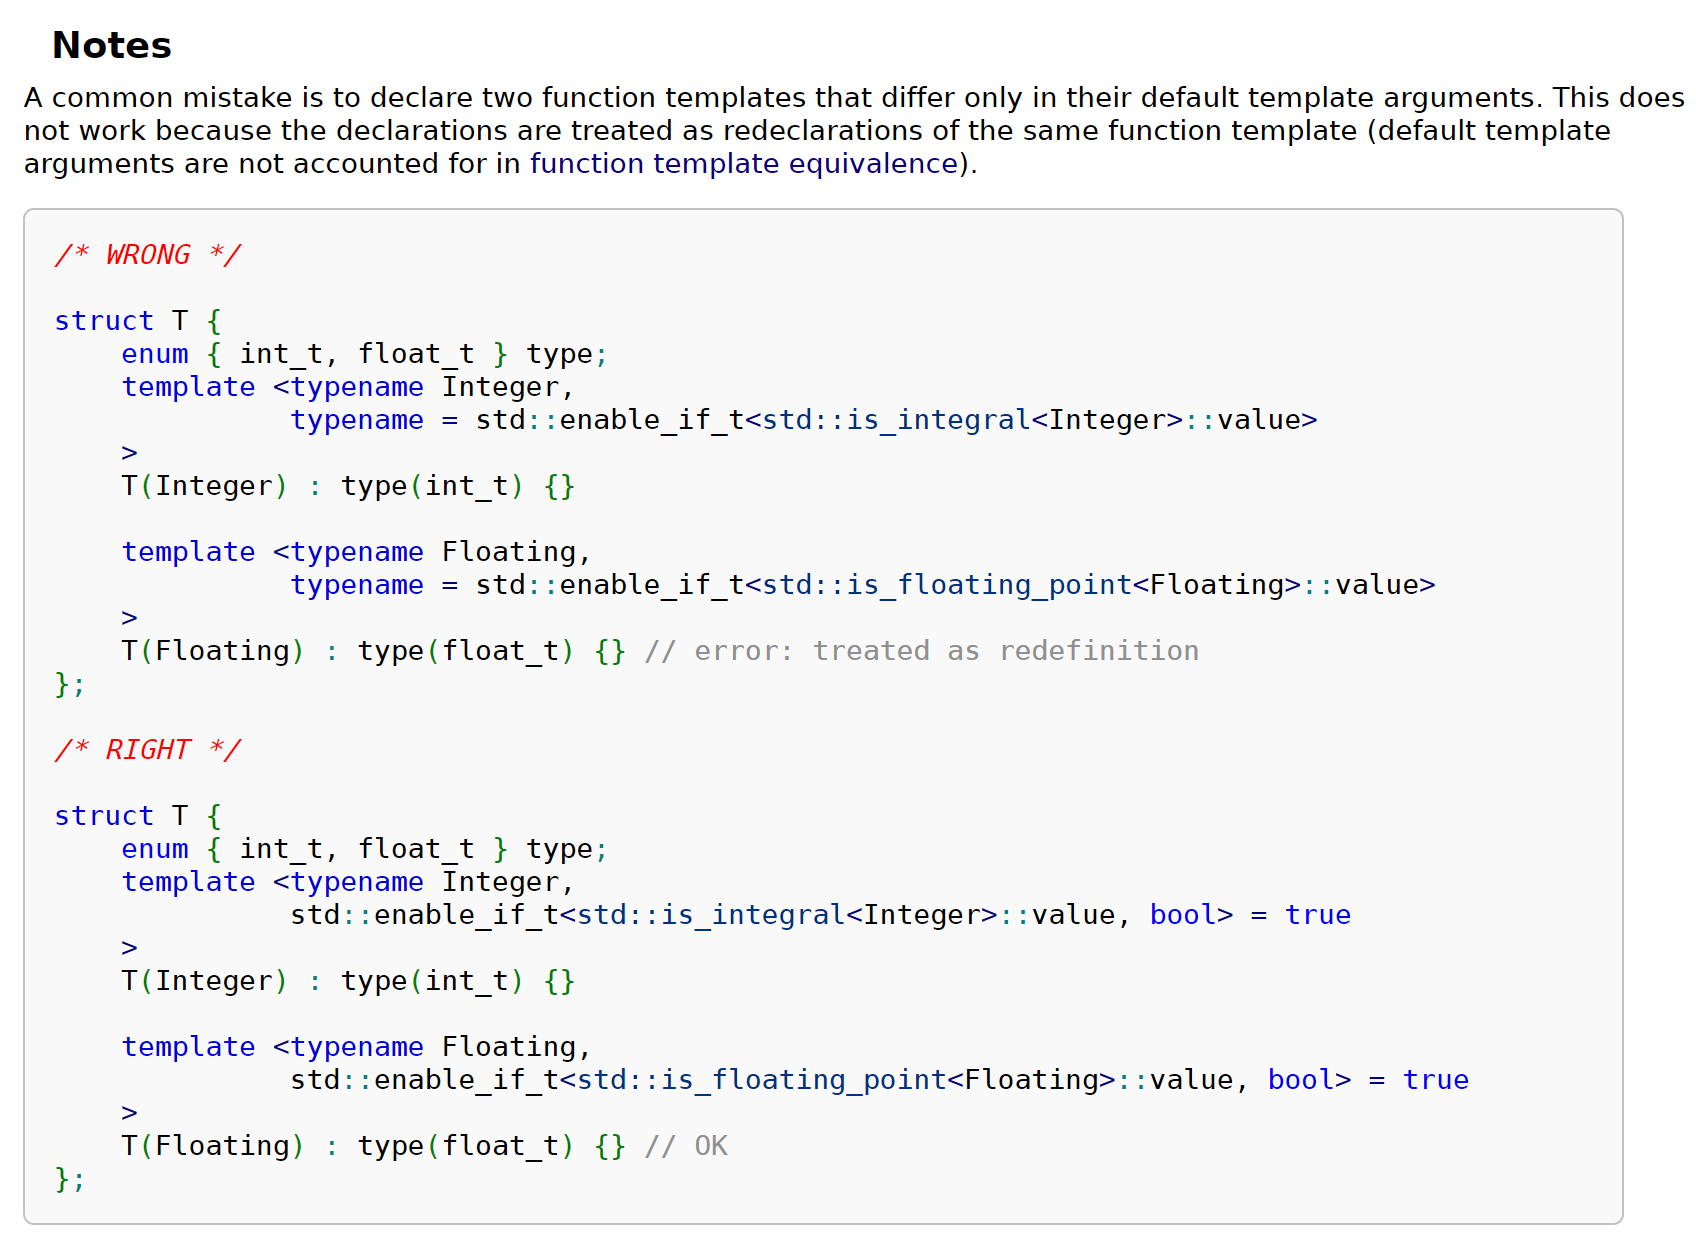
需要注意的是,这里提到的是
only differ in default template arguments,如果两个模板的default template argument一样但是template parameters不一样,那么不会发生编译错误.所以如上图所示,对于第一个例子,由于两者只在默认模板参数上有所不同,进而报错。但是第二个例子两者的模板参数是不一样的(虽然两者的默认模板参数都被设置成了
true,但仍然不会报错)
if constexpr
在cpp17中,我们可以将if conxtexpr statement使用在模板中,起到与enable_if_t相同的作用:
template <typename T>
auto get_value(T t) {
    if constexpr (std::is_pointer_v<T>)
        return *t; // deduces return type to int for T = int*
    else
        return t;  // deduces return type to int for T = int
}
concepts-requires
终于,我们来到了concepts。
// concept:
template<typename T>
concept Hashable = requires(T a) {
    { std::hash<T>{}(a) } -> std::convertible_to<std::size_t>;
};
在这里,我们定义一个concept,将一个requires-expression赋值给它。requires关键字有很多种写法:
- requires clauses
template<typename T>
void f(T&&) requires Eq<T>; // can appear as the last element of a function declarator

template<typename T> requires Addable<T> // or right after a template parameter list
T add(T a, T b) { return a + b; }
- requires expressions
template<typename T>
concept Addable = requires (T x) { x + x; }; // requires-expression
- simple requirements
template<typename T>
concept Addable =
requires (T a, T b) {
    a + b; // "the expression a+b is a valid expression that will compile"
};
因为所有以关键字
requires开头的requirements都会被解释成nested requirement,所以simple requirements不会以requires开头
- Type requirements
template<typename T> using Ref = T&;
template<typename T> concept C =
requires {
    typename T::inner; // required nested member name
    typename S<T>;     // required class template specialization
    typename Ref<T>;   // required alias template substitution
};
- Compound requirements
- Nested requirements
Abbreviated function template
自cpp20始,提出了Abbreviated function template的做法,即使用placeholder types(auto, concept auto)出现在函数声明或者函数模板声明中:
void f1(auto); // same as template<class T> void f(T)
void f2(C1 auto); // same as template<C1 T> void f2(T), if C1 is a concept
void f3(C2 auto...); // same as template<C2... Ts> void f3(Ts...), if C2 is a concept
void f4(const C3 auto*, C4 auto&); // same as template<C3 T, C4 U> void f4(const T*, U&);
template <class T, C U>
void g(T x, U y, C auto z); // same as template<class T, C U, C W> void g(T x, U y, W z);
于是对于原博客中给出的例子:
// requires:
template <typename T>
requires std::is_floating_point_v<T>
constexpr bool close_enough20(T a, T b) {
   return absolute(a - b) < precision_threshold<T>;
}
constexpr bool close_enough20(auto a, auto b) {
   return a == b;
}
根据官方文档,我们利用constrained auto将其改写为:
constexpr bool close_enough20(std::floating_point auto a,
                              std::floating_point auto b) {
   return absolute(a - b) < precision_threshold<std::common_type_t<decltype(a), decltype(b)>>;
}
constexpr bool close_enough20(std::integral auto a, std::integral auto b) {
   return a == b;
}
这里有一篇文章作了较为详细的介绍。
Template friends
这是一节单独列出来的主题。分为两个部分,Template class friends和Template function friends,在第二种中尤其讨论Template friend operator.
Template class friends
在做hashmap作业时,我们需要将自己实现的iterator class作为友元声明到container也即hashmap类中,我们有两种方法来实现这一声明操作:
template<typename T>
class foo{
    template<typename U>
    friend class foo_1;
};
Template parameters cannot shadow each other.
如此一来,不论T被实例化为什么类型,任何类型的foo_1类都是foo的友元。需要注意的是类模板的声明方式,我们不可以写出这样的语法:
template<typename U>
friend class foo_1<U>;
或者我们也可以这样声明,这也是hashmap中我们可以做的(因为只需要这么做就足够了):
template<typename T>
class foo{
    friend class foo_1<T>;
};
这种声明方式中,模板参数推断只发生在一开始的类模板部分,而在类内部仅仅对foo_1按照推断出来的类型T做了一次实例化。如若foo被实例化为foo<int>,那么此时也便只有foo_1<int>有资格成为它的友元了。
我们可以在友元处做模板特化(Template specialization),需要注意的是,模板友元(Template friends)不允许我们做模板偏特化,但是我们可以做模板全特化:
template<class T> class A {}; // primary
template<class T> class A<T*> {}; // partial,因为此时T*仍然带有泛型T
template<> class A<int> {}; // full, int已经脱离T了,被“完全特化”了,所以模板参数中也不需要填东西
class X {
    template<class T> friend class A<T*>; // error!
    friend class A<int>; // OK
};
Template function friends
我们常常需要将重载的操作符声明为友元(见下方Object-Oriented Programming部分详述),根据这篇文章,我们有三种方式实现这一声明操作:
The Extrovert
与模板友元类类似,我们可以这样声明:
template <typename T>
class Test {
   template <typename U>      // all instantiations of this template are my friends
   friend std::ostream& operator<<( std::ostream&, const Test<U>& );
};
template <typename T>
std::ostream& operator<<( std::ostream& o, const Test<T>& ) {
   // Can access all Test<int>, Test<double>... regardless of what T is
}
按照友元声明习惯,将声明放在类内部,定义放在类外部,这种方法类似模板友元类声明的第一种方法,不再详述。
The Introverts
我们也可以把友元函数的声明+定义全部放在类内,这允许我们进行如下两种声明模式:
这两种声明不允许我们将函数定义放在类外,否则编译器无法找到模板函数的定义
template <typename T>
class Test {
   friend std::ostream& operator<<( std::ostream& o, const Test& t ) {
      // can access the enclosing Test. If T is int, it cannot access Test<double>
   }
};
这种方法类似模板友元类声明的第二种模式,不同的是在这里我们必须给函数在类内提供一个定义。
或者,我们也可以做得更加麻烦一些,在官方文档中也提过这种方法:
or the function template has to be declared as a template before the class body, in which case the friend declaration within
Foo<T>can refer to the full specialization ofoperator<<for itsT:
// Forward declare both templates:
template <typename T> class Test;
template <typename T> std::ostream& operator<<( std::ostream&, const Test<T>& );

// Declare the actual templates:
template <typename T>
class Test {
   // refers to a full specialization for this particular T
    friend std::ostream& operator<< <> (std::ostream&, const Test&);
    // note: this relies on template argument deduction in declarations
    // can also specify the template argument with operator<< <T>":
    // friend std::ostream& operator<< <T>( std::ostream&, const Test<T>& );
};
// Implement the operator
template <typename T>
std::ostream& operator<<( std::ostream& o, const Test<T>& t ) {
   // Can only access Test<T> for the same T as is instantiating, that is:
   // if T is int, this template cannot access Test<double>, Test<char> ...
}
Template meta-programming
本部分内容来自于Stanford CS 106L Fa2020的guest lecture,以及cpp Template Tutorial和cpp官方文档。
在学习了一系列基本关于模板的基础知识以及先前关于iterator的内容后,对模板元编程(Template meta-pragramming)做一下浅显的了解和认识。在这一章节,也会对先前没有提到的模板特化(Template Specialization)做一些介绍。
所以什么是元编程?这里直接引用提到的文章中的一段话:
元(meta)无论在中文还是英文里,都是个很“抽象(abstract)”的词。因为它的本意就是“抽象”。元编程,也可以说就是“编程的抽象”。用更好理解的说法,元编程意味着你撰写一段程序A,程序A会运行后生成另外一个程序B,程序B才是真正实现功能的程序。那么这个时候程序A可以称作程序B的元程序,撰写程序A的过程,就称之为“元编程”。
我们的目的,是找出程序之间的相似性,进行“元编程”。而在cpp中,元编程的手段,可以是宏,也可以是模板。
Template Specialization
我们应当区分模板特化与模板实例化的区别,其实实例化(template instantiation也可以被叫做模板实例化的特例(instantiated/generated specialization))模板特化又分为Explicit/full specialization与Partial template specialization(模板偏特化)两种。对于模板特化,首先我们要注意以下几点规则:
- 在定义模板特例之前应当有模板通例(
generic template/primary template)在先 - 模板偏特化(部分特化)(
partial template specialization)只适用于class template和variable template。 - 模板特化的匹配规则遵循以下顺序:
If only one specialization matches the template arguments, that specialization is used
If more than one specialization matches, partial order rules are used to determine which specialization is more specialized. The most specialized specialization is used, if it is unique (if it is not unique, the program cannot be compiled)
If no specializations match, the primary template is used
这也是我们在先前提到过的Partial ordering方法,只不过在模板特化这里被使用并明确了。简而言之,从特例到通例,从more specializaed到less specialized。
Template Specialization Examples
// primary template
template <typename T> class TypeToID
{
public:
    static int const ID = -1;
};
// specialization template
template <> class TypeToID<uint8_t>
{
public:
    static int const ID = 0;
};
需要注意的是,在模板特化时,如果我们特化的类型不需要依赖模板参数T,那我们就不需要也不能在specialiazed template中的<>位置写任何东西,因为他的位置已经被其后的int占领了:
// use float specialization
template <> class TypeToID<float>
{
  static int const ID = 0xF10A7;
};
// use void* specialization
template <> class TypeToID<void*>
{
  static int const ID = 0x401d;
};
但有些时候我们不得不给入一个模板参数T来进行模板特化,比如我们要特化所有指针类型:
template <typename T>                    // 嗯,需要一个T
class TypeToID<T*>                        // 我要对所有的指针类型特化,所以这里就写T*
{
public:
    typedef T         SameAsT;
    static int const ID = 0x80000000;    // 用最高位表示它是一个指针
};
在进行模板特化时,我们需要注意的一点是,特化的模板可以把我们提供的类型中的const或者*给去掉,也就是说,当我们给如下的模板定义分别提供float*与const int时,其中对应的T分别变成了float与int:
// float* -> T:float
template <typename T>
class RemovePointer<T*> {
public:
    typedef T Result;
};

// const int -> T:int
template<typename T>
class RemovePointer<const T> {
public:
    using type = T;
};
在继续进行我们的主题之前,我们先来对模板中的名称查找问题进行解决,这会帮助我们理解之后的例子。
Name Resolution
在一开始给到的文章中,提到了Name Resolution这一概念:
这里我们需要注意的是,模板中的名称可以被分为两个大类:依赖性名称与非依赖性名称。什么是依赖性名称?
A dependent name is a name that depends on the type or the value of a template parameter. For example:
template<class T> class U : A<T>
{
  typename T::B x;
  void f(A<T>& y)
  {
    *y++;
  }
};
在这里,A<T>,T::B,y都是依赖性名称。
- 除此之外,如果成员访问运算符(., ->)依赖于模板参数,则p->x中的x也是依赖性名称;
- this->x在模板定义中出现时,也是依赖性名称;
- f(A<T>)中的f也是依赖性名称.
而他们被程序进行name lookup的时机也不相同:Non-dependent names会被程序在模板定义的时候查找,可是dependent names只有当模板被实例化时才被查找到,因为他们都是与模板参数有关的,依赖于具体的模板参数。所以,我们在模板这一节开始时提到的name lookup过程会在模板定义和实例化时各做一次,分别处理Non-dependent names与dependent names。这一机制被称为Two phase name lookup(两阶段查找)。
而正是基于这样的原因,在如下的例子中:
#include <iostream>
using namespace std;

void f(double) { cout << "Function f(double)" << endl; }

template <class A> struct container{ // point of definition of container
   void member1(){
      // This call is not template dependent,
      // because it does not make any use of a template parameter.
      // The name is resolved at the point of definition, so f(int) is not visible.
      f(1);
   }
   void member2(A arg);
};

void f(int) { cout << "Function f(int)" << endl; }

void h(double) { cout << "Function h(double)" << endl; }

template <class A> void container<A>::member2(A arg){
   // This call is template dependent, so qualified name lookup only finds
   // names visible at the point of instantiation.
   ::h(arg);
}

template struct container<int>; // point of instantiation of container<int>

void h(int) { cout << "Function h(int)" << endl; }

int main(void){
   container<int> test;
   test.member1();
   test.member2(10);
   return 0;
}
在这个例子中,我们为f和h分别提供了两种类型的重载,并在第26行对模板进行实例化。由于文件编译顺序自上而下,所以在模板定义阶段发生的第一阶段名称查找只能找到在模板定义上方的f或者h,实例化也同样。如果更改这两个函数定义的位置,那么程序最终会输出不同的结果。
我们得到了如下的结果:
Function f(double)
Function h(double)
正是因为编译器分别在模板定义和模板实例化时完成了名称查找。在之后进行名称解析时,根本不会用到后边定义的东西。
而name lookup中提到,名称查找又分为qualified name look-up以及unqualified name look-up。这样一来,在模板名称定义的概念里,我们有如下四种组合:
| 非依赖性名称 | 依赖性名称 | |
|---|---|---|
| 非受限名称 | 1 | 2 |
| 受限名称 | 3 | 4 |
基于这种特性,对于一个多文件的项目,我们必须把模板类或者模板函数的声明与实现放在一个文件中,根据官方文档:
Because templates are compiled when required, this forces a restriction for multi-file projects: the implementation (definition) of a template class or function must be in the same file as its declaration. That means that we cannot separate the interface in a separate header file, and that we must include both interface and implementation in any file that uses the templates.
Why use typename?
正因为这一Two phase name lookup的特性,typename关键字在模板定义内派上了用场。
template <typename T> struct X {};

template <typename T> struct Y
{
    // X[T] is a dependent name on template parameter T
    // which will be lookup during the template instantaition
    // not the template definition period
    typedef X<T> ReboundType;
    typedef typename X<T>::MemberType MemberType2;    // 这里的typename是做什么的?
};
这里使用typename的目的简而言之,就是cpp标准规定,T::type的形式不仅可以是一个类型,还可以是T的一个成员变量,**如果编译器能够在模板定义(该形式出现)时就明确知道它的类型,就不需要加typename;如果要等到二阶段,即模板实例化时才知道它是否合法(到底是个变量还是个类型),那么我们必须使用typename明确指定这是一个类型。**更多的例子参见原文章。
这个例子更清晰一些:
template<class T> class A
{
  T::x(y);
  typedef char C;
  A::C d;
}
根据IBM文档的解释,T::x可以被理解成一个函数调用,即T::X();或者是T::x类型用y初始化的变量;在这种情况下,cpp编译器解释为函数调用,我们为了让编译器把它理解为类型,typename派上了用场。最后的A::C这里就成了ill-formed,我们也需要使用typename来告诉编译器我们想让你如何处理它。
Type Computations
与Computations on Types相对应的是Computations on Values:
int s = 3; // computations on values
using S = int; // computations on types

int triple = 3 * s; // computations on values
using cl_ref = const S&; // computations on types

int result = foo(triple); // computations on values
using result = std::remove_reference<cl_ref>::type; // computations on types

bool equals = (result = 0); // computations on values
constexpr bool equals = std::is_same<result, const int>::value; // computations on types

if (equals) exit(1); // computations on values
if constexpr (equals) exit(1); // computations on types
我们通过将type传递给meta_function实现这一点。
A meta-function is a “function” that operates on some types/values (parameters) and outputs some types/values (return values). Concretely, it is a struct that has public member types/fields which depend on what the template types/values are instantiated with.
比如:
// a value meta-function: identity
template<int V>
struct identity {
    static const int value = V;
}

// a type meta-function: identity
template<typename T>
struct identity {
    using type = T;
}
在第一个结构体中使用
static关键字的作用是,允许我们在不实例化结构体(或者类)的时候使用其成员(他们在定义的时候就存在了),即:
int val = identity<3>::value;
那么这种meta-function有什么作用呢?
type_traits
我们结合meta-function的知识,以及先前我们对模板特例化(template specialization)的了解,我们便可以得知cpp内置的type traits库是在做什么事情了,并且为什么我们经常遇到::type或者::value的写法。这里只需要一个例子,就可以说明问题:
// primary/generic template
template<typename T>
struct is_pointer {
    static const bool value = false;
}

// specializaed template
template<typename T>
struct is_pointer<T*> {
    static const bool value = true;
}
如此一来,根据partial ordering的规则,如果我们传入一个指针,那么is_pointer<int*>::value应当为true,如果不是指针,则无法匹配specialized template,会使用通例模板,最终返回false。
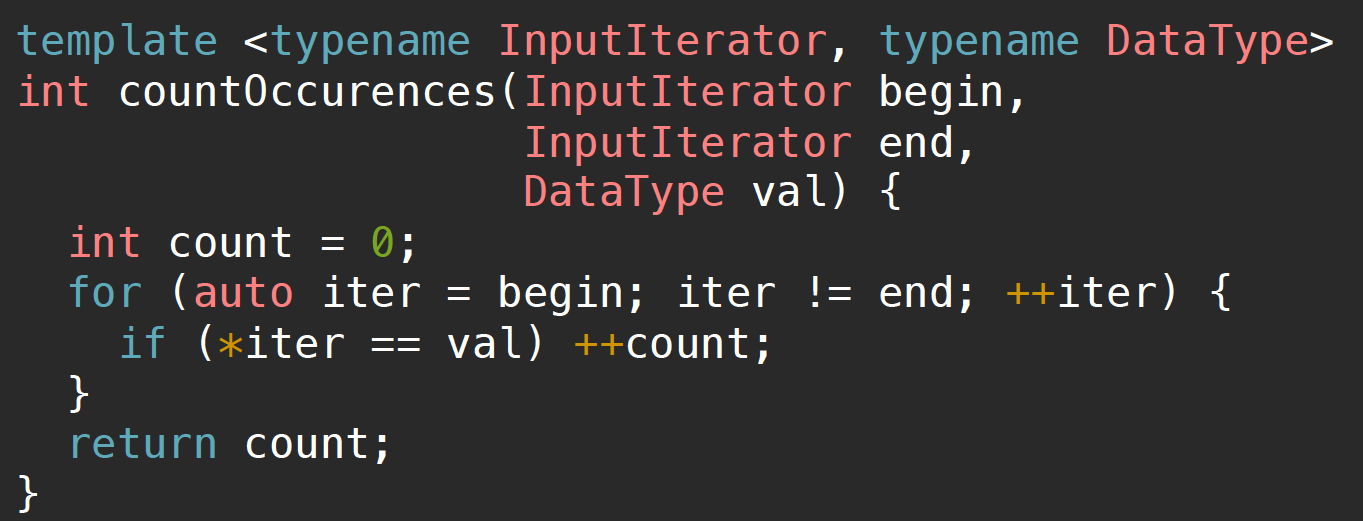
Examples
最后,我们来看一个例子。这里我们想写一个标准库里iterator的distance函数,大致的结构应该是这样:
template<typename It>
size_t my_distance(It first, It last) {
    // if it_category == random_access_Iterator
    // then
    // return last - first
    else {
        size_t result = 0;
        while (first != last) {
            ++first;
            ++result;
        }
        return result;
    }
}
现在的问题在于我们首先要找到一个办法能拿到迭代器的类型。于是我们想到了我们的meta functions和cpp的type traits:
template<typename It>
size_t my_distance(It first, It last) {
    // notice! typename, lol we just introduced its effect
    using category = typename std::iterator_traits<It>::iterator_category;
    if (std::is_same<category, std::random_access_iterator_tag>::value) {
        return last - first;
    }
    else {
        size_t result = 0;
        while (first != last) {
            ++first;
            ++result;
        }
        return result;
    }
}
但是!这个例子目前并不完美,他无法编译通过,原因正是我们之前总结的-没有利用SFINAE!
在cpp17中,很简单,我们只需做如下改写:
template<typename It>
size_t my_distance(It first, It last) {
    // notice! typename, lol we just introduced its effect
    using category = typename std::iterator_traits<It>::iterator_category;
    if constexpr (std::is_same<category, std::random_access_iterator_tag>::value) {
        return last - first;
    }
    else {
        size_t result = 0;
        while (first != last) {
            ++first;
            ++result;
        }
        return result;
    }
}
Lambda Expressions
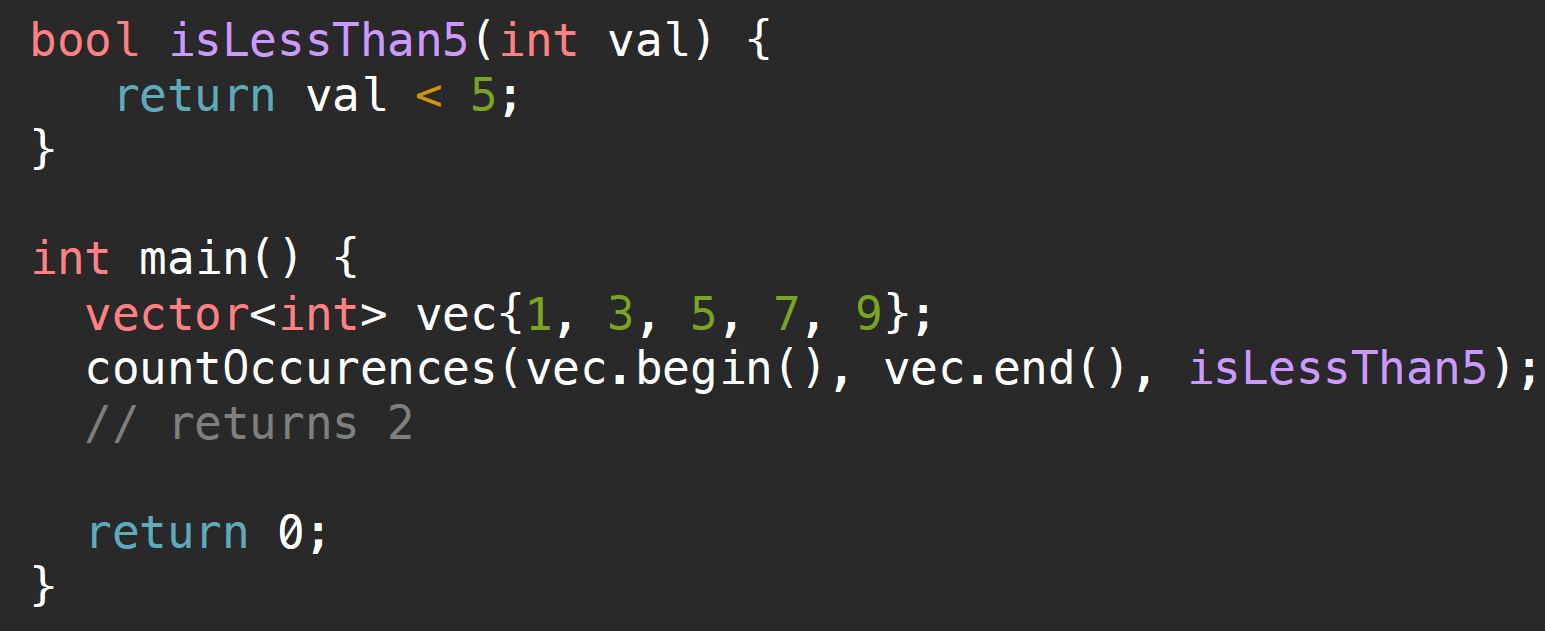
1话题的引入来自于该函数中的predicate,我们尝试着将它写做一个非固定最大值的版本,即将下边的5替换为一个limit变量:
call it by using function pointers
Pre-cpp11(Functors)
在cpp11之前,我们使用如下方法,这也是我们所说的闭包,之后lambda表达式的基础或者说内部形式:
// by value
class GreaterThan {
public:
    GreaterThan(int limit) : limit(limit) {}
    // note: this should have a const
    bool operator() (int val) const {return val >= limit};
private:
    int limit; /* the value we captured outside*/
}

// by reference
class GreaterThan {
public:
    GreaterThan(int &limit) : limit(limit) {}/* pass by reference */
    // note: this should have a const
    bool operator() (int val) const {return val >= limit};
private:
    int& limit; /* the value we captured outside, by reference*/
}
在cpp11中引入了lambda expression:
auto func = [capture-clause](parameters) -> return-value {
// body
};

// the simplest lambda:
[]{};
return-valueis optional- can use
=to capture all by value (not recommend)- can use
&to capture all by reference (not recommend)
需要注意的是,在cpp11中引出了一种返回值的写法:
auto identifier(argument) -> return type
这种写法帮助我们写出如下函数:
template<typename T1, typename T2>
auto compose(T1 a, T2 b) -> decltype(a + b);
而在cpp14中,我们可以直接省略->return type。
在cpp11中规定,如果
lambda函数体内部出现了除了return额外的语句,则lambda对象默认返回void,所以我们需要-> return type指定返回类型.
cpp14
- can use
autoas the parameters to templatize the lambda–generic lambda
auto p = [](auto a) {cout << a << endl; };
- can capture with an initialiser–
z = x + y
cpp17
- use
constexpr:
constexpr auto Square = [](int n) { return n * n; };
- can capture
*this
cpp20
We can pass a template tail:
auto ForwardToTestFunc = []<typename ...T>(T&& ...args) {
  return TestFunc(std::forward<T>(args)...);
};
同时对于未捕获值的lambda对象,拥有了默认构造函数和赋值运算符(不再被声明为delete).
mutable
让我们把注意力移回到cpp11之前的版本,严格来说,成员函数operator()的重载应当设置一个指向常量对象的常量指针,即写为:
void operator()(...) const {
    // since there is a const,
    // if captured by reference, we can change the values captured
    // if captured by value, we cannot change it.
}
所以关键字mutable允许我们改变捕获的值:
class a {

public:
  a(int x1): x(x1) {}
  mutable int x;

  bool changeX(int y) const {
    x = y;
  }
};
关于关键字mutable的用法,其只能作用于非常量和非静态数据成员上(因为静态数据成员不属于类自己)。
globals & statics
lambda表达式仅允许捕捉当前函数中定义的具有automatic storage duration的变量,所以我们不能够捕捉global/static variables,对于定义在当前函数之外的名字,lambda可以直接使用。
storage duration
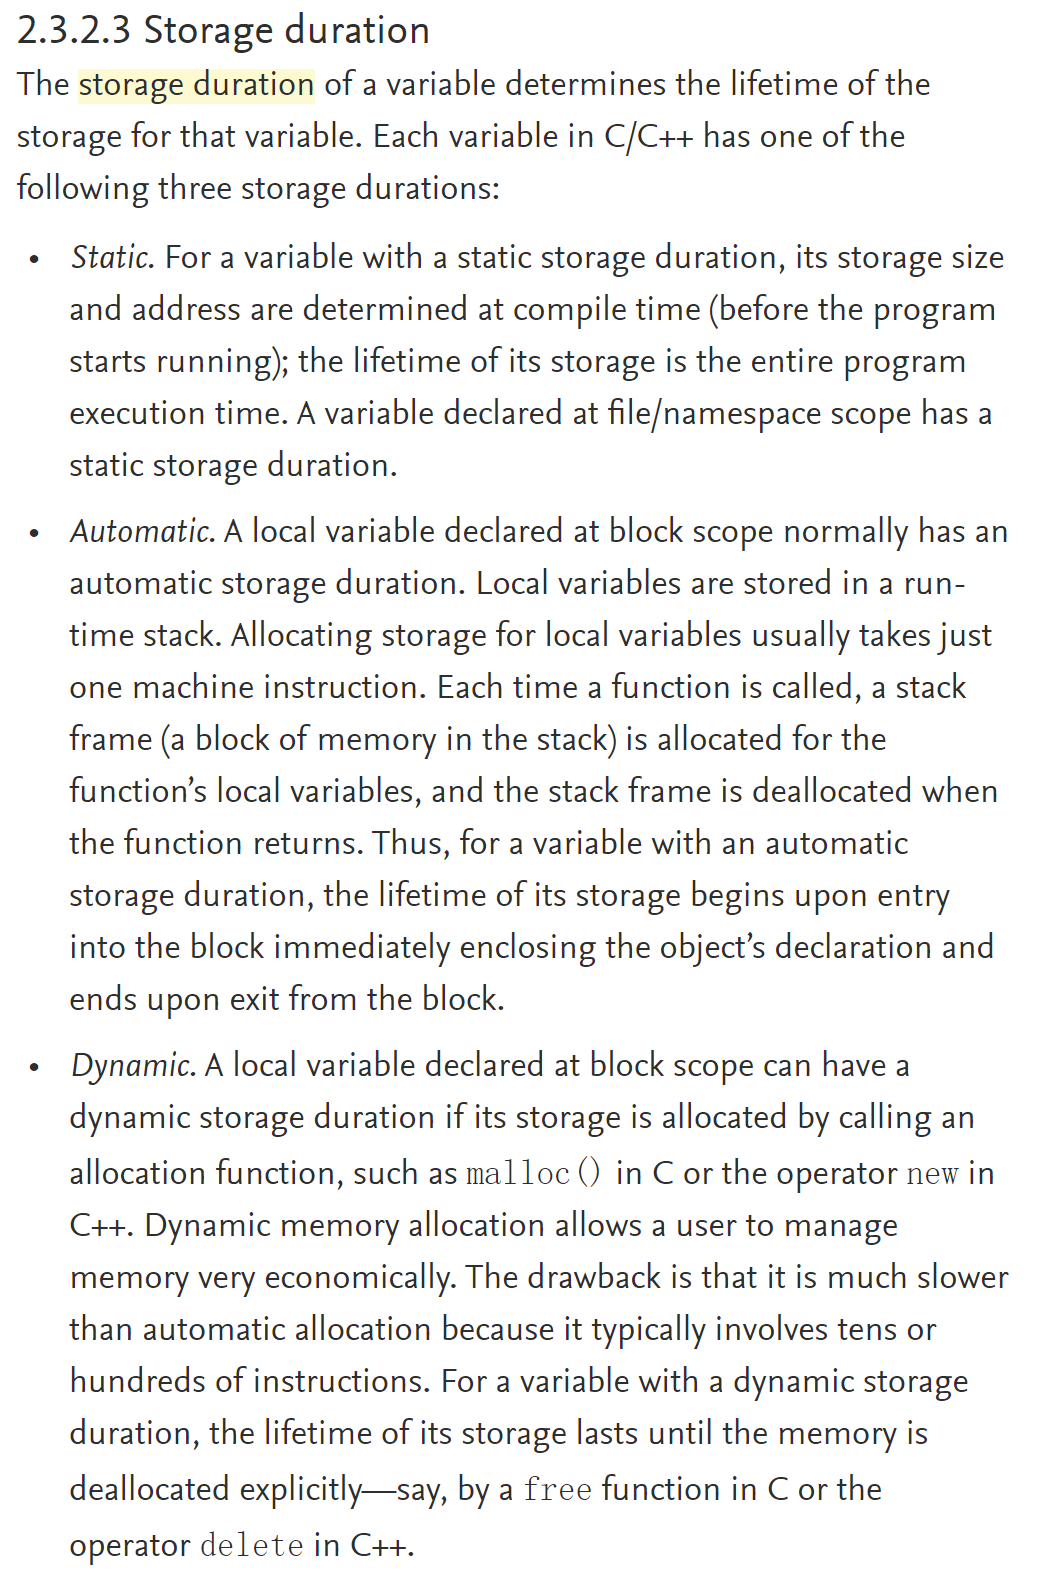
需要注意的是,对于具有static生命周期的变量,还包括我们使用static关键字定义的变量。即使我们将static variable定义到了函数中,他的生命周期也是直至程序结束,只不过在函数栈退出后,我们无法获取这个定义的变量了. 它还包括一种特殊情况,就是字符串字面值(string literals):
// a string literal
char *str = "ABCDEFG";
// NOT a string literal -- 储存在栈上
char str[] = "ABCDEFG";
这三种不同的生命周期的变量,在其后的CS 61C课程中我们会了解到,其实是对应着储存在三个不同的存储器区域:static,stack,heap.
type of lambda?
需要注意的是,lambda expression最前边的auto并不是lambda的返回值,而是函数类型。所以我们是否能够不使用auto或者说在模板中为了得到lambda的类型使用decltype关键字?
在cpp20之前,答案是不行。从定义上来说,lambda表达式的类型是闭包类型(closure type),如果我们尝试使用typeid关键字获取其类型,则即使是同一个类型的lambda对象,每一个lambda对象的typeid值也是不同的:
The type of the lambda-expression (which is also the type of the closure object) is a unique, unnamed non-union class type — called the closure type.
这是由于lambda被编译器翻译为未命名类的未命名对象(cpp Primer P508),即使定义一样,编译器也会认为每个匿名类名都不一样。
该匿名类的默认构造函数被设置为delete,并且赋值函数也被禁用,但是我们可以调用其拷贝构造函数(是否含有默认的拷贝构造/移动构造函数通常要视捕获的数据成员类型而定):
auto f = [](int x){ return x; };
decltype(f) g = f;
需要注意的是,cpp允许使用decltype提取已经计算的lambda表达式,如上所示;但是不允许提取未计算的lambda表达式类型:
decltype([](int x){ return x; }) // error
不过自cpp20起,未捕获值的lambda表达式拥有了默认构造函数和赋值运算符。
当捕获列表为空时,我们可以将lambda表达式赋值给一个拥有相同函数签名的函数指针,相应的函数指针指向的是lambda表达式内部的一个static成员函数:
int(* f)(int, int) = [](int a, int b){ return a + b; };
但是当存在捕获值时,便无法进行这种隐式转换,因为捕获对象的实体是以类成员的形式存在的,对象整体上形成一个functor。
Pass Lambda As Argument?
所以接下来要思考的一个问题是,如何才能把一个lambda表达式作为参数传进函数?
根据先前的讨论,当lambda捕获值时,我们无法执行到函数指针的隐式转换。同时此时由于我们无法确定lambda表达式的具体类型是什么,意味着使用继承,即运行期多态让lambda对象进行动态绑定不可行。那么我们只有使用模板,作为一种编译器多态,可以将lambda表达式传入函数当中。这样做的一个好处是编译器可以在编译期将lambda表达式内联进调用函数内部,加快运行速度:
template< class ForwardIt, class T >
constexpr std::pair<ForwardIt,ForwardIt>
              equal_range( ForwardIt first, ForwardIt last,
                           const T& value );
std::function
而在cpp11中,提出了std::function,它的存在使得几个可调用对象共享同一种调用形式成为可能。
// normal functions
int add(int i, int j) { return i + j; }
// lambda
auto mod = [](int i, int j) { return i % j; };
// function object class
struct divide {
    int operator()(int denominator, int divisor) {
        return denominator / divisor;
    }
}
我们也可以利用std::function来把lambda表达式传入函数中:
std::function<double(double, double)> f_mul = [a](double x, double y) { return x * y + a; };

double calculator(double a, double b, std::function<double(double, double)> fn)
{
	return fn(a, b);
}
Class template
std::functionis a general-purpose polymorphic function wrapper. Instances ofstd::functioncan store, copy, and invoke anyCopyConstructibleCallabletarget – functions, lambda expressions, bind expressions, or other function objects, as well as pointers to member functions and pointers to data members.
std::bind
除了lambda expression之外,我们还可以使用头文件<functional>中的bind方法来写先前我们所需要的predicate函数,根据官方文档给出的示例,我们可以结合占位符std::placeholders来使用该函数:
using namespace std::placeholders;  // for _1, _2, _3...

std::cout << "1) argument reordering and pass-by-reference: ";
int n = 7;
// (_1 and _2 are from std::placeholders, and represent future
// arguments that will be passed to f1)
auto f1 = std::bind(f, _2, 42, _1, std::cref(n), n);
n = 10;
f1(1, 2, 1001); // 1 is bound by _1, 2 is bound by _2, 1001 is unused
                // makes a call to f(2, 42, 1, n, 7)
在该段示例代码中,std::cref(n)的作用是为n创建一个reference_wrapper的对象,与之有相同作用的还有函数std::ref(n):
std::reference_wrapperis a class template that wraps a reference in a copyable, assignable object. It is frequently used as a mechanism to store references inside standard containers (like std::vector) which cannot normally hold references.
放到上边的例子中,就是让bind函数按照引用传递n。
比如,我们可以使用如下语法:
std::vector<std::reference_wrapper<int>> v(l.begin(), l.end());
如此一来,v内所有元素均是vector l内元素的引用。
bind()函数会给原函数创建一个call wrapper,调用wrapper函数相当于invoke f with some of its arguments bound to args.值得注意的是,bind函数声明也是通过可变函数参数实现的。
Variadic template
Variadic arguments
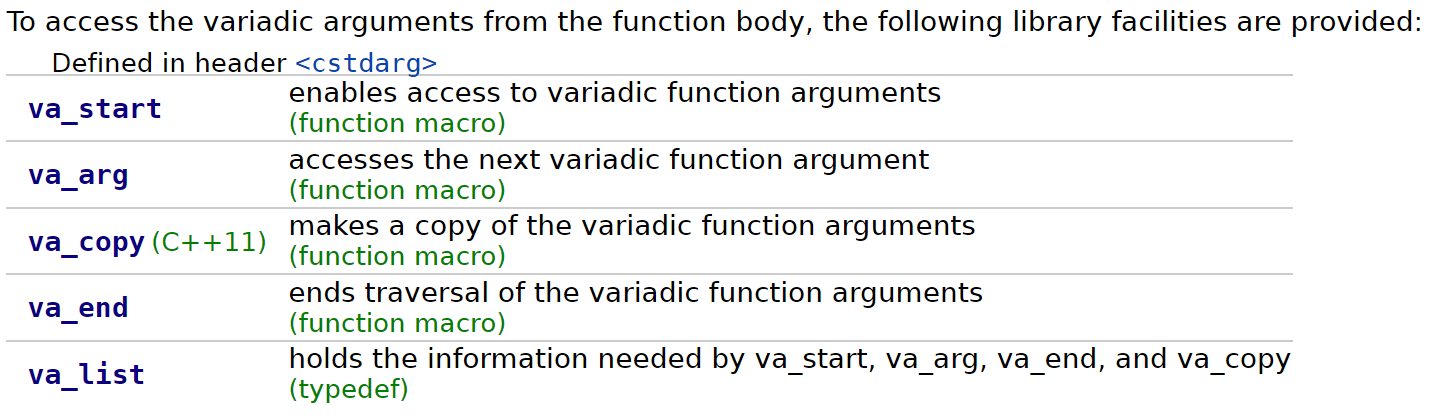
1在cpp11之前,如果我们想让一个函数接受任意参数,那么我们需要使用...的语法配合va_系列的宏来使用,文档给出了一个例子:
#include <iostream>
#include <cstdarg>

void simple_printf(const char* fmt...) // C-style "const char* fmt, ..." is also valid
{
    va_list args;
    va_start(args, fmt);

    while (*fmt != '\0') {
        if (*fmt == 'd') {
            int i = va_arg(args, int);
            std::cout << i << '\n';
        } else if (*fmt == 'c') {
            // note automatic conversion to integral type
            int c = va_arg(args, int);
            std::cout << static_cast<char>(c) << '\n';
        } else if (*fmt == 'f') {
            double d = va_arg(args, double);
            std::cout << d << '\n';
        }
        ++fmt;
    }

    va_end(args);
}

int main()
{
    simple_printf("dcff", 3, 'a', 1.999, 42.5);
}
我们首先建立一个va_list的对象用于储存余下几个宏需要的信息,之后调用va_start,允许程序访问后随具名参数parm_n的可变参数:
void va_start( std::va_list ap, parm_n );
之后每当我们调用一次va_arg,就可以获取va_list内的下一个参数;最终调用va_end终止这一过程。
需要注意的是,在使用variadic arguments时,...必须跟随在参数列表之后,而不允许被放到参数列表的前边。但是在cpp中,这样的使用方式是被允许的:
int printz(...)
这种使用方式在模板重载中被作为SFINAE的fallback overload使用,因为...最不specialized,所以在overload resolution中具有最低的优先级。
fallback is a function that does not take any arguments and does not return anything.
Parameter pack
上一节中提到的variadic argument与parameter pack不一样:
Note: this is different from a function parameter pack expansion, which is indicated by an ellipsis that is a part of a parameter declarator, rather than an ellipsis that appears after all parameter declarations. Both parameter pack expansion and the “variadic” ellipsis may appear in the declaration of a function template, as in the case of std::is_function.
换而言之:
// variadic arguments
int printx(const char* fmt...);
// parameter pack
void foo(const T &t, const Args&... rest);
parameter pack是构成variadic template的基础:
A template with at least one parameter pack is called a variadic template.
共有两种参数包:模板参数包与函数参数包:
template <typename T, typename... Args> // a template parameter packet
void foo(const T &t, const Args&... rest); // a function parameter packet
我们如何理解上边的语句?可以举例来想,模板参数包中将各种不同的可能出现的类型(int, double, char* ...)打包,之后把这个包交给函数,函数对包Args做包扩展(packet expansion),传入的每一种类型都可能存在多个元素,比如double a, double b...,于是对每一种类型(即模板参数包中的每一个对应元素)打包、组合成一个名为rest的函数参数包。
需要注意的是,对于
class template,参数包只能出现在最后一个参数的位置上。但是对于function template,参数包可以出现在任意位置上。
Packet expansion
在上一节中,提到了包扩展:pattern…,扩展一个包就是将他分解为构成的元素,并对每个元素应用模式pattern:
template<class ...Us> void f(Us... pargs) {}
template<class ...Ts> void g(Ts... args) {
    f(&args...); // “&args...” is a pack expansion
                 // “&args” is its pattern
}
g(1, 0.2, "a"); // Ts... args expand to int E1, double E2, const char* E3
                // &args... expands to &E1, &E2, &E3
                // Us... pargs expand to int* E1, double* E2, const char** E3
包扩展可以出现在函数调用符()内部,根据官方文档:
f(&args...); // expands to f(&E1, &E2, &E3)
f(n, ++args...); // expands to f(n, ++E1, ++E2, ++E3);
f(++args..., n); // expands to f(++E1, ++E2, ++E3, n);
f(const_cast<const Args*>(&args)...);
// f(const_cast<const E1*>(&X1), const_cast<const E2*>(&X2), const_cast<const E3*>(&X3))
f(h(args...) + args...); // expands to
// f(h(E1,E2,E3) + E1, h(E1,E2,E3) + E2, h(E1,E2,E3) + E3)
一个包扩展的例子可参见cpp Primer P621,需要注意的是,在例中进行函数调用时的包扩展,先将包中第一个参数剥离(peel off),对应了const T &t,余下的元素构成了新的参数包,并递归调用,直到我们遇到了base case,并使用对应了非可变参数函数模板:
// base case function
template<typename T>
ostream &print(ostream &os, const T &t) {
    return os << t;
}

template<typename T, typename... Args>
// the first packet expansion, using pattern `const Args&`
ostream& print(ostream &os, const T &t, const Args&... rest) {
    os << t << ", ";
    // the second packet expansion, using pattern `rest`
    // then peel off the first element in the expansion list to be `const T &t`
    // recursion with the list with other elements
    return print(os, rest...);
}
sizeof...
我们可以通过使用sizeof...()得到包中参数的数目。
Performance
摘自:https://eli.thegreenplace.net/2014/variadic-templates-in-c/
If you’re concerned with the performance of code that relies on variadic templates, worry not. As there’s no actual recursion involved, all we have is a sequence of function calls pre-generated at compile-time. This sequence is, in practice, fairly short (variadic calls with more than 5-6 arguments are rare). Since modern compilers are aggressively inlining code, it’s likely to end up being compiled to machine code that has absolutely no function calls. What you end up with, actually, is not unlike loop unrolling.
Compared to the C-style variadic functions, this is a marked win, because C-style variadic arguments have to be resolved at runtime. The
va_macros are literally manipulating the runtime stack. Therefore, variadic templates are often a performance optimization for variadic functions.
range
在cpp20中,提出了range的概念,写了一个range库,其中包含range, view, range adaptor等……但这里不打算深究,具体详见官方文档以及这篇文章。
Object-Oriented Programming
Const
几种不同的const含义:
// 指向整型常量的指针(可修改指针本身,不可修改指针指向的对象)
const int* a;
// or:
int const* a;

// 指向整形的常量指针(不可修改指针本身,可修改指针指向的对象)
int* const a;

// 根据《cpp Primer》,this指针默认为指向非常量对象的常量指针,
// 此操作将this指针设定为指向常量对象的常量指针
void func() const
Why initialization-list?
加入我们将对象定义为const类型,那么在声明之后,对象就不可以再改变了,这意味着一般的构造函数初始化方法会出现问题(先建立对象,再挨个初始化其元素)。而initialization list在建立对象的同时立即初始化其所有元素:
test(int num1, double str1): num(num1), str(str) {};
我们也可以直接使用大括号初始化列表(brace-init-list),编译器也会为我们选择合适的对应的构造函数(如果需要的话):
class foo {
public:
    foo(size_t size):
        size{size},
        vec{size, nullptr} {}
private:
    vector<int*> vec;
    size_t size;
};
friend
类的友元函数是定义在类外部,但有权访问类的所有私有(private)成员和保护(protected)成员。尽管友元函数的原型有在类的定义中出现过,但是友元函数并不是成员函数。
友元可以是一个函数,该函数被称为友元函数;友元也可以是一个类,该类被称为友元类,在这种情况下,整个类及其所有成员都是友元。
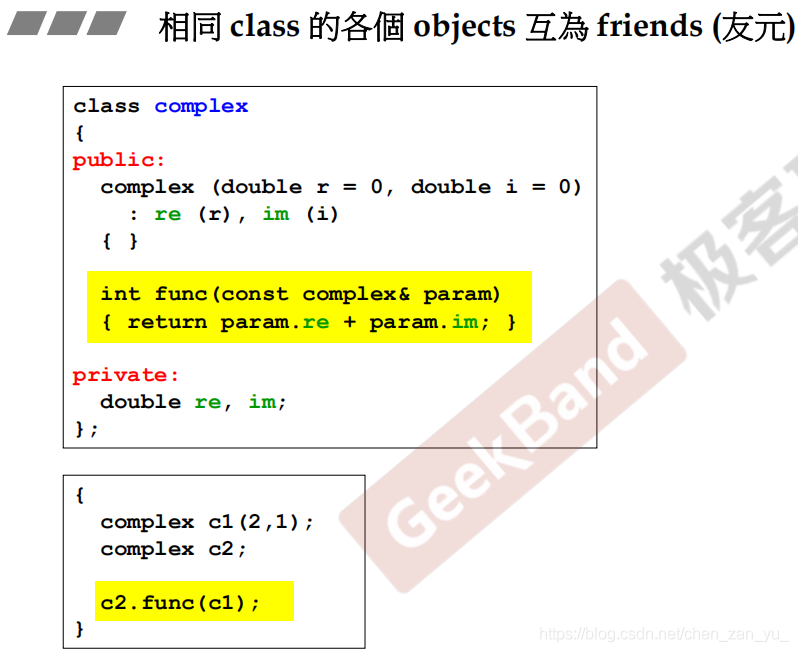
相同class的各个objects互为友元:
Mutual friends class
在完成HashMap作业的过程中,出现了Container与Iterator类需要互为友元的问题,这一问题在模板的章节中已有提到,但是对于这种特殊的Mutual friends class行为并未作出过多的解释。
当A, B两个类互为友元时,我们称这两个类为Mutual Friends Classes。为了解决这个问题,我们首先要知道,当一个类仅有声明,而没有定义时,类为不完整类型。我们仅能够使用指向该类的指针、引用或者将类作为形参和返回值出现在函数声明中。
one file
当这两个类位于同一文件中时:
- 作类
B的前置声明(forward declaration),告知类A存在一个名为B的类; - 定义类
A,在类A中将类B声明为友元,对于需要用到类B的函数,仅提供函数声明,因为此时我们还不知道B的具体定义; - 定义类
B,提供完整定义; - 将类
A中需要调用B的方法定义补充完整
// Forward Declaration
class B;

// Class A
class A {

    // Member of class A
    int data;

public:
    // Make B as a friend of class A
    friend class B;

    // Constructor to initialise member
    // of class A
    A(int d) { data = d; }

    // Function to get data of friend
    // class B
    void get_data_B(B objb);
};

// Class B
class B {

    // Member of class B
    int dataB;

public:
    // Making A a friend of class B
    friend class A;

    // Constructor to initialise member of
    // class B
    B(int d) { dataB = d; }

    // Function to get the data of
    // friend class A
    void get_data_A(A obja)
    {
        cout << "Data of A is: "
             << obja.data;
    }
};

// Function for accessing friend class
// B's object
void A::get_data_B(B objb)
{
    cout << "Data of B is: "
         << objb.dataB;
}
separate file
当类A与类B分别定义在不同的文件中时,我们需要注意应当避免出现头文件递归包含额情况,也就是说我们不可以在A.h中包含了B.h的同时反过来也同时包含另一个文件。
假定我们现在B.h包含了A.h,那么在文件A.h中,我们应当使用先前提到的策略:做一个类B的前置声明,并且同样地不可以在类A内部提供类B的内部信息:
- A.h
/* This is called a "forward declaration".  We use it to tell the compiler that
   the identifier "B" will from now on stand for a class, and this class will be
   defined later.  We will not be able to make any use of "B" before it has been
   defined, but we will at least be able to declare pointers to it. */
class B;

class A
{
    /* We cannot have a field of type "B" here, because it has not yet been
       defined. However, with the forward declaration we have told the compiler
       that "B" is a class, so we can at least have a field which is a pointer
       to "B". */
    B* pb;
}
- B.h
#include "A.h"

class B
{
   /* the compiler now knows the size of "A", so we can have a field
      of type "A". */
   A a;
}
template mutual friends
在hashmap的作业里,我们看到了这种用法:两个文件hashmap.h与hashmap_iterator.h中,前一个文件对后一个文件,即提供了迭代器类的文件做了包含,但是在hashmap_iterator.h中我们发现,即使不提供HashMap的前置声明,运行也不会报错,这是为什么呢?
这是因为在hashmap_iterator.h中,我们对iterator做了模板类的定义,在模板参数中包含了HashMap类型,这允许我们直接通过作用于运算符::来获取(不需要提供其他任何参数,因为在hashmap_iterator模板类被实例化之后,我们便得到了其模板参数HashMap的具体类型):
HashMap中的类型别名定义HashMap的静态成员
于是这里出现一个问题,如果我们要用到HashMap中的非静态成员变量、函数怎么办呢?这些内容我们无法直接通过::的方法获取,而因为我们是把container class name放到了template parameter中更是无法直接在此类中给出实例化类名的代码从而通过成员访问运算符获取非静态内容。
我们可以通过如下手段解决此问题:首先把需要使用的容器非静态类成员转化成使用类型别名表示的形式,之后在友元类中使用::获取其类型,定义一个该类型的指针,并将指针初始化指向容器成员:
// friend class, class type foo as template parameter
template<typename foo>
class foo_1 {
    // since foo will be a complete type even if it's a template class,
    // we can directly write 'foo'
    friend foo;
    // the type of vector, defined in the hashmap class
    // since it's a type, we can directly use :: to get it here!
    using bucket_array_type = foo::bucket_array_type;

    // thyen, make a pointer!
    bucket_array_type* _buckets_array;

    // in iterator class, we shall use private constructor
    // iterator's constructor, we will use it in the
    // hashmap class
    foo_1(bucket_array_type* _buckets_array):
    	_buckets_array(_buckets_array) {}

public:
	// some member functions
};

class foo {
private:
    vector<node*> _buckets_array;

    using bucket_array_type = decltype(_buckets_array);
    // foo_1's template specialization of <foo> type
    friend class foo_1<foo>;

public:
    foo(/* */);
    foo_1 begin() {
        // call iterator constructor here
        /** give the address of the vector to initialize the
         * pointer pointing to vector<> type in the iterator
         * class */
        return {&_buckets_array};
    }
};
经过类似的操作,我们便可以获得指向这些成员类型的指针,比如对于原容器中的vector,我们可以使用decltype(vector_name)的方式获取该容器的类型,而对于vector<>类型来说,指向它的指针其实就像我们所使用的最最普通的数组一样,是&array_name的形式!
我们在构造函数中将这个指针指向类foo中对应的成员(用foo的成员初始化它们),也即_buckets_array。这样一来,我们便可以在友元类中对另一个类中的成员进行操作了。
Operators
基本的用例略过,这里记录课件中几点关键的原则:
General rule of thumb
- Some operators must be implemented as members ( eg. [], (), ->, =) due to cpp semantics.
因为成员函数隐藏的第一个参数一定是
this,即对象的地址,而使用这些操作符时我们无法在别处提供对象地址.
- Some must be implemented as non-members (eg. «, if you are writing class for rhs, not lhs).
因为第一个参数要是
ostream& os,所以必不可能为成员函数.
If unary operator (eg. ++), implement as member.
If binary operator and treats both operands equally (eg. both unchanged) implement as non-member (maybe friend). Examples: +, <.
根据官方文档:
Binary operators are typically implemented as non-members to maintain symmetry (for example, when adding a complex number and an integer, if
operator+is a member function of the complex type, then onlycomplex+integerwould compile, and notinteger+complex).
何为symmetric?
根据Wikipedia:
A corresponding property exists for binary relations; a binary relation is said to be symmetric if the relation applies regardless of the order of its operands.
因为定义为非成员函数,所以需要友元,以下是最习惯的一种重载二元运算符的方式:
// friends defined inside class body are inline and are hidden from non-ADL lookup
  friend X operator+(X lhs,        // passing lhs by value helps optimize chained a+b+c
                     const X& rhs) // otherwise, both parameters may be const references
  {
    lhs += rhs; // reuse compound assignment
    return lhs; // return the result by value (uses move constructor)
  }
需要注意的是,当我们在类模板中定义友元函数时,我们还需要为友元函数单独提供一份模板参数,而不能直接利用类模板参数–因为友元本身并不属于类成员的一部分:
template<typename K, typename M, typename H=std::hash<K>>
class foo {
    // do something
    template<typename K_, typename M_, typename H_>
    friend std::ostream& operator<<(std::ostream& os, const foo<K_, M_, H_>& foo_1);
};
- If binary operator and not both equally (changes lhs), implement as member (allows easy access to lhs private members). Examples: +=
  X& operator+=(const X& rhs) // compound assignment (does not need to be a member,
  {                           // but often is, to modify the private members)
    /* addition of rhs to *this takes place here */
    return *this; // return the result by reference
  }
->
在HashMap的作业中,我们需要在iterator类中对成员访问操作符进行重载。该运算符的重载可能看起来有些奇怪,实际上,运算符重载的结果不是简单的替换原则,比如我们可能认为obj->value重载替换之后应当被理解为ptrvalue(ptr是私有指针成员),但实际上该运算符的重载结果为:
(obj.operator->())->value;
obj是一个类对象,它使用运算符重载函数operator->()之后,我们知道一般是要返回一个指针(比如在迭代器的实现中,是利用迭代器内置指针指向对应的容器中的数据的一个指针),之后程序会在该运算符重载函数返回值上调用指针自己的->运算符来获取指向的数据成员。
[]
一般来说,我们需要重载operator []的两种形式(const与非const),这是为了解决当我们定义的对象本身即为const类型时可能出现的问题:
由于this指针默认是一个指向非常量对象的常量指针,如果对象被声明为const,则指this为指向常量对象的常量指针,只有在我们将成员函数后加上const,才可以使得参数中实参类型为const test*,否则势必丢失底层const。(这也是为什么const成员函数内只允许调用const成员函数的原因)。同时需要注意,该函数可以返回引用,引用前也应当有const,确保不能改变对象:
const string& vector<string>::operator[](size_t index) const {
    // do something
}
Principle of Least Astonishment (POLA)
这里只提几点:当我们实现了+的重载时,我们最好也要实现类似于+=的重载,类推:
同时,我们也要注意能够链式使用重载运算符的计算结果(靠运算符重载函数返回对象或者对象的引用来实现):
ostream& operator<<(ostream& out, const Fraction& f) {
    out << f.num << “/”<< f.denom;
    return os;
}
Converting constructor & Conversion operator
Converting constructor
如果
构造函数可以只接受一个实参(包括对其余所有形参提供了默认值的情况),则它实际上定义了由实参类型转换为类类型的隐式转换机制。这种构造函数被称为转换构造函数。
仅接受一个实参的规定仅在cpp11之前适用。在cpp11之后,converting constructor的定义变为:
没有由
explicit关键字修饰的构造函数
cpp PrimerP264:
编译器只会自动执行一步隐式转换,也就是说如果我们接受一个
string类型的参数,那么我们不能直接把char*放进去,否则自动转换为string后,不会继续隐式转换了.(但我们可以做显式转换):
class test_explicit {
public:
 test_explicit(string text): text(text) {}
 string combine(const test_explicit& new_text) {
     return text + new_text.text;
 }
private:
 string text;
};
// OK, implicit conversion:
string new_value = "9999";
cout << "Combine value: " << foo_1.combine(new_value) << endl;

// error, only permit one conversion:
cout << "Combine value: " << foo_1.combine("9999") << endl;
我们可以通过关键字explicit来抑制构造函数定义的隐式转换:
class test_explicit {
public:
    explicit test_explicit(int i): data(i) {}
    int combine(const test_explicit& new_value) {
        return data + new_value.data;
    }
private:
    int data;
};

// error, try to converting implicitly from int to test_explicit type
string new_value = "9999";
cout << "Combine value: " << foo_1.combine(new_value) << endl;
需要多个实参的构造函数不能用于执行隐式转换,所以无需将其定义为explicit的。同时,只能在类内声明构造函数时使用explicit关键字,在类外部定义时不应重复。
注意,当拷贝构造函数被声明为
explicit时,表明拷贝构造函数不能被隐式调用,所以,如果我们尝试使用=进行拷贝初始化(隐式调用了拷贝构造函数),也是不被允许的:
string null_book = "9999";
Sales_data item2 = null_book; //error
explicit可以避免我们写出二义性的代码。
Conversion operator
explicit关键字除了可以用在构造函数之前外,还可以用在类型转换运算符前:
explicit operator double() const {
    // do something
}
类型转换运算符是类的一种特殊成员函数,一般形式便如(因为一般不改变原对象的内容,所以声明为const):
operator type() const;
一个可能借此机会发生隐式类型转换的例子(cpp Primer P516)是:
int i = 42;
cin << i;
如果这里cin的operator bool() const没有被声明为explicit,那么由于cin并没有<<重载,编译器会尝试将cin转化为一个bool,之后将<<理解为一个移位运算符!
使用了
explicit后,该规定存在一个例外,如果表达式被用作条件,则编译器会将显式的类型转换自动应用于它。operator bool一般定义成explicit的.
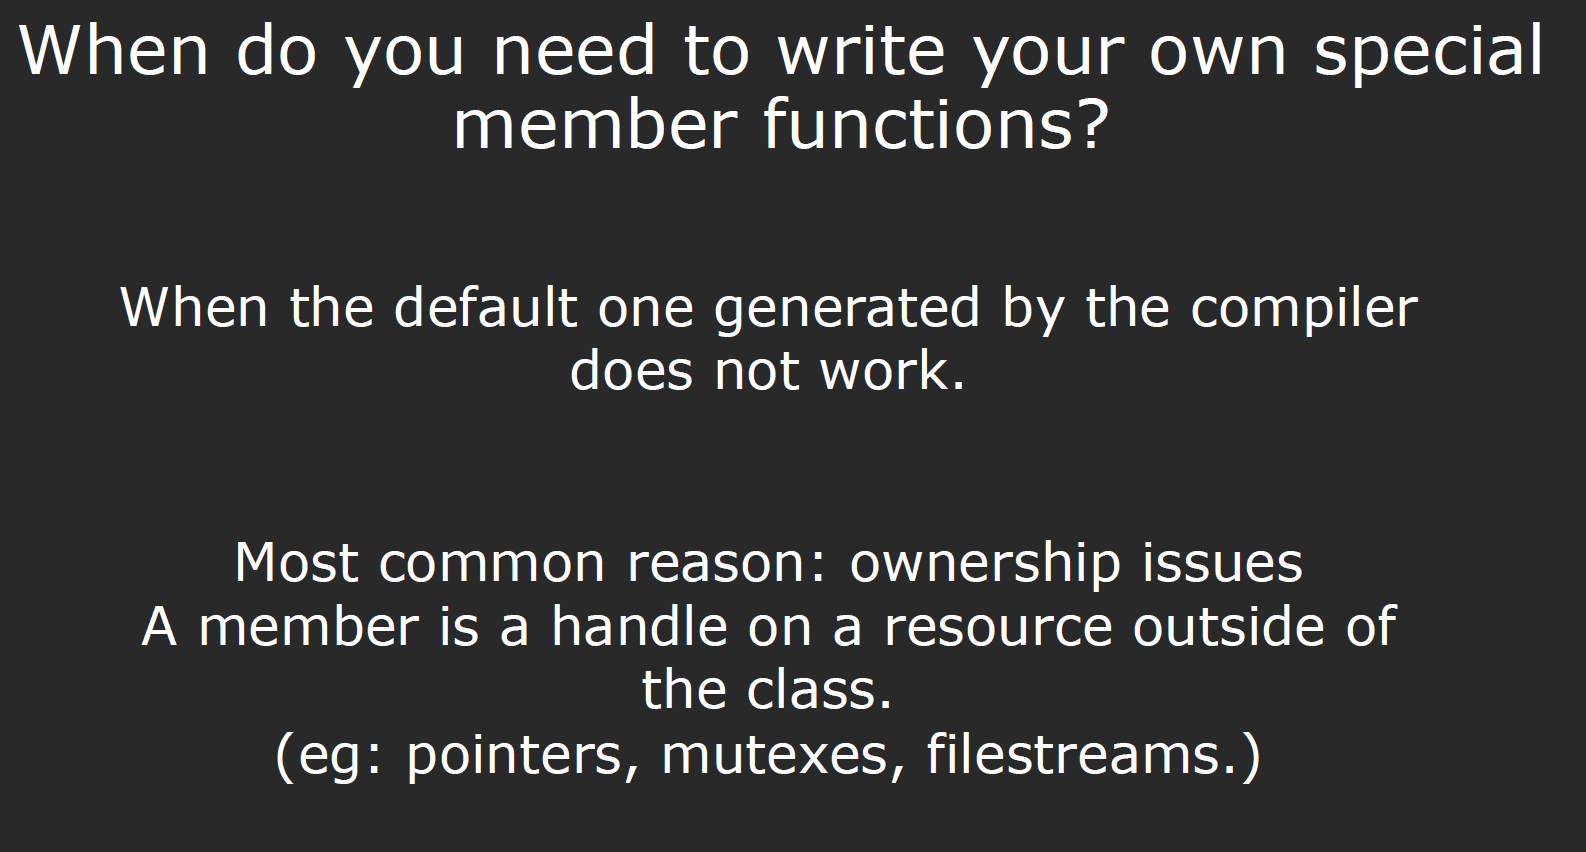
Special member functions
这些函数会由编译器自动生成一份:
- Default construction
- Copy construction
- Copy assignment
- Destruction
Most vexing parse

根据Wikipedia的解释:
The most vexing parse is a counterintuitive form of syntactic ambiguity resolution in the cpp programming language. In certain situations, the cpp grammar cannot distinguish between the creation of an object parameter and specification of a function’s type. In those situations, the compiler is required to interpret the line as a function type specification.
简而言之,编译器不能判断这是一个初始化操作还是在调用函数,在这种情况下,他被当作一个函数来处理了。**所以不要这么写!**我们可以使用cpp11中的Uniform initialization(a{x})来规避歧义。
需要注意的是,上图中在函数结尾返回对象时调用的即是copy constructor.
shallow copy & deep copy
编译器在默认情况下生成的copy assignment就是一种shallow copy,而我们需要的往往是deep copy,shallow copy带来的问题很明显,它并没有完全复制所有的数据,而是用指针指向了源数据存放的位置:
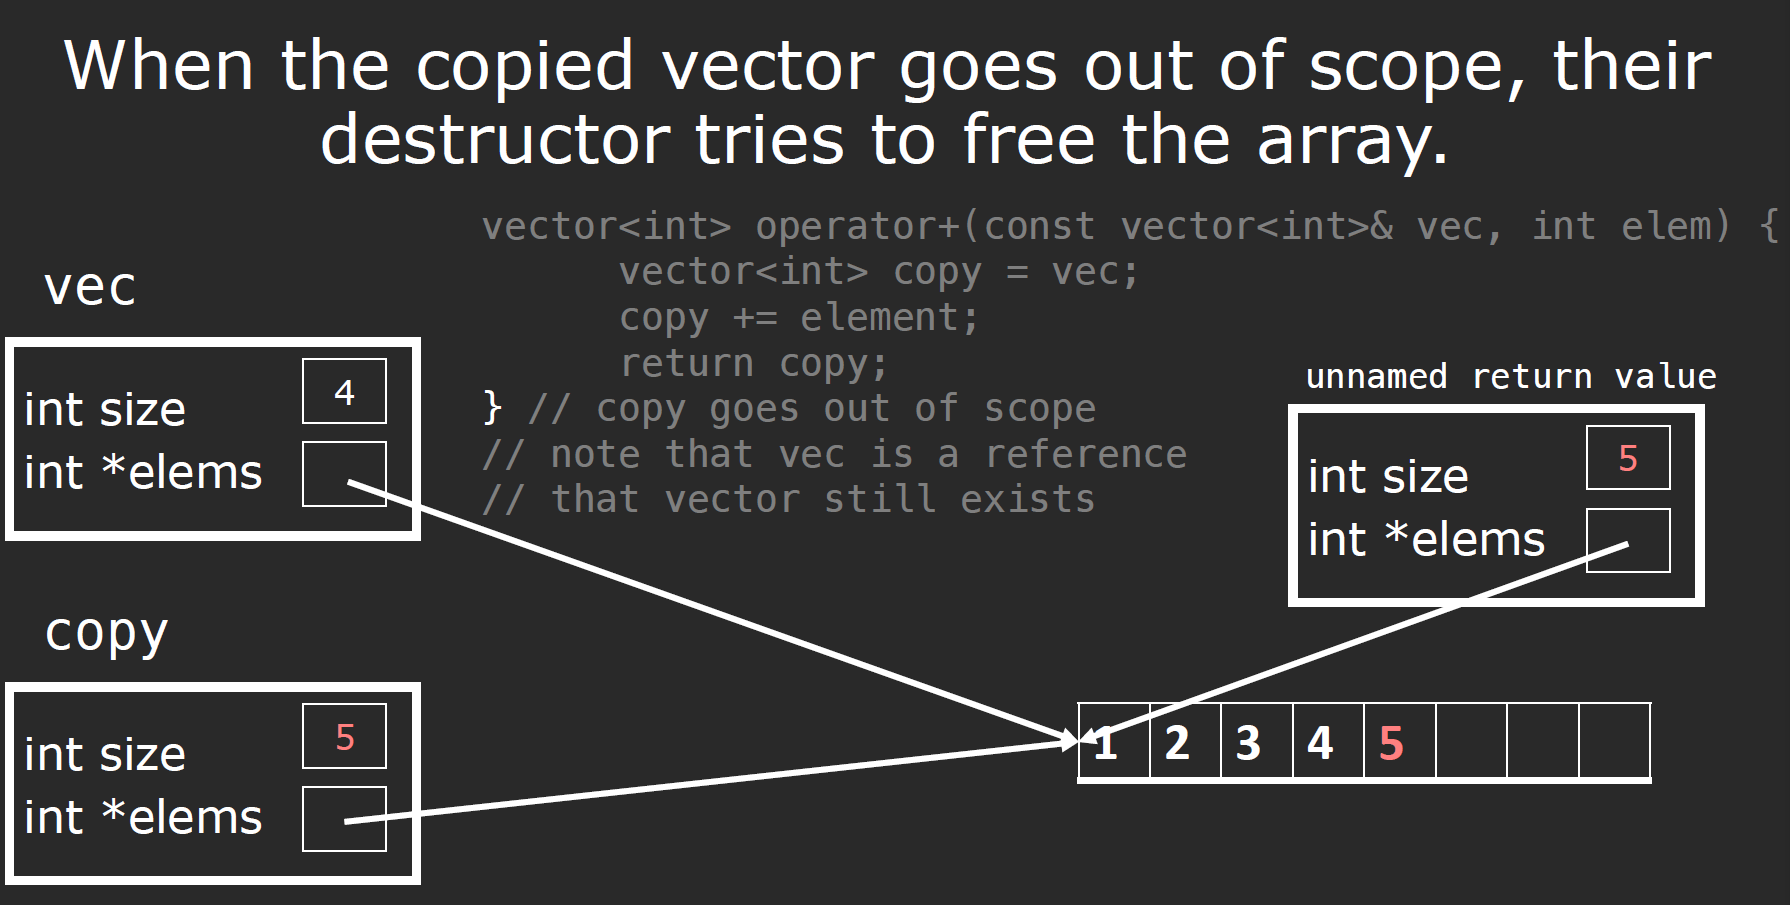
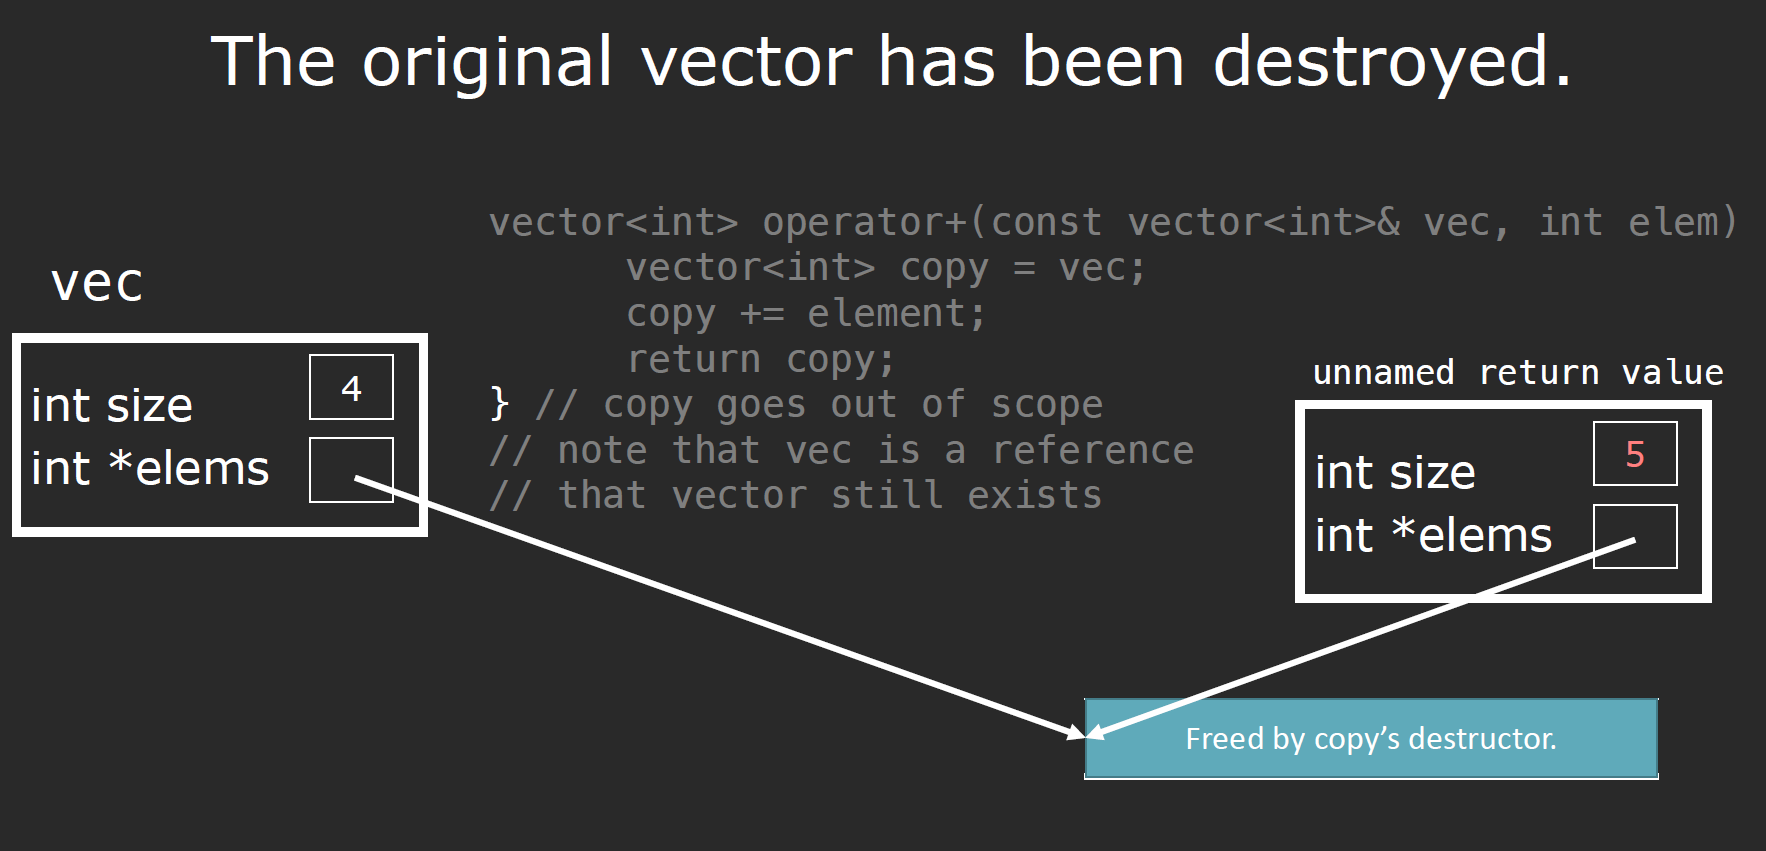
Copy constructor
StringVector::StringVector(const StringVector& other) :
        _logicalSize(other._logicalSize),
        _allocatedSize(other._allocatedSize) {

    _elems = new ValueType[_allocatedSize];
    std::copy(other.begin(), other.end(), begin());
}
Copy assignment
需要注意的是,在copy assignment中,我们要考虑到copy的对象与源对象是同一个的情况(self-assignment):
StringVector& StringVector::operator=(const StringVector& rhs) {
    if (this != &rhs) {
        delete [] _elems;
        _logicalSize = rhs._logicalSize;
        _allocatedSize = rhs._allocatedSize;
        _elems = new ValueType[_allocatedSize];
        std::copy(other.begin(), other.end(), begin());
    }
    return *this;
}
不可以用
*this != rhs,因为这需要我们重载!=操作符.
=delete & =default
如果我们的类不需要拷贝/移动操作,我们需要在public域中使用=delete将其禁用(但=delete关键字并非只适用于这几种函数,该关键字意为“弃用”):
test(const test&) =delete;
test& operator=(const test&) =delete;
如果我们需要默认的行为,可以要求编译器提供生成默认构造函数(一般此时我们还需要其它类型的构造函数)
test() = default;
Write our own?
需要注意的是,stream对象均不可被复制,因为这样的操作没有意义,而在实现中,他们的复制构造函数也都被声明为private。
Rule Of Three
If you explicitly define (or delete) a copy constructor, copy assignment, or destructor, you should define (or delete) all three.
因为当定义了这三种函数的任意一种时,就表明会出现ownership issues.
Rules of Zero
If the default operations work, then don’t define your own custom ones.
Delegating Constructor
cpp11引入了委托构造函数–使用它所属类的其他构造函数执行他自己的初始化过程,或者将自己的职责委托给其他构造函数:
class Sales_data {
public:
    Sales_data(): Sales_data("", 0, 0) {}
    // other constructors
}
inline & constexpr
内联函数(inline),在编译过程中内联地在调用点展开,从而消除函数在运行时的开销。inline本义是将所调用函数用自身的函数本体替换之,免受函数调用所招致的额外开销,比宏还要不易出错;但是实际上inline的受编译器的控制,编译器根据执行语境来对inline函数是否做优化,inline只是对编译器的申请,不是强制命令。(如果函数体比较大,用inline关键字可能导致编译产生的目标文件过大,导致额外的换页行为,降低CPU高速缓存的命中率,效率有损失;当然如果inline函数本体很小,还可能导致更小的目标文件和更高的CPU SRAM的命中率).
一般来说,内联函数用于优化规模较小,流程直接,频繁调用的函数。定义在类内部的函数是自动
inline的。
constexpr函数是指能用于常量表达式的函数:它的返回类型、所有的形参类型都是字面值类型,而且函数体中除了using/typedef等在运行时不执行任何操作的语句外,只能有一条return语句:
constexpr int new_sz() {return 42;}
constexpr int foo = new_sz(); // foo is a const expression
算术类型、引用和指针(初始值必须为
nullptr或者0,或者存储于某个固定地址的对象–一般定义于函数体之外)类型均为字面值类型,自定义类、IO库、string类型不是字面值类型,不可以被定义为constexpr。
我们允许constexpr函数的返回值并非一个常量:当给入函数的实参是常量表达式时,返回值也是常量表达式,反之不然:
constexpr size_t scale(size_t cnt) { return new_sz() * cnt;}
// OK
int arr[scale(2)];
// ERROR
int i = 2;
int arr[scale(i)];
编译器对constexpr函数的调用替换为结果值,为了能在编译中随时展开,constexpr函数被隐式指定为inline函数。
正因为
inline与constexpr函数的编译展开特性,仅仅有函数声明是不够的,还需要函数的定义–所以他们的定义通常直接放在头文件中。
Move semantics
emplace_back
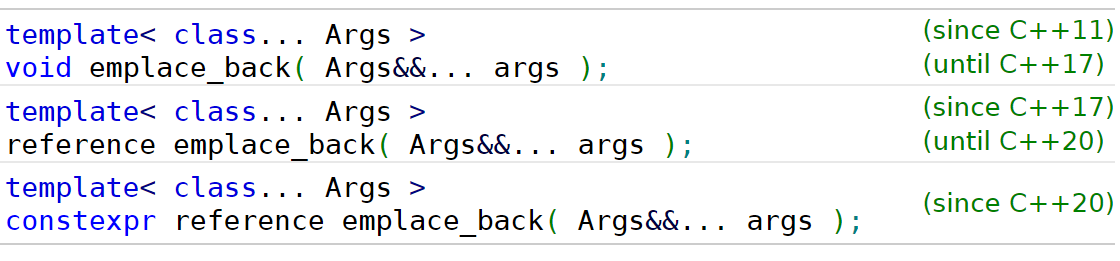
该函数的参数声明是用了可变参数模板,并对参数包Args进行了pattern=Args&&的pack expansion操作。与push_back方法所不同的是,该方法借助右值引用,也就是我们接下来要谈的特性,避免了先创建一份数据,再复制的操作,而是直接给定需要的数据元素参数,加入数据队列中:
std::vector<President> elections;
std::cout << "emplace_back:\n";
auto& ref = elections.emplace_back("Nelson Mandela", "South Africa", 1994);
assert(ref.year == 1994 && "uses a reference to the created object (cpp17)");

std::vector<President> reElections;
std::cout << "\npush_back:\n";
reElections.push_back(President("Franklin Delano Roosevelt", "the USA", 1936));
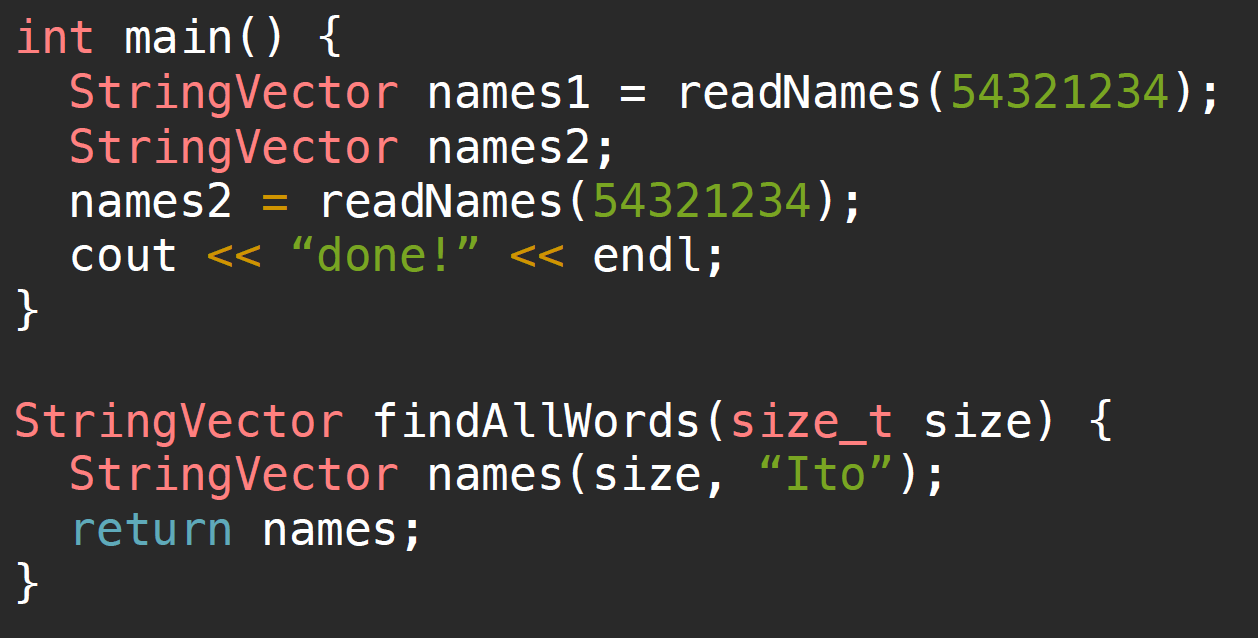
Without copy elision
在上图所示的代码中,需要注意的是,在不进行RVO等优化机制时,return这一步会创建一个temporary object,这需要我们调用复制构造函数,将变量names复制到临时对象中。
Basic idea
根据这篇文章,为了提高运行效率,我们尝试使用某种方法避免一些不必要的数据复制过程,比如当给到这样一个拷贝赋值函数:
X& X::operator=(X const & rhs)
{
  // [...]
  // Make a clone of what rhs.m_pResource refers to.
  // Destruct the resource that m_pResource refers to.
  // Attach the clone to m_pResource.
  // [...]
}
现在,假设X被如下使用:
x foo();
// do something
x = foo();
那么相比起在先前的函数体描述中的方法,是否存在一种更为高效的方法让X获取当前foo()的内容呢?我们想如果可以直接将指向X与指向temporary object的指针交换一下(即让X拿到这个行将销毁的临时对象的控制权,而不是想着再去复制一份给自己用),不是更为高效嘛?于是我们有了一个期望的函数模板:
X& X::operator=(<mystery type> rhs)
{
  // [...]
  // swap this->m_pResource and rhs.m_pResource
  // [...]
}
我们需要一种新的mystery type,表示传入了一个右值(因为打算直接利用临时对象),并且可以让程序在编译阶段识别出到底是应该使用这个新的重载拷贝赋值函数还是先前的传入左值引用的那一个。因为我们此处想要实现的也是一种copy assignment overload,所以传入的也要是一种引用类型,并且传入的要是一个右值,故rvalue reference(&&)被引入作为mystery type,我们期望该类型具备如下的行为特征:
rvalues must prefer the mystery type, while lvalues must prefer the ordinary reference.
程序对于这两种成员重载函数(传入左值或者右值)的选择通过overlaod resolution实现:
Rvalue references allow a function to branch at compile time (via overload resolution) on the condition “Am I being called on an lvalue or an rvalue?”
如果说我们传入的是左值,那么程序仍然会按照之前的重载函数运行(包含复制等一系列操作),我们不能偷取左值中存放的内容,因为之后可能还会用到;但如果我们传入的是右值,因为右值表达式行将销毁。
基于上述特性,我们想把等式右边的内容偷过来,或者说我们想让等式左边的内容的指针指向等式右边的右值的内容,而不是把右值的内容复制到左边一份。这种操作(想法)被叫做move semantics。
完整的来说,我们希望移动赋值函数具有如下定义:
X& X::operator=(X&& rhs)
{

  // Perform a cleanup that takes care of at least those parts of the
  // destructor that have side effects. Be sure to leave the object
  // in a destructible and assignable state.

  // Move semantics: exchange content between this and rhs

  return *this;
}
先把等式左边的内容清空,再把等式右边的内容拿过来,这也符合我们对赋值的作用定义。并且通过这个函数伪代码可以看出,当我们在等式右边给一个右值之后,就是告诉程序我们打算做move semantics了,具体如何去move,如何cleanup,如何交换控制权(ownership),是由我们自己所定义的行为(e.g. 一个类移动构造函数)决定的。
std::move正是通过强制将左值转换为右值的方法,使得外部函数可以调用如上所示的右值重载,使得等式左边的对象获得给入的右对象的实际控制权:
struct A {
    A(A&& a) {
        this->data = a->data;
        a->data = nullptr;
    }
};
PS: 这也是为什么我们说在进行移动后,我们不能对源对象的值做任何假设(在后边有提到)的原因,右对象的控制权(指针)已经被交出去了.
lvalues & rvalues
根据官方文档,每一个Expression都具备两个独立属性:
type(e.g. int, double, class, …)
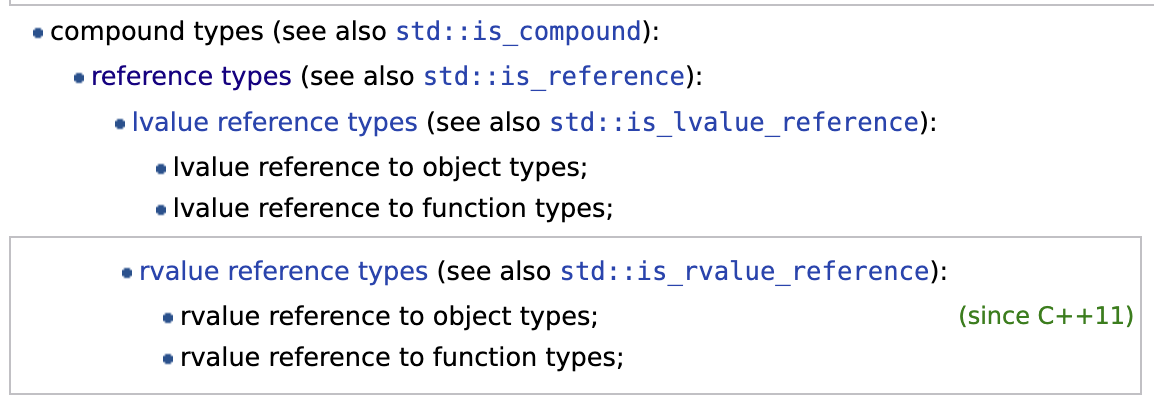
需要特别注意的是,有一种特殊的类型为reference type:
比如拿std::forward的实现来讲:
// forward:
template<class S>
S&& forward(typename remove_reference<S>::type& a) noexcept
{
  return static_cast<S&&>(a);
}
这里的type就是rvalue reference type。
value category
如果按照标准定义,共有三种基本的value category: prvalue, xvalue, lvalue。在这里,我们做两个粗略的定义:左值与右值:
lvalue
An lvalue is an expression that has a name/identity. In other words, we can find address using address-of operator(&var)
rvalue
An rvalue is an expression that does not have a name/identity.
- temporaray values
- cannot find address using address-of operator (&var)
从直观上来说,左值可以出现在表达式的左侧或者右侧,但是右值一定只能出现在右侧。
右值引用,利用rvalue的结果,但本身为lvalue.
l/rvalue reference
需要注意的是,我们只能够将左值引用绑定到左值,右值引用绑定到右值,
// rvalue reference
// here, v1 + v2 is a temporary object, which is a rvalue
auto&& v4 = v1 + v2;
一种特殊情况是:可以将const lvalue reference绑定到rvalue上:
const auto& ptr3 = ptr + 5;
原因如下:
Normally, a temporary object lasts only until the end of the full expression in which it appears. However, cpp deliberately specifies that binding a temporary object to a reference to const on the stack lengthens the lifetime of the temporary to the lifetime of the reference itself, and thus avoids what would otherwise be a common dangling-reference error. In the example above, the temporary returned by f() lives until the closing curly brace. (Note this only applies to stack-based references. It doesn’t work for references that are members of objects.)
简而言之,使用const reference可以延长临时对象的生命周期,但这仅限于local const reference,在如下语句中,是不会产生实际效应的:
Sandbox(const string& n): member(n) {};
这也很好理解,这里的const reference对应的scope为构造函数本身,当构造函数栈退出后,该reference object也随之消亡了。
关于life time的问题,与const auto&一样,根据官方文档:
- Whenever a reference is bound to a temporary object or to a subobject thereof, the lifetime of the temporary object is extended to match the lifetime of the reference!
- Rvalue references can be used to extend the lifetimes of temporary objects (note, lvalue references to const can extend the lifetimes of temporary objects too, but they are not modifiable through them)
当我们把一个引用绑定到一个临时对象上时,临时对象的生命周期被延长到引用的生命周期。
l/rvalue reference & l/rvalue
对函数声明test(T&& a)的形式产生了一点疑问,这里的a是一个lvalue而不是rvalue。为什么?
首先我们要知道,根据先前的介绍,表达式具备两个独立的特性:
typevalue category
在该函数参数中,type为rvalue reference of T,而我们这里所说的lvalue,是指的该表达式的value category。那么问题来了,为什么它的value category为lvalue呢?这是因为cpp的这条规定:
Things that are declared as rvalue reference can be lvalues or rvalues. The distinguishing criterion is: if it has a name, then it is an lvalue. Otherwise, it is an rvalue.
这里的T&& a显然是一个name variable,而不是类似于3或者goo()这种的unnamed variable。为什么cpp要做出这种规定,详见这篇文章。
void foo(X&& x) {
    X anotherX = x; // calls X(X const & rhs)
}

X&& goo();
X x = goo(); // calls X(X&& rhs) because the thing on the righ side has no name
简而言之,如果在代码X anotherX = x中的x被归类为一个rvalue,那么这意味着此式之后,等式右侧作为一个右值,应该是消亡了:
- An object that is an l-value is NOT disposable(一次性的), so you can copy from, but definitely cannot move from.
- An object that is an r-value is disposable, so you can either copy or move from.
但是在这里显然我们仍然可以通过&x获取关于x的信息,x本身应该被视为一个lvalue。
而当我们试图给函数foo(X&& x)传递参数的时候,我们也要保证传入的参数本身是一个右值(这里也是说的参数的value category),因为我们只允许将右值绑定到右值引用上。这也是std::move()会派上用场的地方:
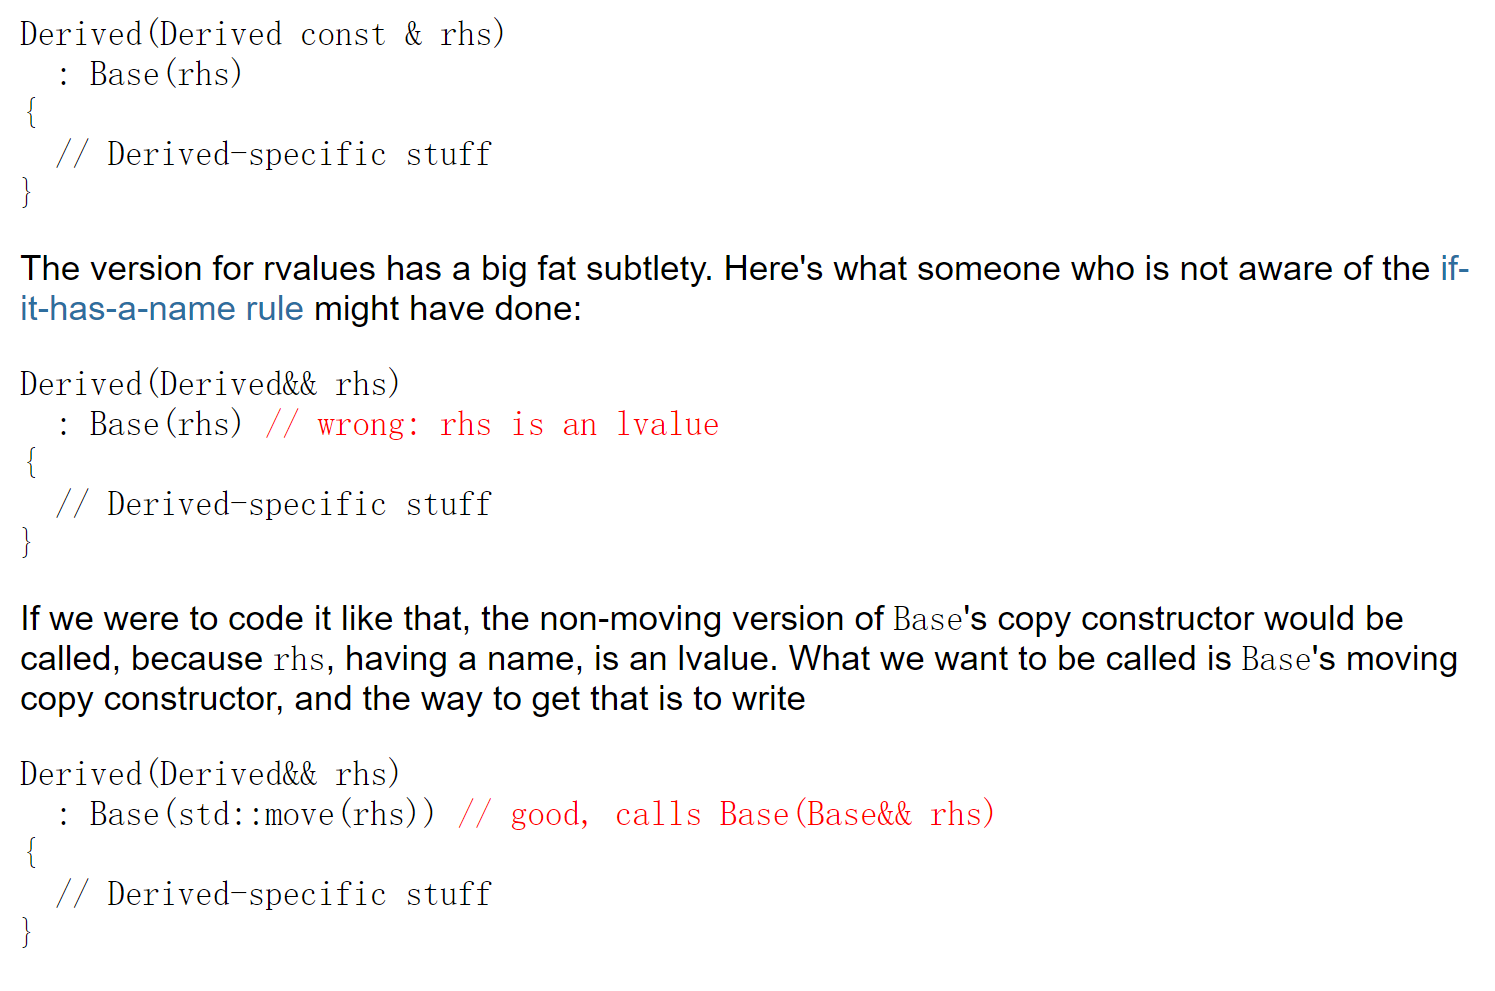
Move Constructor & Move assignment
StringVector(StringVector&& other);
StringVector& operator=(StringVector&& rhs);
在写这两个函数的时候,我们需要注意一点,即之前谈到的函数参数中的StringVector&& other的value category其实是lvalue,这意味着我们可以写出如下的代码:
Axess& operator=(Axess&& rhs) {
    students = rhs.students;
}
我们还是把数据copy了一份……
如何避免这个问题?我们想如果可以把这个左值强制转化为右值就好了,之前不是说对一个右值可以窃取他的内容吗?为了force move semantics,我们引入方法std::move()。
在课上有一个stringVector的例子:
StringVector& StringVector::operator=(const StringVector& rhs) noexcept {
    if (this != &rhs) { // IMPORTANT: prevent self-assignment
        delete [] _elems;
        _logicalSize = rhs._logicalSize;
        _allocatedSize = rhs._allocatedSize;
        _elems = new std::string[_allocatedSize];
        std::copy(rhs.begin(), rhs.end(), begin());
    }
    return *this;
}

StringVector::StringVector(StringVector&& other) noexcept :
    // IMPORTANT: need to move all members, not copy.
		// 事实上,对于内置类型使用move没有意义,这里只是用于演示
    _logicalSize(std::move(other._logicalSize)),
    _allocatedSize(std::move(other._allocatedSize)),
		// elems是一个指向string数组的指针
    _elems(std::move(other._elems)) {
    other._elems = nullptr; // IMPORTANT: set other to valid undetermined state.
}
注意到其中的_elems成员,我们实际上是在做这样的事情:
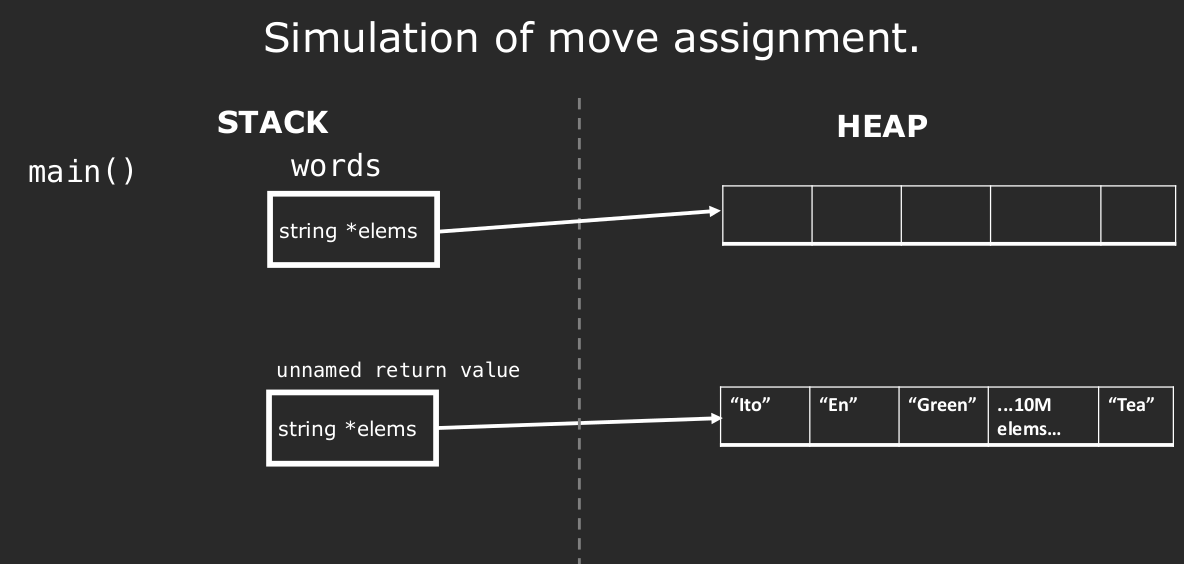
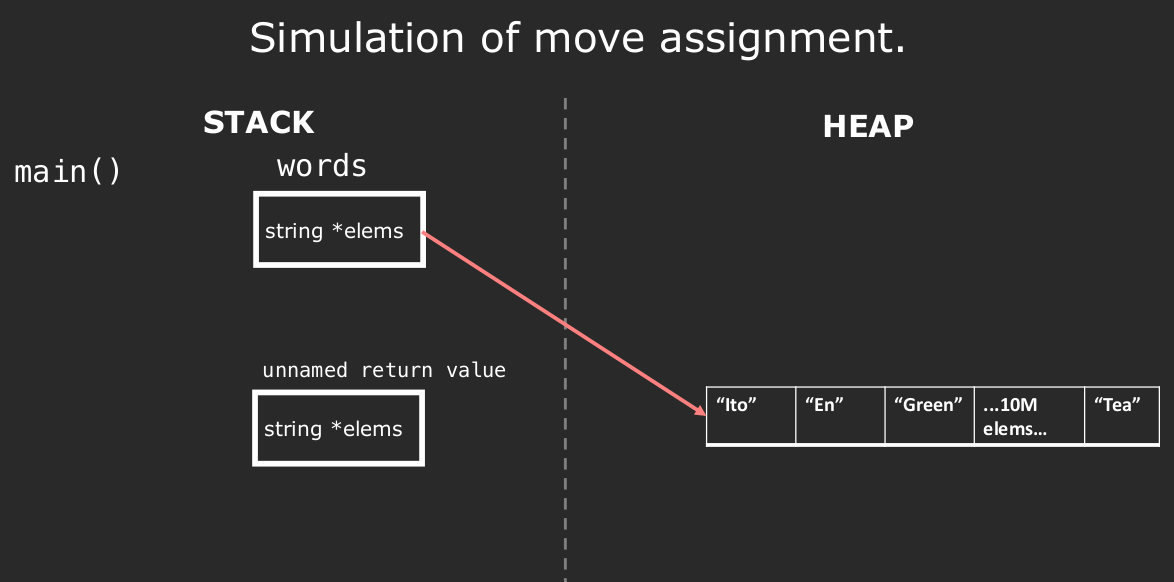
最后随着函数栈的退出,unnamed return value也随之消失。
在上述代码中,将other._elems这个指针设置为nullptr是相当重要的一步,当我们设计移动构造函数与移动赋值运算符时我们必须保证:
- 移后源对象处于这样一个状态–销毁他是无害的。特别是,一旦资源完成移动,源对象必须不再指向被移动的资源–这些资源的所有权已经归属于新的对象;
- 移后源对象进入一个有效且可析构的状态,但用户不能对其值做任何假设.
而将指针指向nullptr,正是确保其对象进入可析构状态(析构它不会对当前程序产生side effect)。否则,销毁移后源对象会释放掉我们刚刚移动的内存。
vector’s move operation
对于vector这种常用的数据结构来说,官方文档给出了其关于move操作的注意事项:
- Move Constructor
Move constructor. Constructs the container with the contents of
otherusing move semantics. Allocator is obtained by move-construction from the allocator belonging toother. After the move,otheris guaranteed to be empty().
- Move assignment
Move assignment operator. Replaces the contents with those of
otherusing move semantics (i.e. the data inotheris moved fromotherinto this container).otheris in a valid but unspecified state afterwards.
这意味着,当我们有一个vector<node*>形式的容器时,在进行move constructor后不必将容器内所有指针设置为指向nullptr;但是在move assignment后,我们最好这么做。
move()
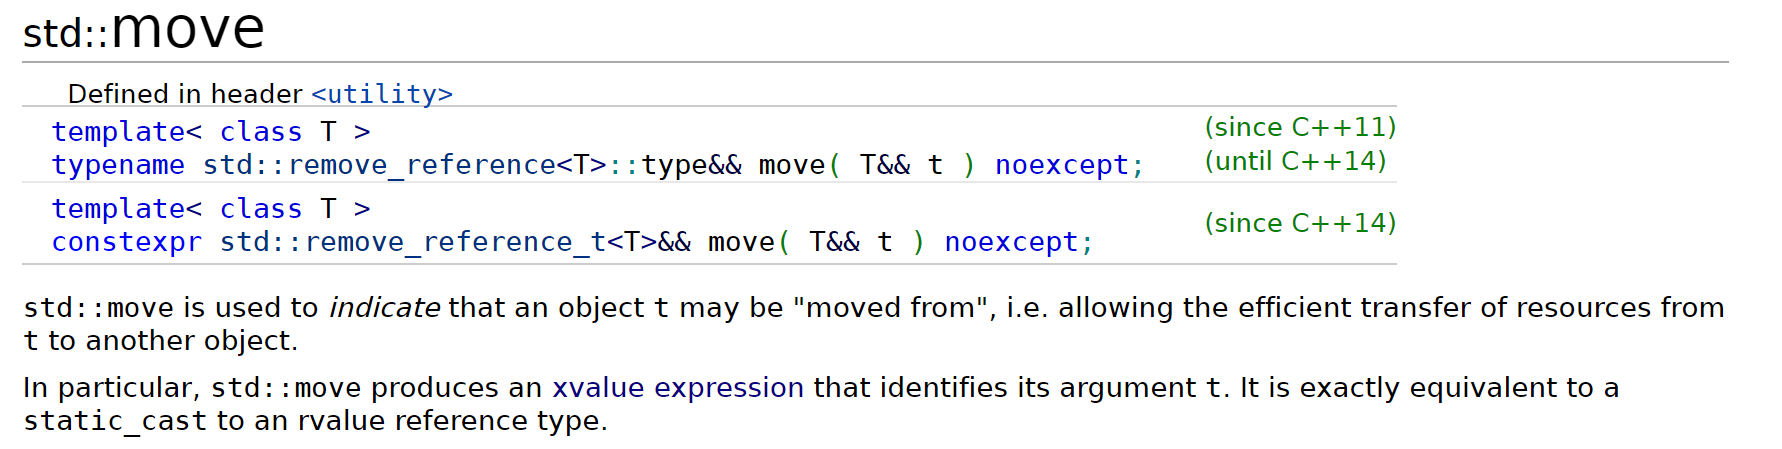
首先一个疑惑就是,既然右值引用只能被绑定到右值上,那为什么我们可以将左值rhs传入到声明为move(T&& t)的参数中呢?这是因为这里的T&& t并非rvalue reference,而是一种forwarding references(universal references)。(下边会介绍)
使用move函数可以帮助我们强制执行move semantics(Forcing Move Semantics),它将参数转化为一个rvalue reference(type)的ravlue(value category)。
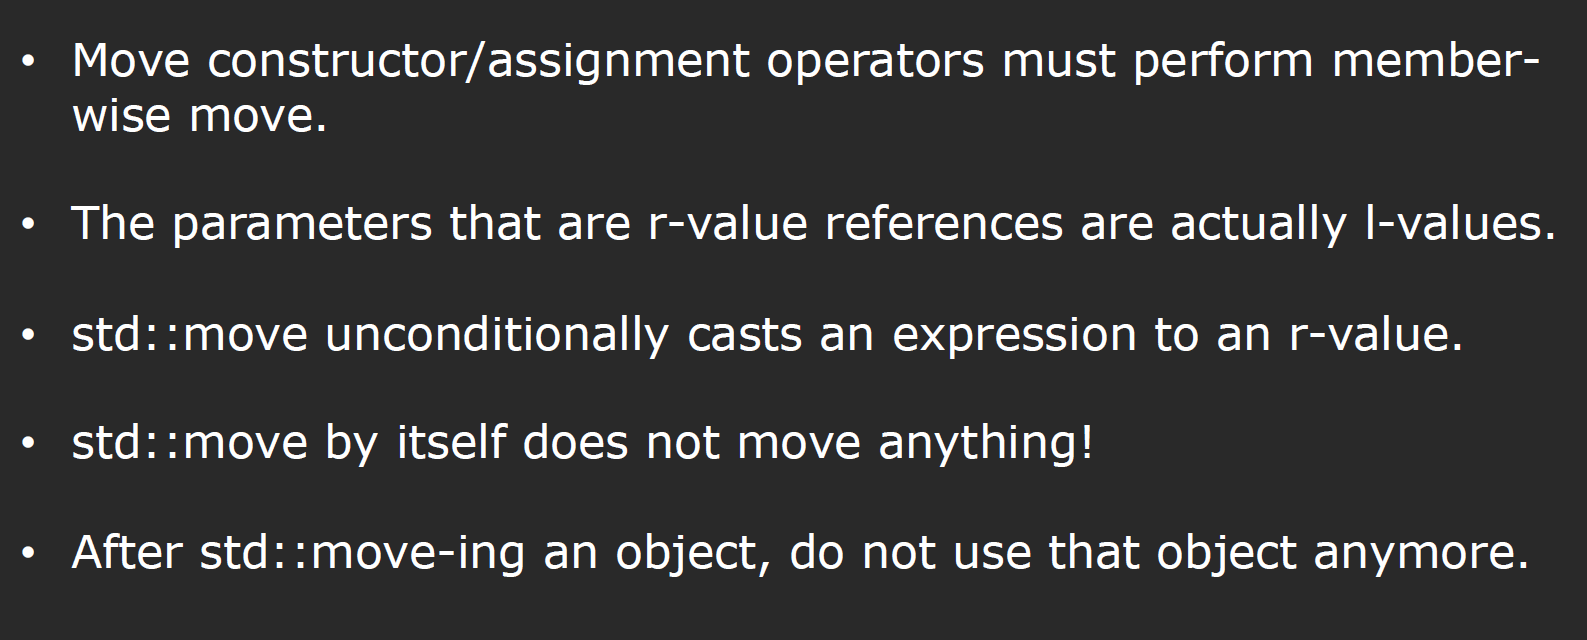
template<class T>
typename remove_reference<T>::type&&
std::move(T&& a) noexcept
{
  typedef typename remove_reference<T>::type&& RvalRef;
  return static_cast<RvalRef>(a);
}
Static_cast:

也就是说,
static_cast可以改变expression的value category,比如对于如下的例子(相当于简化版的move):std::vector<int> v0{1,2,3}; std::vector<int> v2 = static_cast<std::vector<int>&&>(v0); std::cout << "2) after move, v0.size() = " << v0.size() << '\n';最终的输出结果会是0,因为v0的value category变成了xvalue(暂且理解为rvalue);于是vector的移动复制函数被调用来创建v2,STL确保了原vector被清空。

remove_reference的实现:利用模板偏特化来实现引用的去除。
template<class T> struct remove_reference { typedef T type; };
template<class T> struct remove_reference<T&> { typedef T type; };
template<class T> struct remove_reference<T&&> { typedef T type; };
通过观察move的实现,我们发现写作static_cast<X&&>(x)也是可以的,但std::move更好(more expressive).
如果这里我们直接使用
static_cast,而非std::move,那么我们需要作重载已分别适应传入的X经过推断后变为X&(原本的X为lvalue),以及保持X(原本的X为rvalue)的两种情况。而在原函数std:move中使用remove_reference的原因就是避免因对static_cast<X&&>中的unversal referneces进行reference-collapsing从而最终返回一个左值引用。
根据cpp Primer,使用std::move(rr1)意味着承诺:除了对rr1进行赋值或者销毁外,不再使用它。这不也正是我们一开始的初衷吗?“当我们对函数传入一个右值作为参数的时候,因为它行将销毁,所以我们计划窃取它的值,把我们的指针指向他存储的内容所在的位置。”
Universal References
根据这篇文章,如果一个类型为T&&的变量或者参数,其中T为deduced type,那么此时该参数或者变量即为universal reference. universal reference到底是左值引用还是右值引用完全取决于我们如何初始化它,也就是说既可以绑定到左值上,也可以绑定到右值上:
- If the expression initializing a universal reference is an lvalue, the universal reference becomes an lvalue reference.
- If the expression initializing the universal reference is an rvalue, the universal reference becomes an rvalue reference.
而根据官方文档,universal reference主要应用于这两个地方:
Forwarding references are a special kind of references that preserve the value category of a function argument, making it possible to forward it by means of std::forward. Forwarding references are either:
- function parameter of a function template declared as rvalue reference to cv-unqualified type template parameter of that same function template.
- auto&& except when deduced from a brace-enclosed initializer list:
cv-unqualified:
A type is “cv-unqualified” if it doesn’t have any cv-qualifiers. A cv-qualifer is either
constorvolatile
其实在auto&&的这种情况中,与function template parameters的情况基本完全相同,也是在做type deduction而已。比如在这个例子当中,auto&&就是一个lvalue reference:
std::vector<int> v;
...
auto&& val = v[0];
因为v[0]本身返回的是一个左值引用,而所有的左值引用(type)必定都是左值(value category)。
Notice! Where type decution takes place?
需要注意的是,universal reference只能存在于type deduction直接出现的地方,并且只有当引用声明为T&&的形式时才可以,也就是说以下的例子全部为rvalue reference:
template<typename T>
void f(const T&& param); // const T rather than T

template<typename T>
void f(std::vector<T>&& param); // vector<T> rather than T
而如下则为universal refernce:
template<typename MyTemplateParamType>
void f(MyTemplateParamType&& param);  // “&&” means universal reference
特别的是,在Scott Meyers的文章中,有这么一个例子:
template <class T, class Allocator = allocator<T> >
class vector {
public:
    ...
    void push_back(T&& x);       // fully specified parameter type ⇒ no type deduction;
    ...                          // && ≡ rvalue reference
      													 // push_back()无法脱离vector<T>而存在
};
这就是vector的push_back方法,在这里T&&是一个rvalue reference而非universal reference,因为类型推断并没有发生在push_back函数的声明处,vector<T>依赖于T(dependent name1)。只要vector的类型被确定,push_back方法便不再需要type deduction了。所以universal reference只会出现在type deduction的位置上。所以在emplace_back的声明里:
template <class T, class Allocator = allocator<T> >
class vector {
public:
    ...
    template <class... Args>
    void emplace_back(Args&&... args); // deduced parameter types ⇒ type deduction;
    ...                                // && ≡ universal references
};
这里的&&就是一个universal reference了。于是我们知道,move()参数里的&&确实是一个universal reference。
reference to reference
通常意义上,以下语句是不合法的:
Widget w1;
Widget& & w2 = w1;
但是我们无法在编译过程中避免出现如上所示的情况:为了解决这个问题,cpp提出了reference-collapsing法则。
reference-collapsing
当我们对universal reference类型的模板参数做类型推断时:
template<typename T>
void f(T&& param);

f(10);
f(x);
需要注意的是,根据前边提到的,在遇到万能引用时,lvalue T(value category)会被推断为T&(type),而rvalue T(value category)则被推断为T(type)。这意味着,我们一定会在之后遇到& &&的类似情况,由于这看起来不太合理,cpp是用了引用折叠(reference-collapsing)的方法解决这一问题:
- An rvalue reference to an rvalue reference becomes (“collapses into”) an rvalue reference.
- All other references to references (i.e., all combinations involving an lvalue reference) collapse into an lvalue reference.
需要注意的是,当一个变量的类型本身就是引用时,情况有所不同:变量类型(type)的引用部分会被直接忽视:
int x;
int&& r1 = 10;                   // r1’s type is int&&
int& r2 = x;                     // r2’s type is int&

f(r1);
f(r2);
所以何时会发生引用折叠呢?除了模板实例化(template instantiation)以外,当然还包括auto,以及typedef和decltype:
// typedef:
template<typename T>
class Widget {
    typedef T& LvalueRefType;
};
// use
Widget<int&> w;
Perfect Forwarding
什么是perfect forwarding? 通俗的讲,就是如果我们通过一个函数将一个参数转发给另一个函数处理,在传递的过程中,参数始终能够保持先前的特征,比如右值始终未为右值,左值始终为左值。这里详细讨论了这一主题。为什么我们需要perfect forwarding?因为作为设计者,我们必须考虑到多种用户输入的可能性-给入左值、给入右值(比如一个temporaray object)、给如的数据带有const等等,而所有的这些输入我们希望在经过factory function之后能够与factory function不存在的情况完全一样。
举个例子,以如下的代码为例,我们尝试要将参数arg通过factory function传递给T的构造函数:
template<typename T, typename Arg>
shared_ptr<T> factory(Arg arg)
{
  return shared_ptr<T>(new T(arg));
}

// another example
template <typename A, typename B, typename C>
void f(A& a, B& b, C& c)
{
    E(a, b, c);
}
但上述写法显然不能应对rvalue参数;我们发现了一个可行方案,主要依靠两个部分:
std::forward()reference-collapsing
// perfect forwarding
template<typename T, typename Arg>
shared_ptr<T> factory(Arg&& arg)
{
  return shared_ptr<T>(new T(std::forward<Arg>(arg)));
}
std::forward()的定义如下:
// forward:
template<class S>
// universal reference only happens in the param list, not at the return value position
S&& forward(typename remove_reference<S>::type& a) noexcept
{
  return static_cast<S&&>(a);
}

// called on lvalue
X x;
factory<A>(x);
// called on rvalue
X foo();
factory<A>(foo());
为什么这种方式可以实现完美转发?我们可以尝试向上述代码中分别传递左值与右值以验证结果。在Scott Meyer的一个talk中,很形象的写出了实际上std::forward()的作用机理:
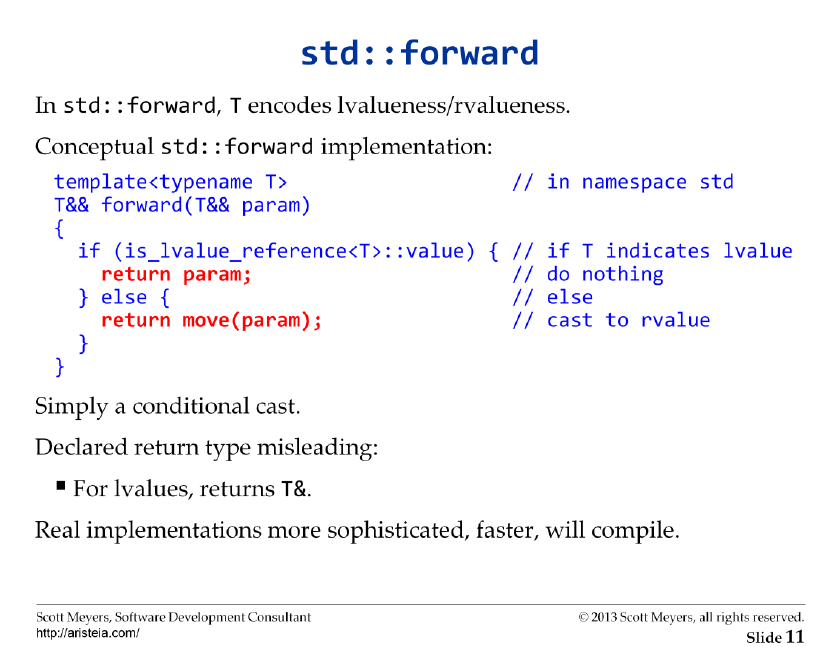
上图中的返回值处为右值引用,并非万能引用。所以如果T为左值引用返回param时会报错。
总结,编译器会去调用对应的“工厂函数”,
- 如果经过引用折叠,此类函数的参数的
type为rvalue reference,参数本身的value category一定是lvalue。在此之后我们使用std::forward,并作为返回值,那么返回值的value category一定与进入“工厂函数”之前相同 —- 依靠std::forward内的static_cast<s&&>将value category为左值的传入forward的“工厂函数”参数转化为xvalue的value category来实现。 - 左值同理。
在HashMap作业中,我们实现了一个简易版本的try_emplace,正是利用了完美转发的特性,保证传入函数的参数被完整的保留到数据类型的构造函数中,代码参见仓库:
template<typename K, typename M, typename H>
template<class... Args>
std::pair<typename HashMap<K, M, H>::iterator, bool> HashMap<K, M, H>::try_emplace(K&& key, Args&&... args) {
    /** support Automatic Rehash */
    if (load_factor() > MaxLoadPercentage) {
        rehash(2 * bucket_count() + 1);
    }

    auto it = find(key);
    if (it != end()) {
        return {it, false};
    }
    // if not found
    size_t index = _hash_function(key) % bucket_count();
    // Now, we can move key's contents
    _buckets_array[index] = std::move(new node({std::move(key), M(std::forward<Args>(args)...)}, _buckets_array[index]));

    ++_size;

    return {{&_buckets_array, _buckets_array[index], index}, true};
}
关于try_emplace方法,这里有几篇博客可供查阅:
noexcept
在函数声明后加noexcept有什么好处?
根据这篇文章,首先,它会进行编译器优化:
因为在调用 noexcept 函数时不需要记录 exception handler,所以编译器可以生成更高效的二进制码(编译器是否优化不一定,但理论上 noexcept 给了编译器更多优化的机会)。另外编译器在编译一个
noexcept(false)的函数时可能会生成很多冗余的代码,这些代码虽然只在出错的时候执行,但还是会对 Instruction Cache 造成影响,进而影响程序整体的性能
其次,当我们试图使用右值引用优化代码时,如果在移动构造函数和移动赋值函数后不添加noexcept标识符,则编译器不会进行move semantics的操作:
Rule Of Five
If you explicitly define (or delete) a copy constructor, copy assignment, move constructor, move assignment, or destructor, you should define (or delete) all five.
The fact that you defined one of these means one of your members has ownership issues that need to be resolved.
需要注意的是,自cpp11起,如果没有用户定义的复制构造函数、复制赋值运算符、析构函数,并且生成的移动构造函数(移动赋值运算符)有效,则编译器会隐式生成移动构造函数(移动赋值运算符)。
Copy elision & RVO
copy elision,也叫复制省略,复制省略常出现我们使用临时对象初始化一个新对象时:
共有两种环境,分别为:
- 在 “return” 语句中,当操作数为与函数返回类型为同一类类型
- 在变量的初始化中,当初始化表达式为与变量类型为同一类类型
同时,可以基本分为两种应用场景:
- 一个函数以值传递参数,当调用时,我们选择传入一个临时对象作为参数:
void foo(MyClass param) {
    // do something
}

int main() {
    // pass a temporary object to initialize the param
    foo(MyClass());
}
何为复制省略?这里,程序原本需要调用移动构造函数,把临时对象MyClass()移动到param中,而由于copy elision机制的存在,这里就可以直接把生成的temporary object传入函数,而不需要多余的移动(或者复制)了。
- 还有一种情况,是函数返回一个临时对象,这里cpp引出了重要的编译器优化方法:RVO.
需要注意的是,copy elision即使在复制/移动操作存在side effects时仍然适用。也就是说,根据Wikipedia上的这个例子:
struct C {
  C() {}
  C(const C&) { std::cout << "A copy was made.\n"; }
};

C f() {
  return C();
}

int main() {
  std::cout << "Hello World!\n";
  C obj = f();
}
函数返回的是一个临时对象,所以编译器会进行copy elision,这里被叫做Return Value Optimization(RVO)。根据编译器的不同设置,它可以选择优化掉一次将f()内生成的临时对象赋值给返回值的操作,还可以选择优化掉一次将f()返回值赋值给C obj的操作,故以下所有输出结果都是合理的:
Hello World!
A copy was made.
A copy was made.
Hello World!
A copy was made.
Hello World!
需要注意的是,这里的例子中C的复制构造函数必须是带const的参数,因为右值可以绑定到const的左值引用,如果没有const,则会报错。
需要注意的一点是,在cpp17之前,使用临时对象(一个prvalue)初始化另一个对象时的copy elision优化不是强制性的。我们可以通过在编译器中使用加上*-fno-elide-constructors*来关闭这一选项。而正因为该优化此时并非强制,编译器要求即使优化发生,复制构造函数/移动构造函数也要存在(显式或者隐式(编译器自动生成)),如果我们给这些函数加上一个=delete,则不能通过编译。
但自cpp17起,这种行为被描述为passing Unmaterialized objects,它变成了编译器强制优化的一种行为,即使此时复制构造函数/移动构造函数不可选,程序仍可正常编译运行。
一种特殊情况是Named Return Value Optimization(NRVO),此时我们返回的是一个lvalue,一个具名对象,而不是一个临时对象(prvalue):
MyClass foo() {
    MyClass obj;
    // do something
    return obj;
}

// amother case: as a parameter
MyClass bar(MyClass obj) {
    // do something
    return obj;
}
NRVO目前仍被列为可选优化,也就是说如果开启NRVO,我们仍需保证存在合适的复制构造函数/移动构造函数。
需要注意的是,在上边的代码中,程序在将函数内的局部变量传递给返回值时,会先尝试调用move constructor而非copy constructor。为什么呢?
根据官方文档,在overload resolution的过程中,对于一个位于返回值位置上的表达式,如果具有Automatic Storage Duration,那么首先会尝试使用move constructor,如果失败,再使用copy constructor:
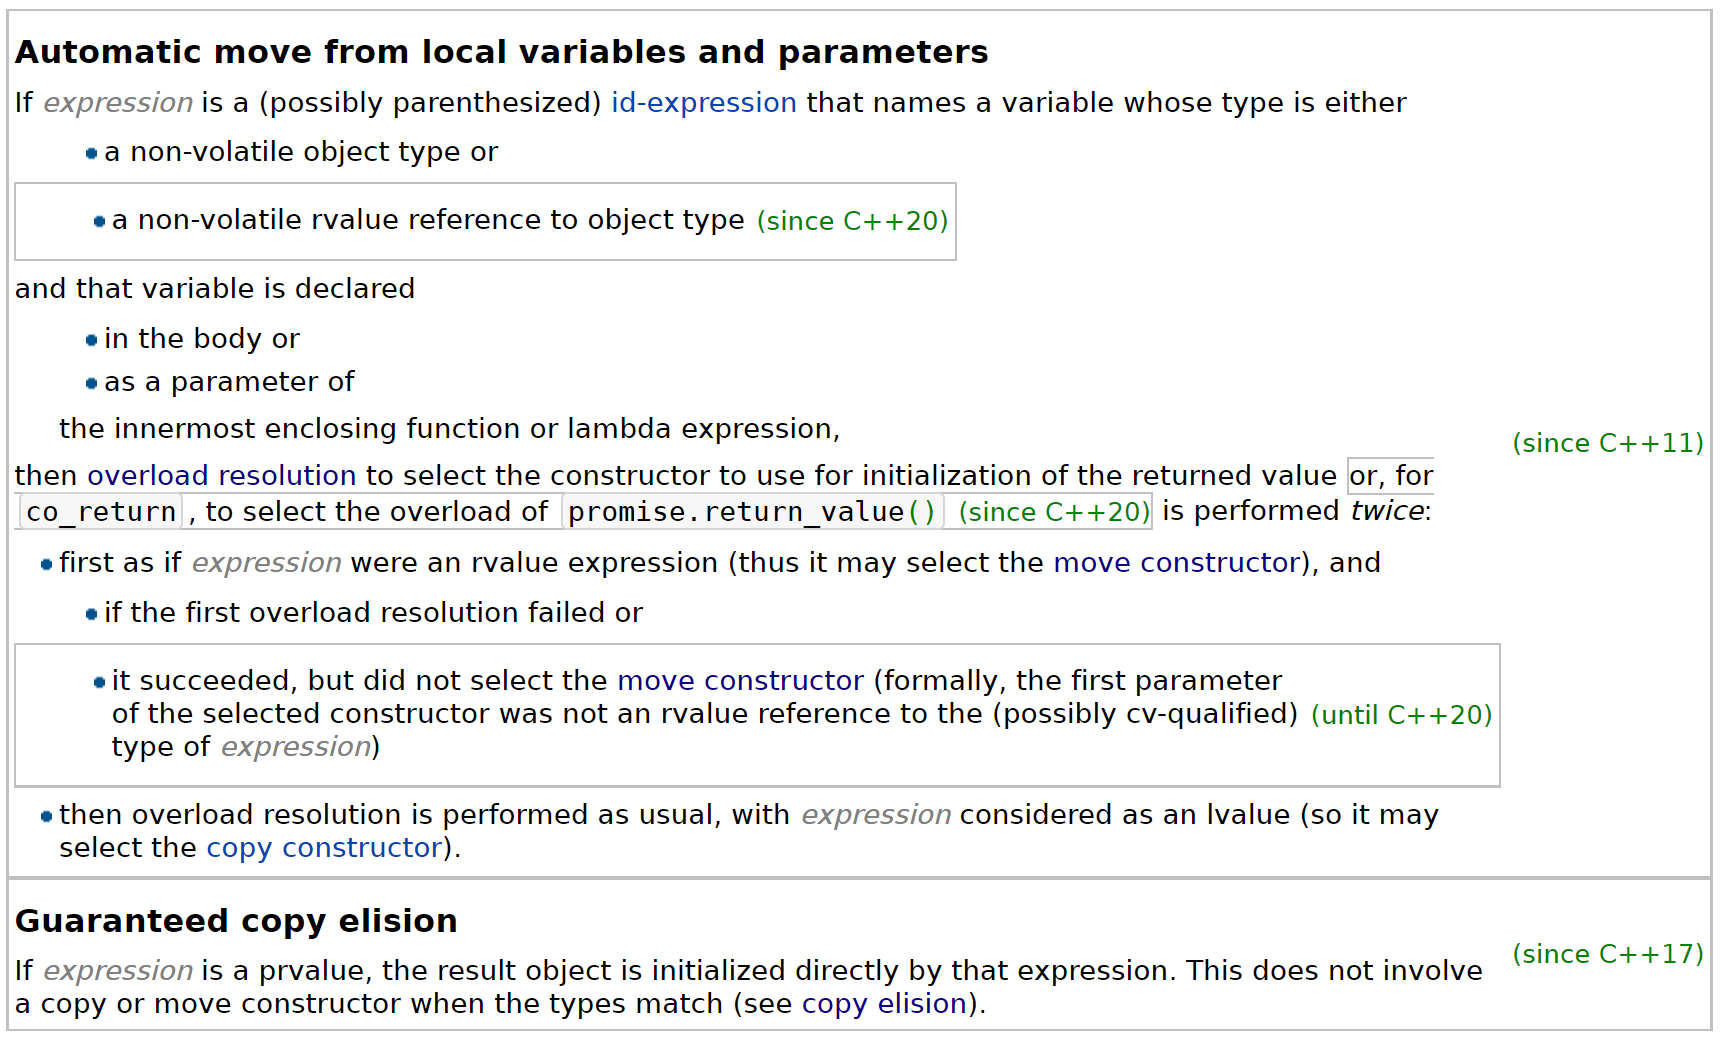
Polymorphism
在先前学习的CS 106L课程中,我们也提到了多态这一概念,templates与Derived classes都是多态:
在CS 106X的课程中,我们详细讨论了关于从派生类到基类的隐式转换过程。在这一节中我们即将提到动态绑定(Dynamic Binding),以及许多其他的继承(Inheritance)的注意事项。
Inheritance
在我们使用继承语法:
class A : public B {

}
时,B所在的位置被称为派生类列表。
关键字
virtual只能使用在类内。
一个纯虚函数就可以使类成为抽象基类,但是抽象基类中除了包含纯虚函数外,还可以包含其它的成员函数(虚函数或普通函数)和成员变量。需要注意的是,我们不能直接实例化抽象基类,但是可以实例化它的派生类。
static
如果基类中存在静态成员,则无论从基类派生出多少子类,静态成员只存在唯一的实例。如果该成员为private,则派生类无权访问;如果该成员被设置为允许访问,则派生类与基类均可访问。关于static关键字在面向对象时的使用,作如下补充:
static对象可以分为non-local static和local static.non-local static对象的初始化发生在加载阶段,即main函数执行前。但cpp没有规定多个non-local static对象的初始化顺序,尤其是来自多个编译单元的non-local static对象,他们的初始化顺序是随机的.
而对于local static,初始化过程发生在第一次执行到该语句时,并且该局部静态变量只初始化这一次。
类内静态成员属于一种non-local static.
- 类的静态成员独立于任何对象之外,对象中不包含任何与静态成员有关的数据。
- 类内静态成员和静态成员函数均不与对象绑定在一起,故静态成员函数不包含
this指针,不能声明成const的,我们也不能在static函数体内使用this指针。 - 成员函数不需要作用域运算符即可访问静态成员。
- 一般来讲,我们只能在类内声明静态成员;类外初始化、定义静态成员,但存在一些例外:
static const int成员可以在类内声明+初始化,如果static const不是整型,则不可以类内初始化;static constexpr成员必须在类内初始化;若编译时static constexpr数据成员可用它的值替代(如表示数组个数等),它可以不需要类外定义。若不能替代(如作为参数等),类外必须含有一条定义语句(所以习惯上无论如何都在类外定义一下)
当在类的外部定义静态函数时,不能重复
static关键字,该关键字只出现在类内的声明语句;我们可以使用静态数据成员作为成员函数的默认实参,但非静态成员不行,因为他们的值是对象的一部分,如果非静态成员如果在成员函数被调用前没有被初始化,将导致在函数调用时编译器无法得知默认实参的值是多少。所以编译器做了这条规定,将可能出现的错误及时避免在编译期。
虚函数也可以拥有默认实参,但是虚函数的默认实参由本次调用的静态类型决定。所以,虚函数的默认实参在基类和派生类中最好一致。
final & override
我们可以使用final阻止一个类被继承:
class A final {/* */}
还可以使用它来阻止一个函数被后续覆盖(放在函数声明最后,函数体之前):
void foo() const final;
我们可以使用关键字override表示这是一个派生类中的虚函数,显式注明覆盖了基类的虚函数;来方便编译器检查我们是否给错了参数列表(找不到对应的基类中的函数):
void foo() const override;
如果我们不覆盖基类的某个虚函数,则该虚函数的行为类似于其他普通成员-派生类直接继承其在基类中的版本。
Accessible?
首先我们要知道,在使用了继承之后,一个类可以有三种不同的用户:
- 普通用户
- 类的实现者
- 派生类
派生类可以访问基类的protected成员,但是普通用户不行。需要注意的是,派生类的成员以及友元只能通过派生类对象访问基类的受保护成员,即他们只能访问派生类对象中的基类部分的受保护成员,对基类中的受保护成员没有访问特权: 参见cpp Primer P543.
class Base {
protected:
    int prot_mem;
};

class sneaky : public Base {
    friend void clobber(sneaky&);	// can access sneaky::prot_mem
    friend void clobber(Base&);     // can NOT access Base::prot_mem
};
这样做的理由是为了避免我们可以直接通过定义一个类似于sneaky形式的派生类直接修改基类中由Protected保护的内容–虽然其中的函数并非是Base类的友元。
在程序中,存在两个访问说明符,分别位于类的实现中以及继承的接口处。其中,派生类的成员以及友元能否访问基类的成员只与基类中的访问说明符有关。 而位于继承接口处的访问说明符可以控制普通用户,即派生类用户的访问权限:也就是我们在CS 106X中所提到的:继承关系在类外部是否可见—-如果此时我们使用了非public访问说明符,那么派生类用户无法获取基类内容:
class Base {
public:
    void pub_mem();
protected:
    int prot_mem;
private:
    char priv_mem;
};
struct Pub_Derv : public Base {
    int f() { return prot_mem; }  // OK, can access protected members
    char g() { return priv_mem; } // error, can NOT access Base's private members
};
struct Priv_Derv : private Base {
    int f1() const { return prot_mem; } // ok
}

Pub_Derv d1;
Priv_Derv d2;
d1.pub_mem();		// ok
d2.pub_mem();		// error
我们可以这样理解,使用private/protected inheritance时Base类的成员在派生类中是private/protected的,所以我们不能使用派生类用户访问他们。
需要注意的是,我们将继承自派生类的新类,也视为一种普通用户(即基类的普通用户)。
同时,如果我们是以
private或者protected的方式继承的基类,则用户代码不能使用派生类到基类的转换。这正是因为派生类用户无法访问基类成员的缘故。只是在这里,用户代码与派生类的派生类有了待遇的差别,我们使用公有或者受保护方式继承基类时,派生类的派生类成员和友元可以访问派生类到基类的转换,只有使用私有方式继承时不可以使用该转换。
virtual dtor
基类通常应当定义一个虚析构函数,如果我们不这样做,则delete一个指向派生类对象的基类指针将产生未定义的行为。Why?这正是因为动态绑定所致:
Quote *itemP = new Quote;	// static type = dynamic type
delete itemP;				// call Quote's dtor
itemP = new Bulk_quote;		// static type != dynamic type
delete itemP;				// call Bulk_quote's dtor
由于指针的静态类型和被删除对象的动态类型可能不一致,我们通过将基类的析构函数设置为虚函数来保证delete基类指针时运行正确的析构函数版本。
需要注意的是,因为基类始终需要一个虚析构函数,但是该析构函数可能为空,我们无法判断此时究竟是否需要一个拷贝构造函数或者赋值运算符,故Rule Of Three此时并不适用。(cpp Primer P552)
需要注意的是,在继承关系中的析构函数的调用顺序与构造函数相反:构造函数是先调用基类构造函数,再调用派生类构造函数;二析构函数是先析构派生类,再析构基类。并且,我们不需要显式调用基类的析构函数,系统会自动调用。
Dynamic Binding
什么是动态绑定?通俗地说,当我们在继承关系中,使用一个基类的引用或者指针,调用一个虚函数时,将会发生动态绑定。 为什么叫动态绑定?因为在编译时,程序并不清楚到底是需要基类的版本还是需要派生类的版本,只有当运行时才能决定, 所以被叫做动态绑定。从而,与Dynamic Binding相对应的就是静态绑定,也即在编译时即可确定的绑定关系—-成员函数如果没有被声明为虚函数,则解析过程发生在编译时,如果我们参看静态绑定的汇编代码,会发现他只是简单的call+address的形式。根据cpp Primer:
表达式的静态类型在编译时已知,它是变量声明时的类型或者表达式生成的类型;而动态类型则是变量或表达式表示的内存中的对象类型。基类的指针或者引用的静态类型与动态类型可能不一样。
我们通过两个例子体会上面的内容:
double print_total(const Quote &item) {
    double ret = item.net_price(n);
}
在这里,因为item的静态类型是基类,但是到底执行的是基类的该函数还是派生类的该函数取决于print_total给入的实参。所以这里可能存在item的静态类型与动态类型不同的情况。同样地,借由此规定,我们理解了为什么在CS 106X中存在如下的情况:
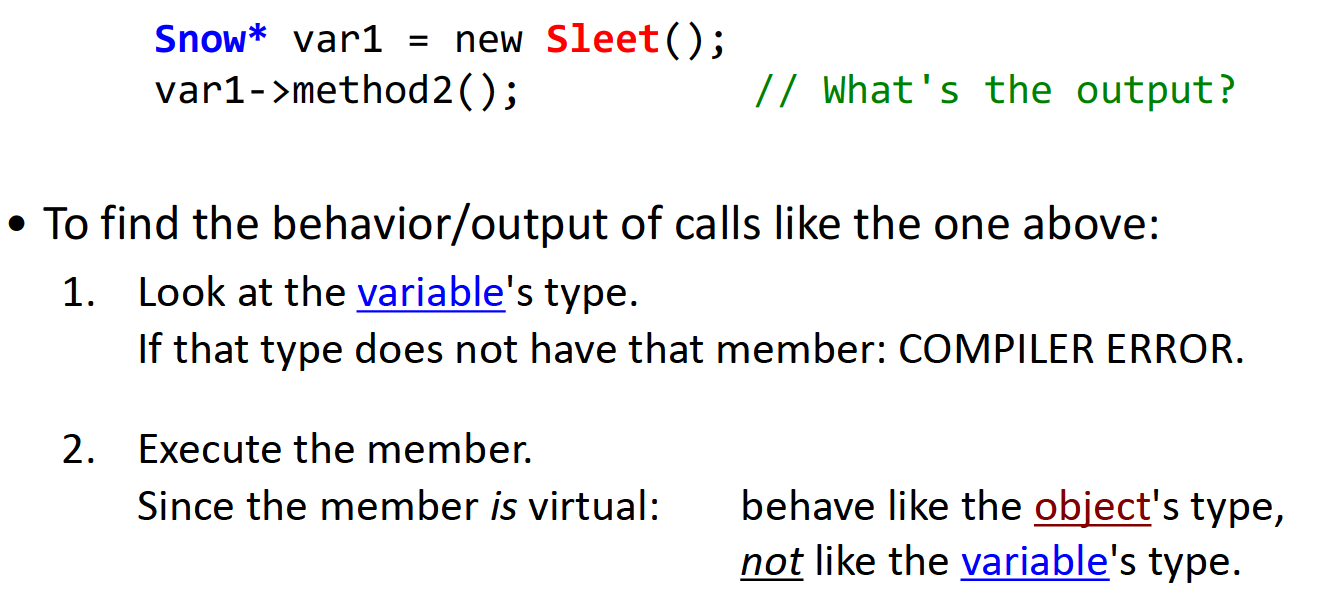
指针var1的静态类型为Snow,但是动态类型为Sleet(内存中的对象类型),这也是为什么对于表达式var1->method2,编译时检查Snow中是否有method2,运行时检查Sleet中是否有method2的原因。
对于对象(即非引用或者指针)来说,是不存在什么类型转换与动态类型的。
同理,我们可以体会到这句话的理由:
对于
virtual关键字,我们需要注意:如果想继承某个函数,我们可以不加该关键字,程序可以正常编译,新的继承函数也可以编译通过,但这会导致程序在运行时不知道去调用新的继承函数(缺少了动态绑定的过程)。
关于类型转换,我们还需要注意,不存在从基类向派生类的隐式类型转换:
Quote base;
Bulk_quote* bulkP = &base;    //error, base->derive class
Bulk_quote& bulkRef = base;   //error, base->derive class
如果我们确实要做从基类到派生类的类型转换,我们有两种选择:
dynamic_cast:RTTI(run-time type identification)
如果我们将基类指针转换为指向派生类的指针,则失败返回0;如果我们将积累引用转换为派生类的引用,则失败抛出bad_cast异常:
if (Derived *dp = dynamic_cast<Derived*>(bp)) {
    // use dp pointing to Derived
}
else {
    // use bp pointing to Base
}

void f(const Base &b) {
    try {
        const Derived &d = dynamic_cast<const Derived&>(b);
    }
    catch (bad_cast) {
        // deal with failure
    }
}
static_cast:已知转换安全,强制覆盖掉编译器的检查工作
我们可以使用派生类对象为一个基类对象构造或者赋值,此时只会对派生类对象中的基类部分处理,其余部分被切割掉(sliced down)。
vptr & vtbl
候捷老师的这张图很清晰的说明了问题:
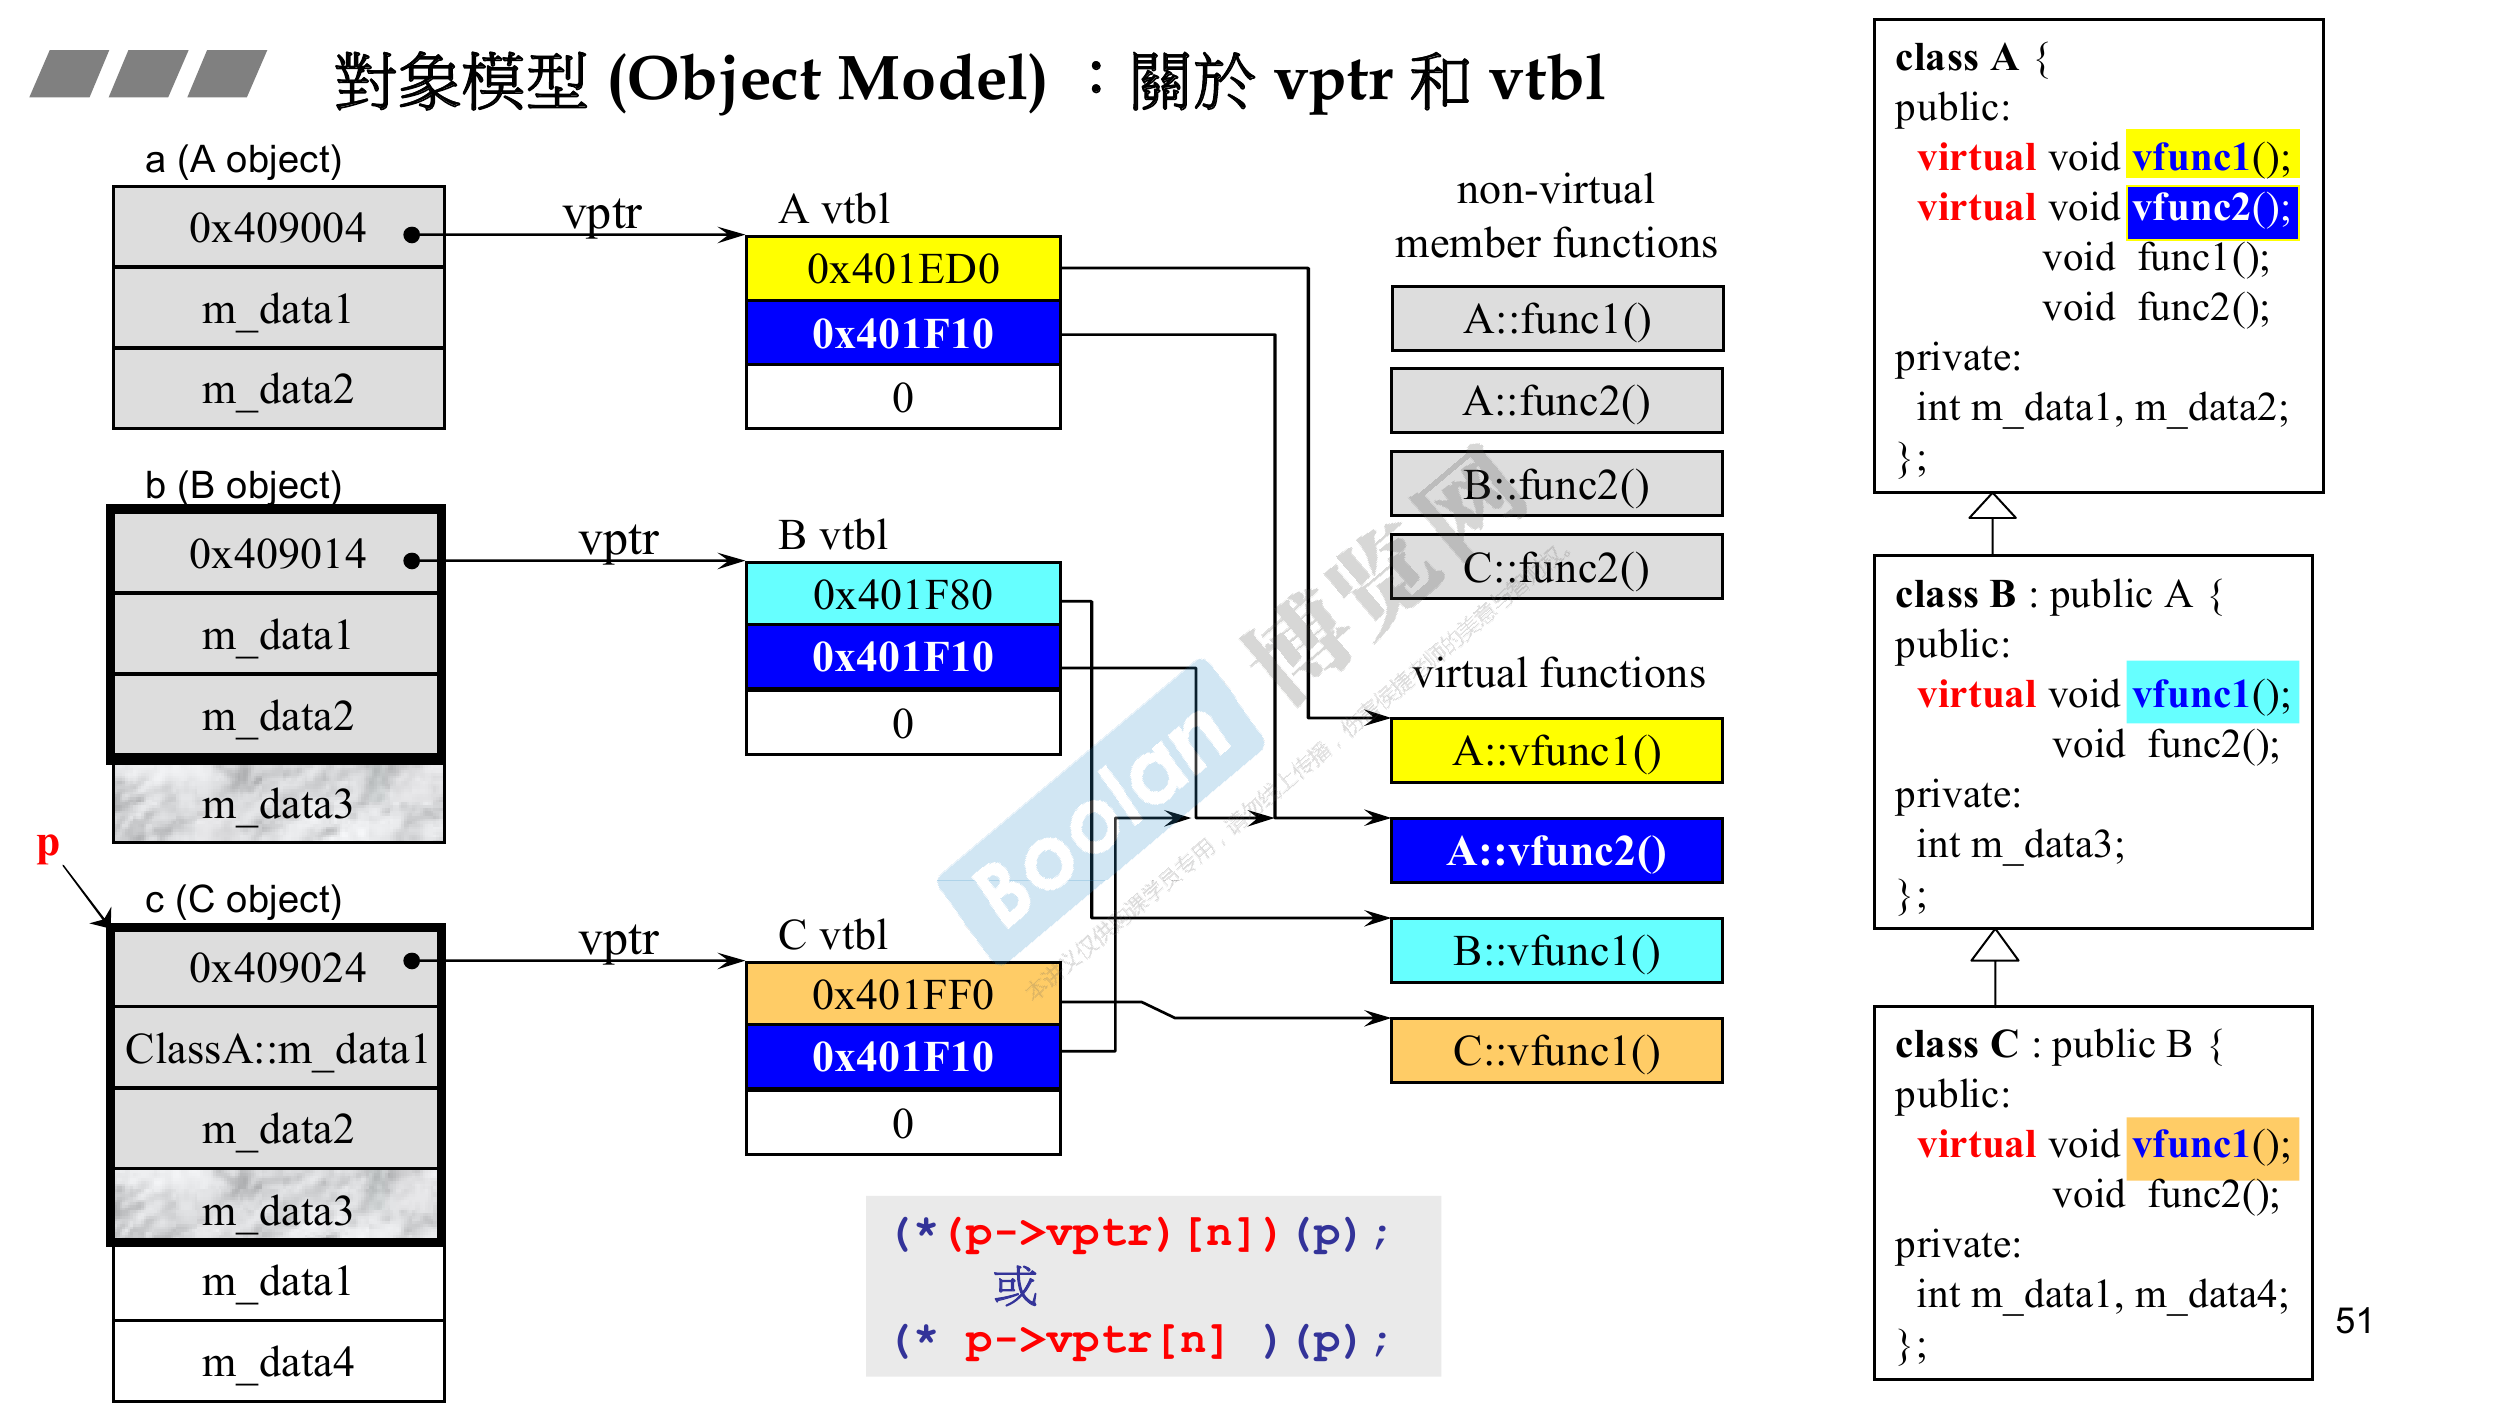
只要我们在类中包含了虚函数,在哪存的对象模型中就会有且始终仅有一个虚指针(virtual pointer),而观察虚指针所在的内存可以看到,派生类中包含有每个基类的子对象,也即派生类中含有基类的部分!。(所以,每当含有虚函数时,类对象实际占用的内存就要比所有类成员的大小大4,因为多了一个虚指针.)
这个虚指针指向虚表(virtual table),虚表中存放的是所有指向该类对象内部虚函数的指针。当我们使用指针p去调用类对象时,动态绑定决定了p指针指向的位置(指向哪一个类对象的内存位置),那这个p是什么呢?
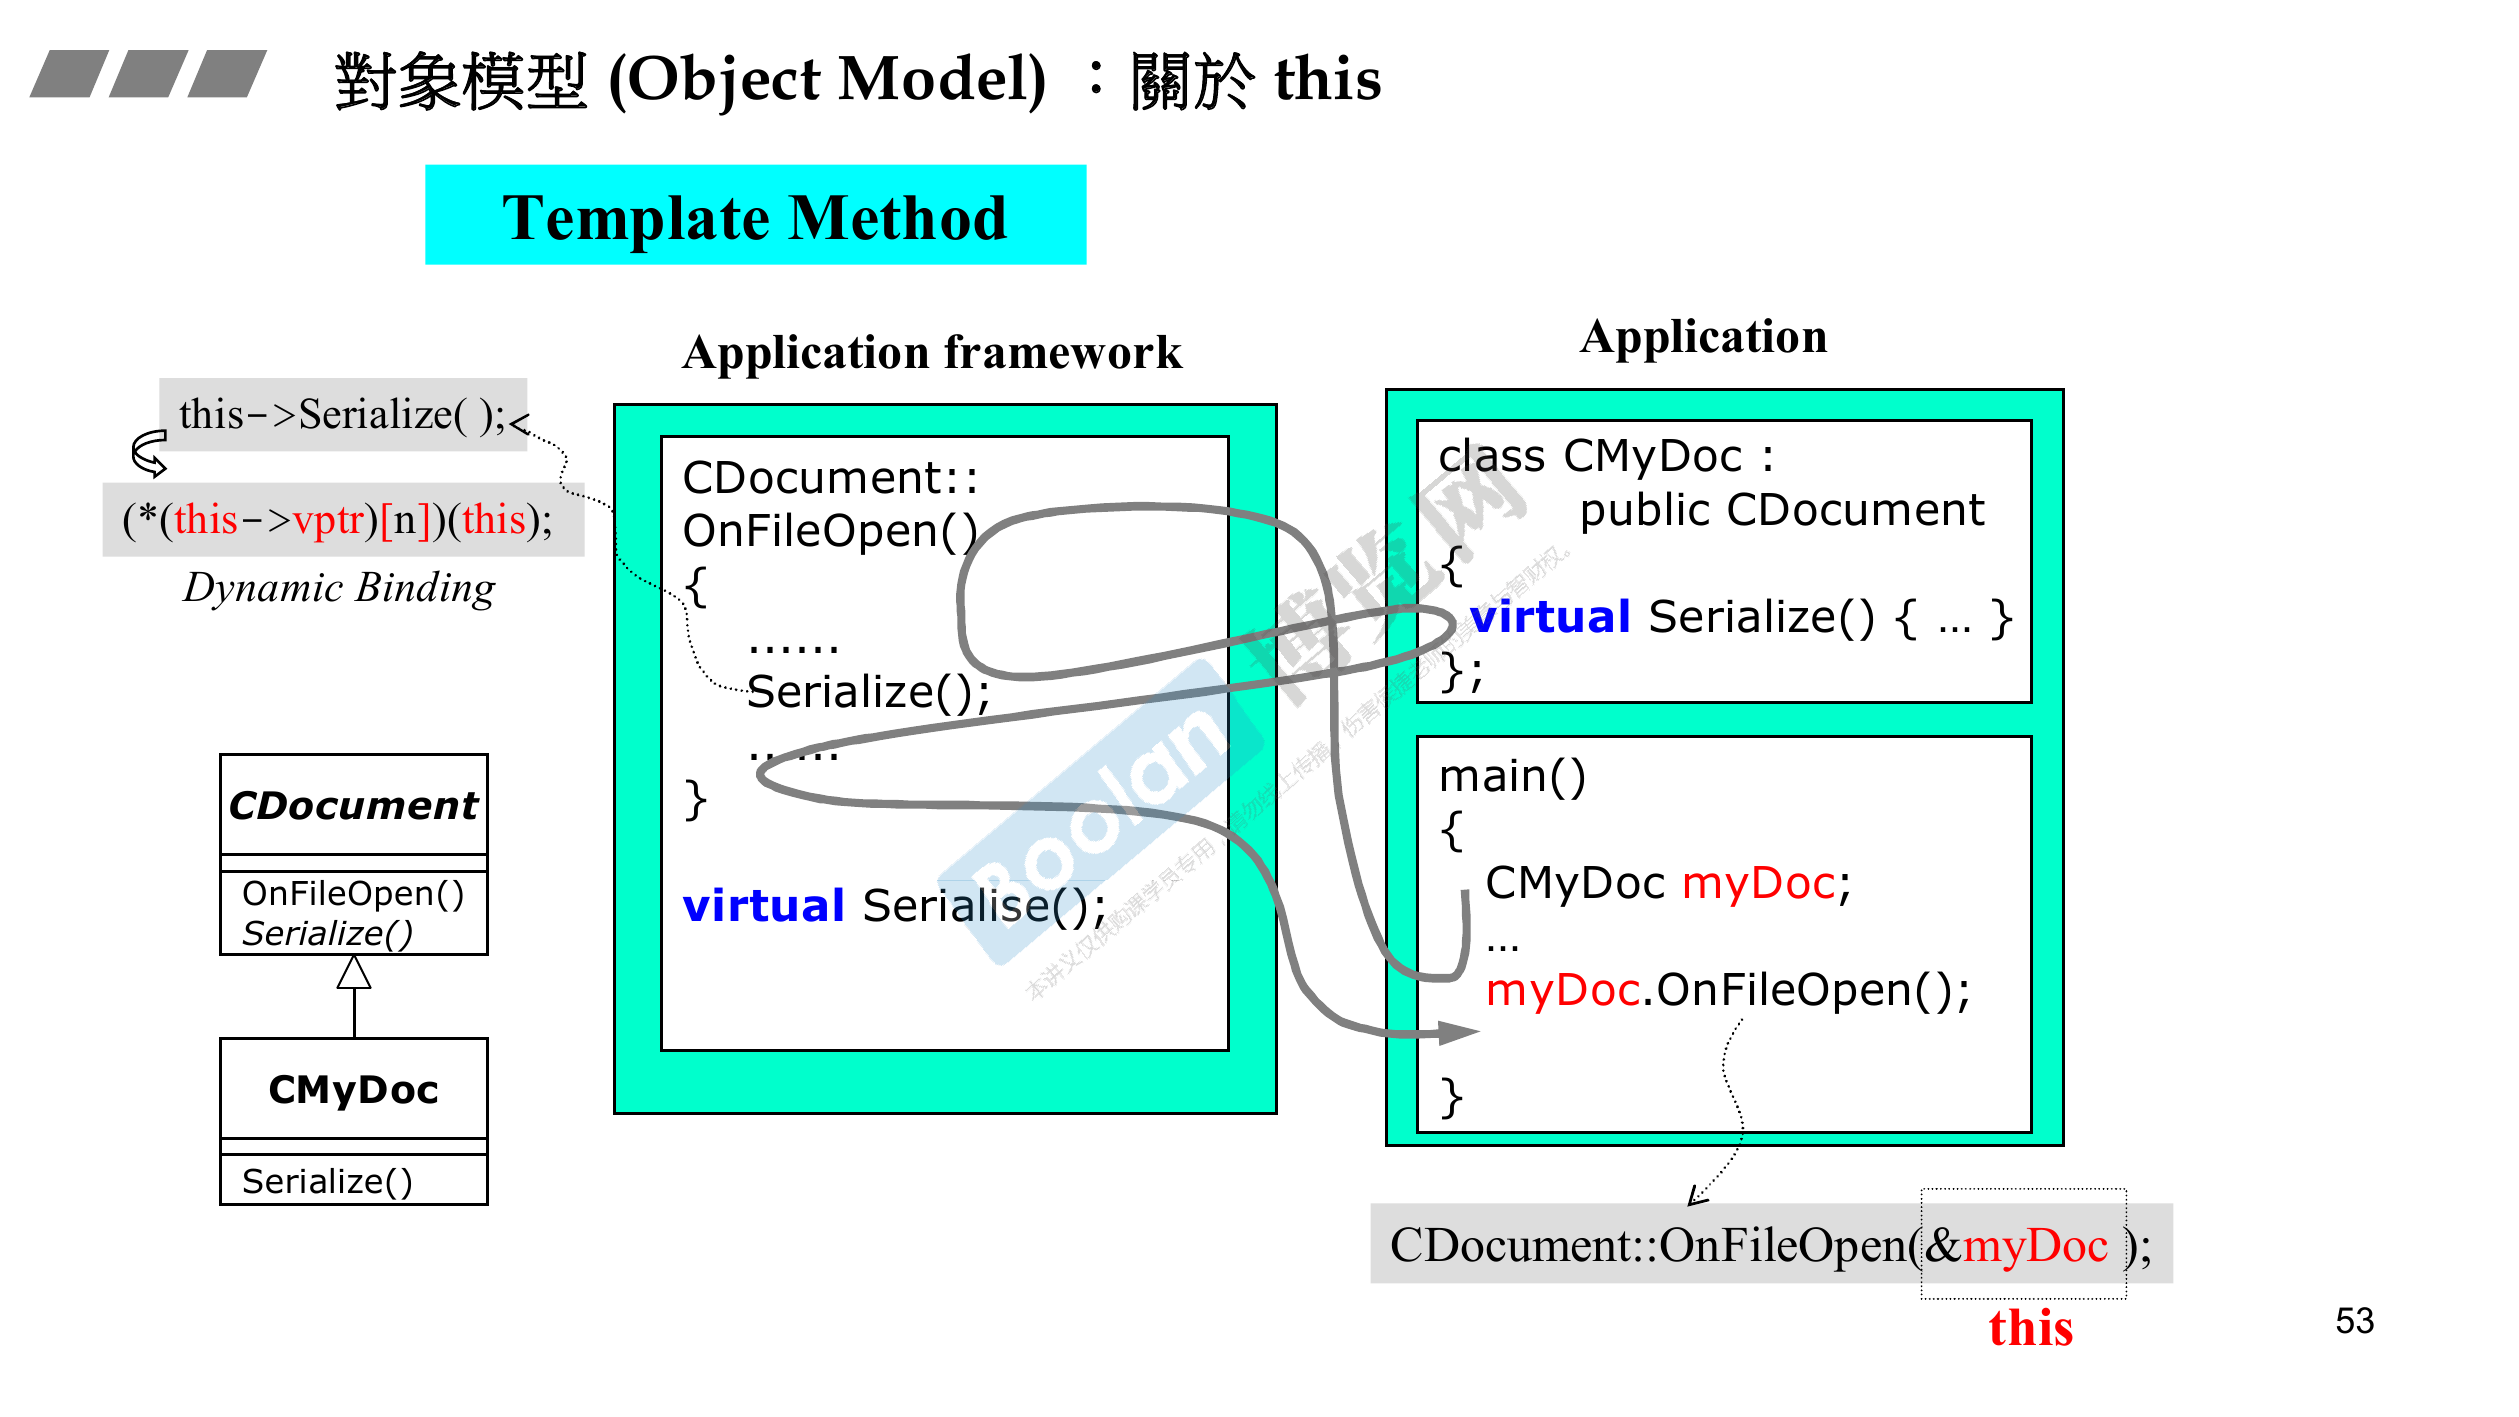
如上图所示,我们首先使用一个派生类对象调用基类的方法,而在该基类方法内,存在一个虚函数,因为指针p其实就是调用成员函数的对象的地址,也就是我们常说的this指针,走到虚函数的位置后,程序会根据传入的指针的地址,找到派生类,并执行对应的虚函数,而这一过程在内部就是经由vptr与vtbl实现的!从而,我们也可以将这一调用过程使用C语言表达出来,即如图所示的形式,首先从虚指针定位虚表,再利用形成的函数指针调用传入的对象。
Inheritance on Templates
最后,来聊一聊模板类的继承。HERE
首先我们要知道两个概念:
- 依赖性基类
- 非依赖性基类
按照我们先前对非依赖性的解释,即无需知道模板实参就可以完全确定类型的基类。他应该具备如下的样子:
template <typename X>
class Base
{
 public:
     int basefield;
     typedef  int  T;
};

template <typename T>
class D2 : public Base<double> // INdependent on template T
{T strange; };
cpp规定,派生类查找一个非受限名称时,会先在非依赖型基类(Base<double>)中查找,然后才查找模板参数列表(template<typename T>)。所以上例中的strange是Base<double>::T而非模板定义中的T.
另一方面,对于依赖性基类:
template <typename T>
class D2 : public Base<T> // dependent on template T
{T strange; };
在两阶段名称查找中我们知道,对于模板中的非依赖型名称,将会在看到的模板定义时进行查找。
// This is a declaration
template<typename X>
class Base
{
    public:
        int basefield;
        typedef int T;
};

// This is a definition
template <typename T>
class DD : public Base<T>
{
    public:
        void f() { basefield = 0; }     // (1)problem……
};

template<>    // 显式特化
class Base<bool>
{
    public:
        double basefield = 1.0;
};

void g(DD<bool>& d)
{
    d.f();
}
但是cpp规定,非依赖型名称不会在依赖型基类中进行查找,所以编译器会在basefield = 0处报错。
那我们可以让这个变量成为依赖性变量:
// 修改方案1
template <typename T>
class DD1 : public Base<T>
{
    public:
        void f() { this->basefield = 0; }     // 查找被延迟了
};

// 修改方案2:利用受限名称来引入依赖性
template <typename T>
class DD2 : public Base<T>
{
    public:
        void f() { Base<T>::basefield = 0; }
};
这样一来,对于依赖性变量,编译器就会在模板实例化时进行名称查找,而实例化时还有个好处,基类的特化是已知的。
如果是使用这个解决方法,我们需要格外小心,因为如果(原来的)非受限的非依赖型名称是被用于虚函数调用的话,那么这种引入依赖性的限定将会禁止该虚函数调用.
或者我们也可以使用using语法以提供在实例化阶段进行名称查找的机制:
// 修改方案3:重复的限定让代码不雅观,可以在派生类中只引入依赖型基类
template <typename T>
class DD3 : public Base<T>
{
    public:
        using Base<T>::basefield;       // (1)依赖型名称现在位于作用域
        void f() { basefield = 0; }     // 正确
};
RAII & Smart Pointers
RAII
RAII是cpp的一种重要机制。什么是RAII?中文翻译为资源获取即初始化–使用局部对象来管理资源的技术。他还有几个名字,比如SBRM(Scope Based Resource Management),CADRE(Constructor Acquires, Destructor Releases)。这样做有什么好处?根据下图所示的例子:
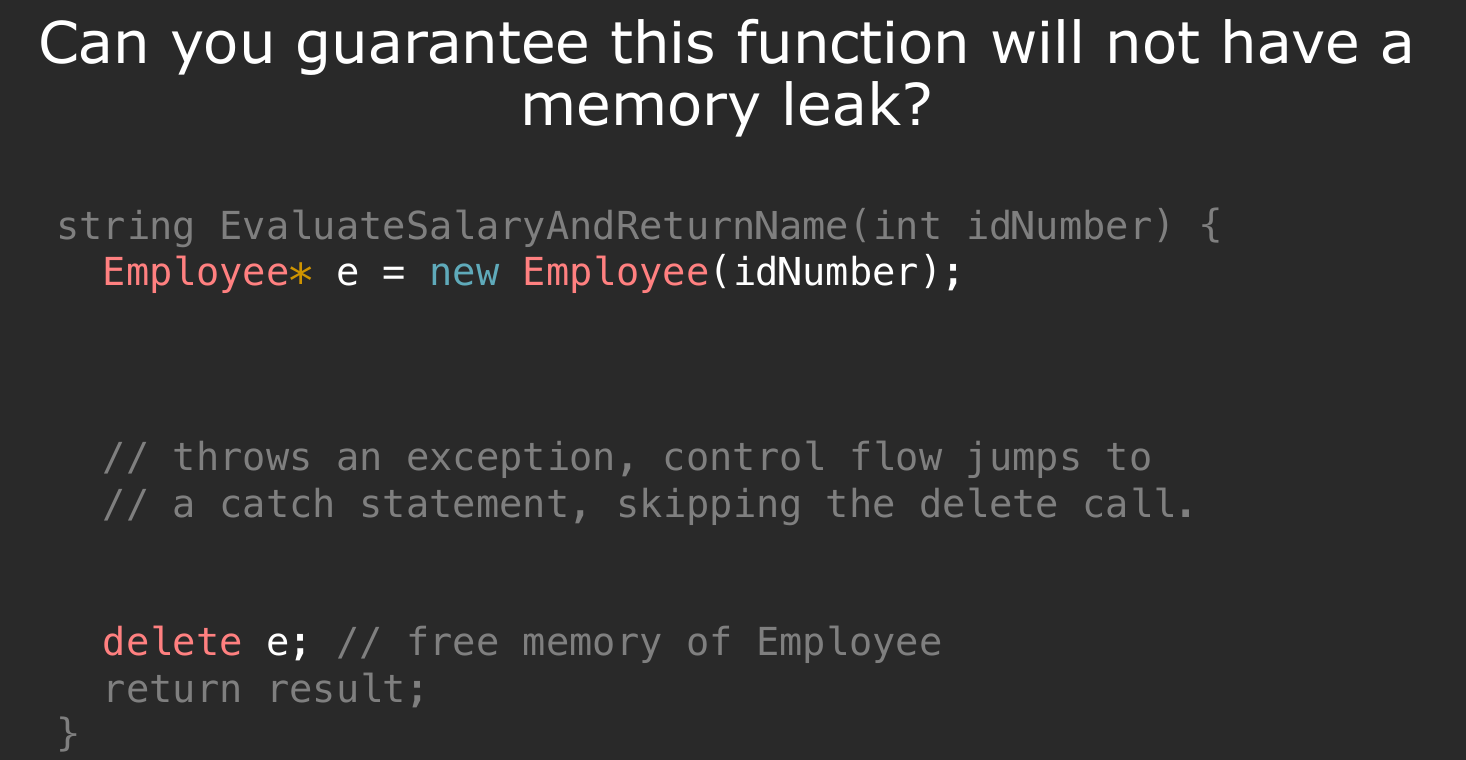
如果我们利用两条单独的语句分配内存和释放内存,如果代码中间出现了异常,那么内存无法被合理释放,便会产生内存泄漏。但如果我们利用一个局部对象来管理和分配内存,那么当局部对象out of scope时,便会自动调用他的析构函数来释放内存,进而避免了内存泄漏的问题。
从而,借助于RAII机制,我们可以将分配内存的任务交给构造函数,释放内存的任务交给析构函数。也就是说:
There should never be a ”half-valid” state of the object. Object immediately useable after its creation.
The destructor is always called (even with exceptions), so the resource is always freed.
RAII机制在多处都有体现,包括我们经常使用的new与delete过程,以及:
- 文件的打开与关闭-cpp内部为我们提供了具备RAII机制的文件处理操作:
// DO NOT WRITE IN THIS WAY:
{
    ifstream input();
    input.open("test.txt");
    // do something
    input.close();
}

// with RAII provided
{
    ifstream input("test.txt");
    // do something
    // no need to close the file anymore!
}
- multithreading
// NO NO NO
void cleanDatabase (mutex& databaseLock, map<int, int>& database) {
    databaseLock.lock();
    // other threads will not modify database
    // modify the database
    // if exception thrown, mutex never unlocked!
    databaseLock.unlock();
}

// use RAII-"lock_guard" instead
void cleanDatabase (mutex& databaseLock, map<int, int>& database) {
    lock_guard<mutex>(databaseLock);
}
class lock_guard {
public:
    lock_guard(mutex& lock) : acquired_lock(lock) {
        acquired_lock.lock()
    }
    ~lock_guard() {
        acquired_lock.unlock();
    }
private:
    mutex& acquired_lock;
}
正是基于RAII的这种想法,cpp引入了智能指针(Smart Pointers).在介绍智能指针之前,我们先来了解一下new与delete关键字是如何工作的。
new & delete
当我们写出如下的代码时,程序实际上在做什么?
Complex* pc = new Complex(1, 2);
String* str = new String("Hello");
new
先分配内存,再调用构造函数:
- 分配内存->使用
operator new的内置函数
String* str;
void* mem = operator new(sizeof(String));
在这一步,函数operator new中会调用malloc()以分配内存。
- 转型->使用
static_cast
str = static_cast<String*>(mem);
- 使用构造函数
str->String::String("Hello");
这里明确两个点:
- 分配内存,分配的是谁的内存?需要注意的是,这一步分配的并不是我们传入的
Hello字符串的内存,而是类,也就是对象本身的内存。 - 使用构造函数时,我们也会分配内存,在这里,我们分配的是所传入的对象,即C式字符串的内存
所以最终,我们会得到这样的内存分布:
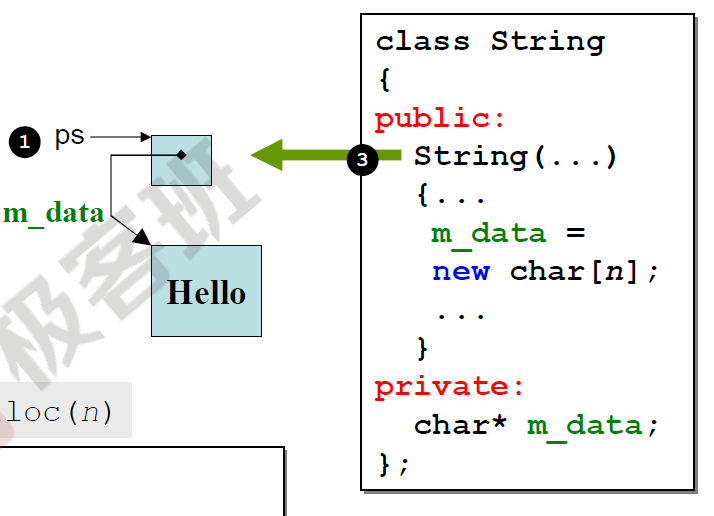
ps是指向类对象的指针,而每个类对象中有一个私有成员指针用来表示传入的字符串(一个char数组)的头指针,指向另一块内存空间。
当然,由于构造函数的行为是由我们自己定义的,如果我们设计的是Complex对象,情况有所不同:
Complex* pc;
pc->Complex::Complex(1, 2);
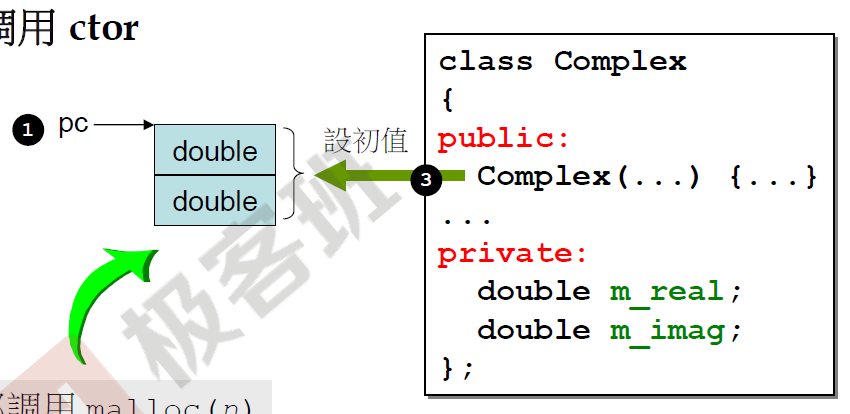
如果我们提供了一个括号包围的初始化器,就可以使用auto,但仅当括号中有单一初始化器时才可以这样使用:
auto p1 = new auto(obj); // OK
auto p2 = new auto{a, b ,c}; // error
我们还可以使用new分配一个const对象:
const int *pc1 = new const int(1024);
delete
Calling a destructor releases the resources owned by the object, but it does not release the memory allocated to the object itself.
可以预想到,delete需要具备与new相反的执行过程,所以我们首先要调用析构函数,再释放对象内存。
调用析构函数时,函数的行为也是由我们定义的,他可能会释放之前在使用
new时为类成员分配的内存,当然,也有可能啥都不需要它干.
比如对于先前的String对象:
- 调用析构函数
String::~String(str);
而在析构函数内部,我们定义了如何释放给入的字符串(char数组)的内存:
~String() {
    delete [] m_data;
}
- 释放对象内存->使用内置的
operator delete函数
operator delete(str);
在这一步,函数operator delete内部会使用free(str)释放对象内存。
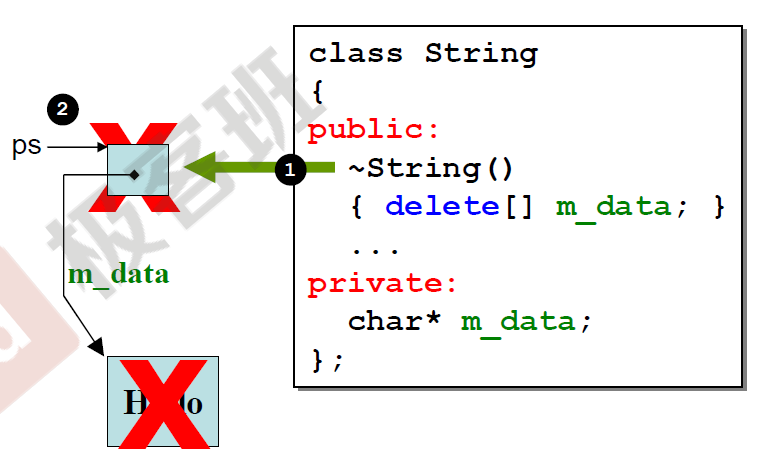
如上图所示,程序会首先调用析构函数释放掉Hello的内存块,之后使用operator delete也即free(str)释放指针ps指向的,也即我们使用new时malloc给对象分配的内存块。我们发现这里的执行过程确确实实是和new时反过来的。
如上所述,程序也有可能在调用析构函数时啥也不做,比如当我们面对
Complex对象:因为我们没有在类内动态分配内存,所以我们只需要使用
operator delete释放对象内存,即pc指向的内存块即可。
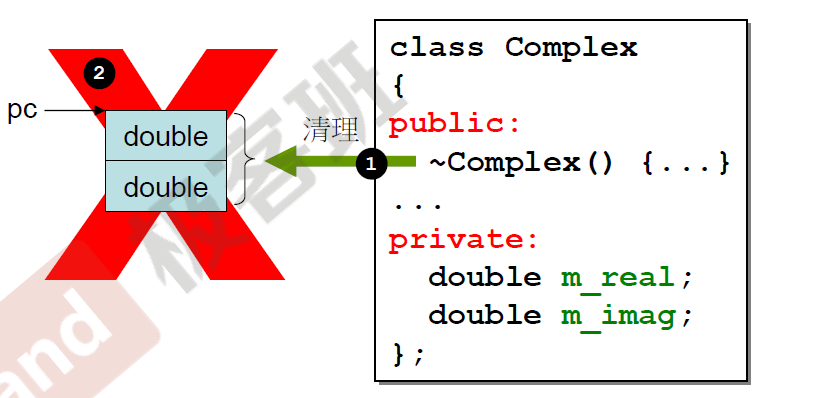
array new & array delete?
为什么我们说array new一定要搭配array delete?首先我们看一下动态分配所得的内存:
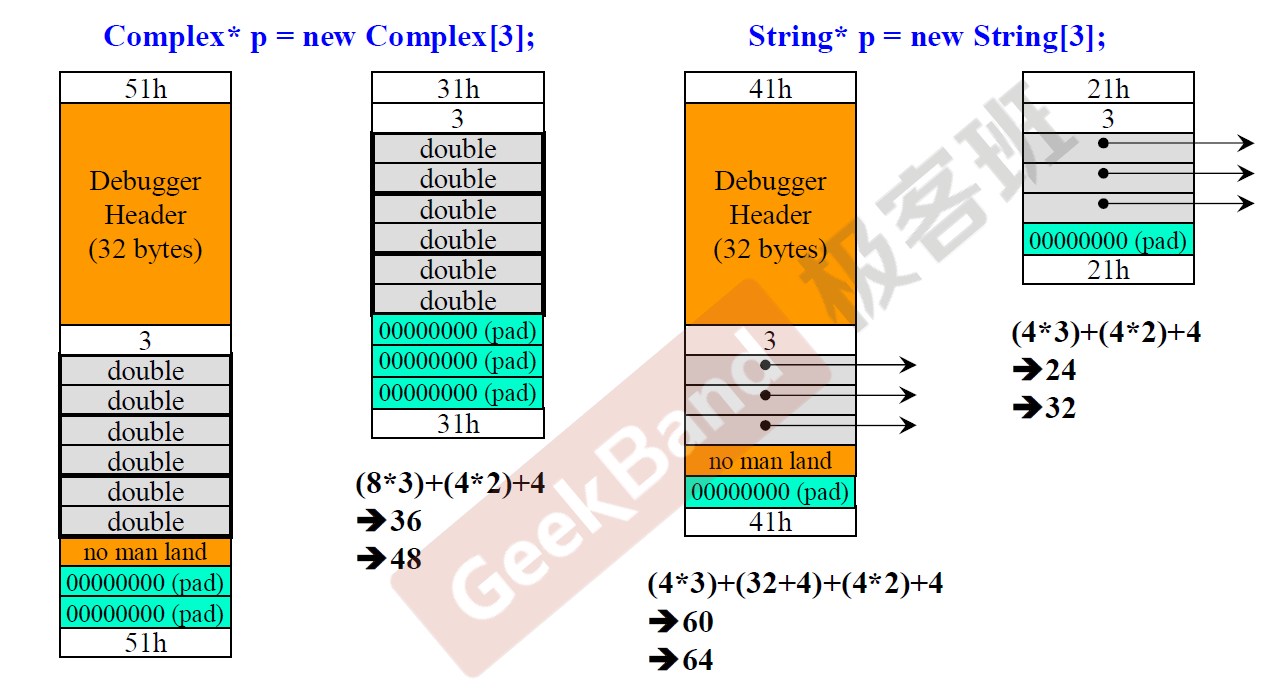
在使用new进行内存分配时,我们观察到除了分配给对象的内存外,我们还需要Debugger Header(在调试模式下),cookie(用来表示总共分配给用户的内存块大小,并使用最后一个byte记录程序是在获得内存还是释放内存),用于**内存对齐**(在VC中要求整块为16的倍数)的pad,还有记录储存的object数量的一个整数。
那么为什么这种情况下就要使用对应的array delete呢?因为如果我们写作delete p,那么在delete的实际执行过程中,析构函数只能被唤起一次,这意味着我们无法完全释放之前在类内为数据分配的内存,进而发生内存泄漏。而使用delete[] p,则可以利用内存块内存储的object数量的数据,完整的释放内存:
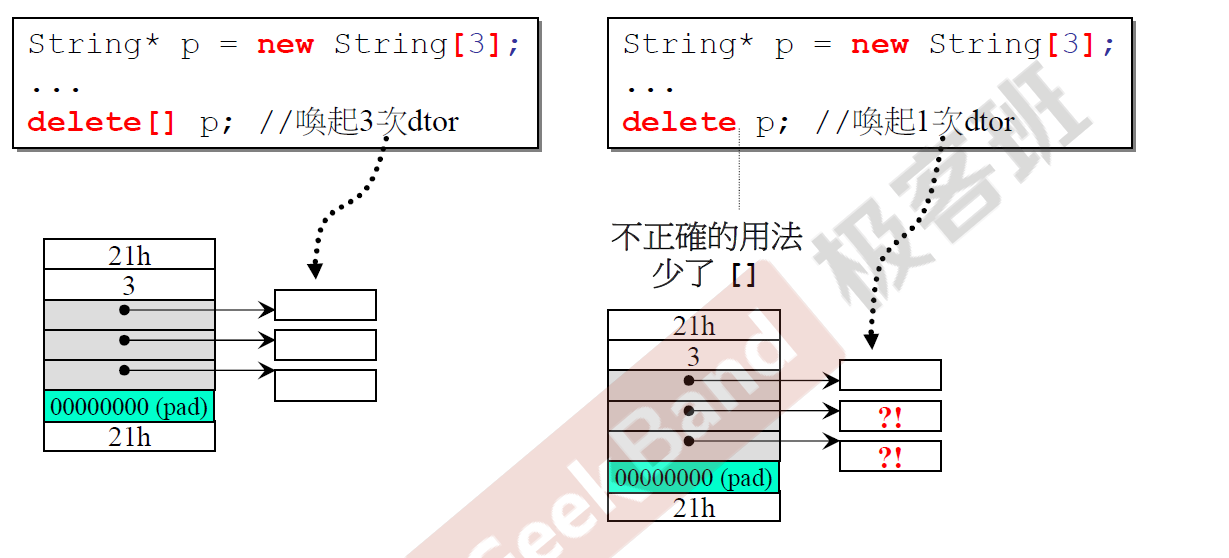
overload operator new/operator delete
new与delete是一个表达式,行为无法重载,但其中调用的operator new(operator new[])与operator delete(operator delete[])是一个函数,可以被重载。
这两个函数的重载可以作为全局重载,也可以放在class内部进行重载。在name lookup那一节我们提到过,如果::左侧没有东西,那么默认在globalscope或者由using引入的命名空间中寻找名称,我们可以借助这一点来去区分到底是使用类中的重载operator new还是全局的operator new:
// look for members, if no member, use global one
Foo* pf = new Foo;
// force to use the global one
Foo* pf = ::new Foo;
// delete 同理
需要注意的是,即使我们在此时的构造函数中抛出异常后没有调用operator delete释放内存,程序也不会因此报错,因为这表明我们放弃处理ctor抛出的异常。在标准库的basic_string代码中,即重载了operator new与operator delete用于扩充string的内存申请量.
Smart Pointers
shared_ptrunique_ptrweak_ptr
这三种类型都定义在<memory>头文件中。
shared_ptr
我们可以检测智能指针是否为空:
if (p1 && p1->empty()) {
    // do something
}
最安全的分配和使用动态内存的方法是调用make_shared:
// we can use auto here
auto p = make_shared<string>(10, '9');
需要注意的是,调用make_shared时传递的参数必须与类型的某个构造函数相匹配.
reference_counting
shared_ptr的一大特征是允许多个指针指向同一个对象,为了操作这一特性,每一个shared_ptr都有一个关联的计数器,即引用计数(reference counting)功能。当我们进行拷贝或者赋值操作时,计数器都会作相应的变化:
- 创建一个
shared_ptr对象,计数器为1; - 将对象
q赋值给p(p=q),则相应地,p的计数器-1,q的计数器+1; - 对于两个
shared_ptr对象,当我们使用q初始化p时(p(q)),q的计数器+1,并传递给p; - 当指向某对象的任意一个
shared_ptr计数器为0时,销毁对象;
基于以上特性,在保证
shared_ptr无用之后不再保留就很重要了,否则会浪费内存,注意如果将shared_ptr存放在一个容器中,随后重排了容器,从而不再需要某些元素,则应当用erase方法删除那些元素
NOTICE!
- 接受指针参数的智能指针构造函数是
explicit的,这意味着我们不能将一个内置指针形式隐式转化为智能指针,必须使用直接初始化:
shared_ptr<int> p1 = new int(3); // error
shared_ptr<int> p2(new int(3)); // OK

shared_ptr<int> clone(int p) {
    return new int(2); // error
}
- 不要混合使用智能指针和普通指针
如何理解这句话?在cpp Primer中给出了清晰的解释:
// a function
void process(shared_ptr<int> p) {
    // do something
} // then the temp p will be destroied (go out of scope)
当我们面对上边的函数时,正确的传参做法是什么?应当是传递一个非临时对象的shared_ptr给该函数:
shared_ptr<int> ptr(new int(3));
process(ptr);
需要注意,我们不能给该函数传递一个普通指针!因为无法隐式转换:
int *ptr = new int(3);
process(ptr);
并且,我们不应该给函数传入一个临时对象的shared_ptr,这样做会导致函数结束后,对应的内存被释放:
int *x = new int(3);
process(shared_ptr<int> ptr(x));
int j = *x; // oop, x is a dangling pointer
- 不要使用
get初始化另一个智能指针或者为智能指针赋值
因为这样做我们会创建两个独立的指向同一块内存区域的shared_ptr:
shared_ptr<int> p(new int(42));
int *q = p.get();
// undefined:
shared_ptr<int>(q);
同时,我们需要保证自己不会释放q指针指向的内存,否则后续无法再对原本的智能指针操作。
reset
reset会更新计数器,如果需要会释放对象:
p = new int(1024);
p.reset(new int(3));
unique_ptr
与shared_ptr所不同的是,unique_ptr只允许一个该类型指针指向某个对象。正因为此,其不支持普通的拷贝或者赋值操作,我们只能将其直接初始化:
unique_ptr<int> pInt(new int(5));	// 显然这里用的是move语义
cout << *pInt;
unique_ptr<int> pInt2(pInt);    // error
unique_ptr<int> pInt3 = pInt;   // error

// OR
auto ptr = std::make_unique<int>(...);
但我们可以使用reset或者release操作转移指针控制权:
unique_ptr<string> p2(p1.release());
或者使用移动构造函数:
unique_ptr<int> pInt3(std::move(pInt2));
release返回当前的unique_ptr保存的指针并将其置空,并将p1的控制权转移给p2.
p3.reset(p2.release());
上述代码不仅将p2的控制权转移给p3,同时将p3原本指向的内存清空。
exception:
不能拷贝
unique_ptr的规则有一个例外,我们可以拷贝或者赋值一个行将销毁的unique_ptr,即作为函数的返回值处理,见cpp Primer P418. 个人猜测是因为编译器的RVO与NRVO机制导致允许我们这么做。
标准库也提供给我们管理new分配数组的unique_ptr版本,我们需要在原先的基础上加一个方括号:
unique_ptr<int[]> up(new int(10));
up.release(); // use delete[]
此时我们可以使用下标运算符,但是不支持成员访问运算符。
weak_ptr
这里不予讨论。
Function Pointers
这里来讨论一下函数指针,并对关键字typedef与decltype的用法加以熟悉。关于函数指针,这里有一篇很清晰的系列。
Function
Function pointer declaration
一个函数:
bool foo(const string&, cosnt string&);
函数指针–一个指向函数的指针:
bool (*pf)(const string&, const string&);
需要注意的是,第一个括号是必须的,否则我们相当于声明了一个函数,其返回值为
bool*:bool *pf(const string&, const string&);
那么我们如何理解函数指针的形式?首先,存在*说明pf是一个指针,其次它指向的是一个返回类型为bool的,参数类型为两个const string引用的函数。
Use function pointers
在使用函数指针时,&与*号往往是可选的,编译器会帮助我们自动转换,但为了满足指针调用的一致性,我们习惯于加上这两个符号:
pf = foo;
pf = &foo; // the same

pf("1", "2");
(*pf)("1", "2"); // the same
As parameters
void useBigger(bool pf(const string&, const string& ));
void useBigger(bool (*pf)(const string&, const string& )); // the same
As return values
我们先来思考,如果要返回一个函数,那应该写作什么形式?–>为了确定函数的类型,我们需要:
- 函数返回类型
- 函数参数类型
- 函数参数个数
于是我们可以有如下代码:
using F = int(int*, int);
F f(int);
上述代码表示函数f返回的是一个函数类型,该函数类型具备int类型的返回值以及int*, int的参数类型。
那么如果我们想要一个函数返回一个函数指针,该如何表示呢?根据我们定义函数指针格式的经验,应当这么写:
int (*) (int*, int);
所以,如果现在我们要直接声明一个函数,该函数返回一个函数指针,形式是这样:
int (*foo(int, int)) (int*, int);
从内而外的分析,因为foo有一个形参列表,所以foo是一个函数,前边有*所以返回一个指针,该指针具备函数的形式:返回类型为int,接受参数为int*, int,所以是一个函数指针。故函数foo返回一个函数指针。
当然,根据cpp11提供的语法,我们还可以这样写:
auto f1(int)->int(*)(int*, int);
Array
Decalaration
在声明数组时,我们一定要区分数组指针和指针数组的区别:
int *p1[10]; //p1 is an array, which has 10 pointers that pointing to int.
int (*p1)[10]; // p1 is a pointer, pointing to an array which has 10 ints.
所以如果我们想声明一个返回数组指针的函数,该怎么做?有了之前返回函数指针的经验,这里也就不难理解了:
int (*func(int i))[10];
该函数返回一个指针,指向一个含有十个整数的数组。
这里外边的括号必须存在,理由和之前一样,如果没有,将直接返回一个有十个整形指针的数组。
同样地,我们也可以使用尾置返回类型:
auto func(int i) -> int(*)[10];
函数指针数组的定义方式,也很好理解了:
int(*pf[10])(int*, int);
typedef & decltype
typedef
variable
这里记录几点容易混淆和误判的使用方法:
typedef double wages; // wages is a type alias of double
typedef wages base, *p; // ???
这里,在第二行代码中,我们需要注意,p是double*的类型别名!
typedef char *pstring; // the same as above
array & struct
另外,对于数组的使用:
typedef int arrs[10];
这里的含义是arrs是一个type alias,其代表有十个int元素的数组。(可类推到结构体等类型上)
function & function pointers
typedef bool func(const string&, const string&);
这里的func是一个函数类型的type alias。
typedef bool (*func)(const string&, const string&)
这里的func是一个函数指针。
decltype
decltype的简单用法这里不提,这里首先说一条关键的语法规则:
delcltype((variable))(双层括号)的结果永远是引用,而decltype(variable)的结果只有当variable的结果本身是引用时才是引用。(是引用意味着我们必须对其初始化.)所以,由于
[]的返回值为一个引用,我们使用decltype(a[i])时必须对其赋初始值。
需要注意的是,decltype关键字返回的是类型,这意味着对于如下代码:
int foo(int i) {
    // do something
}
decltype(foo(3));
我们会得到返回值类型,而对于
int foo(int i) {
    // do something
}
decltype(foo);
我们得到的是函数类型!表示出来是:
int(int);
于是我们可以将typedef与decltype结合来表示函数指针:
typedef decltype(foo) *ptr;
对于数组也是一样,他只会返回数组类型,我们想要指针,则需要一个*:
int odd[] = {1,2,3,4,5};
int even[] = {6,7,8,9,10};
decltype(odd) *arrPtr(int i) {
    return (i % 2) ? &odd : &even;
}
在这里,decltype返回的是一个指向含有5个整型数据的数组的类型,此后我们把他的指针传递回去,即:
int(*)[5];
需要注意的是,在上边的例子中,odd与&odd是不一样的,如果在上例中不加&,我们会得到编译器报错:
cannot convert ‘int*’ to ‘int (*)[5]’ in return
也就是说,虽然数组名也是一个指针,但他是一个int*的指针,但&odd是指向整个数组的指针,这两者的区别就好比省政府和省会市政府,虽然都在同一个位置,地址是一样的,但是他们的意义完全不同:
*odd; // 1
*(&odd); // the same as above

&odd + 1; // we will move to the next variable position (go beyond sizeof(odd) length)
odd + 1; // we will get into the next posision in the current odd array (move sizeof(odd[0]) length)
数组名严格意义上并不是一个指针,通过对其使用decltype可以看出,他是一个identifier for a variable of type array。
但是在使用时,数组名可以被隐式的转化成为一个指针。一个例外就是在使用sizeof操作符时:
Array names in a C program are (in most cases) converted to pointers. One exception is when we use the
sizeofoperator on an array. Ifawas converted to a pointer in this context,sizeof awould give the size of a pointer and not of the actual array, which would be rather useless, so in that caseameans the array itself.
Multithreading
本部分作为扩展内容,在这里不予列出,个人觉得相比起这个版本的CS 106L的多线程内容,CS 106B Su2020是更好的入门。